Vin eRetail | Return Management

Return Management

  1. Returns management overview
    Returns management module enables the user to return the items back to the vendor and manage user returns efficiently. For sales order returns, system follows a different process for delivered returns and non-delivered returns.
    This application enables user to return the items back to the vendors. This module supports returns which are with PO and without PO.

Utility

  • Raise return request against a PO capturing return types, PO number and return quantity.
  • Raise return request for items which are inbounded without a PO capturing return type and other details.
  • Application allows quick ship of items which needs to be returned to the vendor.


1.1 RTV Enquiry
Using this screen, one will be able to view RTV requests in a single screen.

Navigation:
Returns –> RTV Enquiry

Utility 

  • User will be able to see all the RTV requests in a single screen. The search results can be narrowed using different search fields available in the screen and user may further narrow down the search results using the Advance Search option.
  • User may print the search results using the option Export/ Detail Export.
  • Screen also allows user to create a new RTV request using this screen.

Lets understand RTV in detail:

  • RTV No.: If the user wants to see the record corresponding to a RTV Number, then user may use this field.
  • RTV Date: During search user may narrow the search by setting RTV Date to Today, Yesterday, Last 7 days, Last 30 days, This Month, Last Month and also it can be set to custom range. If you set the custom date range, user needs to press Apply action button.
  • RTV Type: User may narrow the search results by choosing RTV type: Damage Return, Intercompany move, Normal Return
  • PO No.: eRetail will be able to narrow the search results using the PO number.
  • Vendor: Search results can be narrowed down using the vendor code.
  • Status: Search results can be narrowed using the status of the PO.
  • RTV Qty, RTV Amount: Search results can be narrowed using the RTV Qty and RTV amount.
  • On Hold: Search results can be narrowed using On Hold as the criteria.Action Button
  • Search: Clicking on the search button without entering any filter criterion will populate the list of all the RTV requests based on default filter setting. User can further narrow down the search by using filter options to get a specific information.
  • Reset: Reset button will refresh the filter fields to default settings, i.e. to an initial state to start a fresh search.
  • Advance Search: This button narrows the search results by adding more search criteria such as site location and SKU Code.
  • Export: When this button is pressed, the result set containing all the fields in the RTV Enquiry screen gets downloaded in .xslx format.
  • Detail Export: When this button is pressed, details of the records in addition to the fields shown in the RTV Enquiry screen gets downloaded in .xslx format.
  • Add New: When this button is pressed a new window will open where user will be able to create a new RTV Request in the system.


1.2 Vendor Return Create/ Edit:
This screen enables user to create a RTV request and modify the existing RTV request.

Navigation:
Returns —> Vendor Return Create/Edit

Utility 

  • Initiate RTV request with two options: With PO and without PO.
  • Modify the existing RTV request.

Lets Understand the below in detail:

  • Vendor Details
  • User Defined Fields
  • Shipping Details
  • Activity and Remarks

Vendor Details tab:
Vendor return request can be created with two options:
With PO
and
Without PO.

With PO option:

  • PO Code: User needs to select a PO from lookup. Upon clicking the lookup, a dialog box opens where user can filter for a PO based on PO No., PO Date, Status and Vendor Code. User needs to highlight the PO from the result set and click OK. User may clear the search criteria using Reset button for a fresh search.
  • Site Location: On selection of PO Code, Site Location field gets populated automatically.
  • Remarks: User may input any remarks about this return request in the field provide.
  • Return Type: User may choose return type indicating the reason for return from the following values:
    Normal return,
    Intercompany Move,
    Damage Return.
  • Vendor Code: This field is auto-populated on the selection of PO.
  • Vendor name: This field is auto-populated on the selection of PO.
  • Status: This field captures various status of the return request.
  • Edit Return quantity: Here user will be able to modify return quantity in the following format: SKU, Quantity. This detail must be entered row by row and user will be able to enter maximum of 200 records at a time. Once all the records are input, user may click OK which updates RTV Qty as per user’s entry.

Without PO option:

  • Site location: On selection of PO Code, Site Location field gets populated automatically.
  • Return type: User may choose return type indicating the reason for return from the following values:
    Normal return,
    Intercompany Move,
    Damage Return
  • Remarks: User may input any remarks about this return request in the field provide.
  • Vendor Code: This field is auto-populated on the selection of PO.
  • Vendor Name: This field is auto-populated on the selection of PO.
  • Status: This field captures various status of the return request.
  • Add SKU: When this button is pressed, a dialog box opens up where user will be able to add a SKU which needs to be returned to the vendor.
  • Remove SKU: Added SKU can be removed by the user by highlighting on this SKU line.
  • Import: User may choose to add SKUs which needs to be returned by using import option. Here user needs to enter SKUs in the following format one by one in a row: SKU, Quantity. User can add a maximum of 200 records using this option.

ACTION BUTTON

  • Add New: When this button is pressed user will be able to create a new vendor return request.
  • Save: Saves the record.
  • Confirm: This button appears when the RTV request is in Created State.
  • Quick Ship: This button appears when the order is in allocated state.
  • Side Menu dropdown: This has options using which user will be able to Cancel and hold the request. Also user will be able to print the details of the request by clicking on Print option. Also user will be able mail this information to the vendor using “Send Mail to Vendor” option.

User defined Fields Tab:

This tab has fields UDF1, UDF2, UDF3, UDF4, UDF5 can be entered. These fields are specific user’s requirement which user can use as per his requirement.

Activity and  Remarks tab
This tab has Add Comments tab. User can add his comments related to the RTV request at various stages. Once comment is added, user must press Submit Comments button. When the user adds a comment, it gets added to comments log section where the user will be able to see Date, AddedBy and Status.


1.3 Customer returns

Customer returns overview
This application enables user to manage sales order returns. This module supports two types returns: delivered returns and non-delivered returns efficiently.
This screen enables one to view sales order returns from various channels in a single screen.

Utility 

  • User will be able to see all the sales order return requests in a single screen. The search results can be narrowed using different search fields available in the screen and user may further narrow down the search results using the Advance Search option.
  • User may retrieve the search results using the option Export/ Detail Export.
  • Screen also allows user to create a new sales order return request using this screen.Lets understand in detail
  • Return No.: User may narrow the search results using Return Number by entering the number in the field.
  • External order No.: This is the external number which will be used to filter the records.
  • Order No.: User may enter a specific order number to get the results.
  • Order type: This is a dropdown field which will help user to filter return requests having specific order types:
    COD,
    Cheque/DD,
    Consignment,
    JIT,
    Prepaid,
    Not Defined
  • Order channel: If user wants to view orders specific to an order channel, he may choose from dropdown.
  • Status: User may view return requests for specific status from the following: Cancelled, Closed, Confirmed, Pending Confirmation
  • Return type: User may choose to view orders belonging to return types: Delivered Return and Non-delivered Return.
  • Return category: User will be able to filter for a specific return category: Credit Coupon, Refund and Replacement.
  • Return date: During search user may narrow the search by setting Return Date to Today, Yesterday, Last 7 days, Last 30 days, This Month, Last Month and it can be set to custom range. If you set the custom date range, user needs to press Apply action button.
  • Created user: User will be able to filter records based on created user.
  • Confirm date: During search user may narrow the search by setting Confirm Date to Today, Yesterday, Last 7 days, Last 30 days, This Month, Last Month and it can be set to custom range. If you set the custom date range, user needs to press Apply action button.
  • Return close date: During search user may narrow the search by setting Return Close Date to Today, Yesterday, Last 7 days, Last 30 days, This Month, Last Month and it can be set to custom range. If you set the custom date range, user needs to press Apply action button.
  • Delivery No.: User may narrow the search results for a specific delivery number using this option.
  • Order date, Amount, Reverse Tracking No., Transporter Name, : This is an indicative field in the screen.
  • Delivery Type: User may choose following delivery types: Delivery, No Pick Up, Pick up from the dropdown to narrow down search resultsAction buttons
  • Search: Clicking on the search button without entering any filter criterion will populate the list of all the sales order return requests based on default filter setting. User can further narrow down the search by using filter options to get a specific information.
  • Reset: Reset button will refresh the filter fields to default settings, i.e. to an initial state to start a fresh search.
  • Advance Search: This button narrows the search results by adding more search criteria such as SKU code, Tracking No., Customer Name, Customer Email and Customer Phone.
  • Export: When this button is pressed, the result set containing all the fields in the Customer Return Enquiry screen gets downloaded in .xslx format.
  • Detail Export: When this button is pressed, details of the records in addition to the fields shown in the Customer Return Enquiry screen gets downloaded in .xslx format.
  • Add New: When this button is pressed a new window will open where user will be able to create a new Customer Return Request in the system.


    1.4 Customer return create/edit
    This enables user to create customer return create/ edit in eRetail.

    Navigation:
    Returns –> Customer return create/edit

Lets understand how we create or edit the customer return:

  • Request type: It has two bullet boxes: Request and Request & Inbound.
  • If the user selects Request Type: Request, then he/she will be able to use return types: Delivered return and non-delivered return.
  • If the user selects Request Type: Request & Inbound, then he/she will be able to use Return Type as Delivered return.
  • External order no.: It is a dialog box. Upon clicking this field a dialog box opens up where user will be able to search for an external order number and add it. User return will be initiated against this request.
    The details of the dialog box is given in the following note: User may filter using  External order no., order no, Delivery No/ AWB No, Order Date, Invoice No in the dialog box. After entering the details user need to press Search button. User may press reset for a fresh search. After choosing a particular external order no user has to press OK to create return request.
  • Delivery location: This is a dropdown field where user will be able to choose return delivery location for the customer request.
  • Return type: This is a dropdown field where user will be able to choose a return type: Delivered return and non-delivered return.
    If the user chooses return type as delivered return, category and delivery type dropdowns fields become active.
    If the user chooses return type as non-delivered return, category and delivery type dropdown fields become inactive and these fields get auto populated with null and Delivery respectively.
  • Category: User will be able to choose a category if the user chooses return type as delivered return. User will be able to choose following categories: Credit coupon, refund, replacement
  • Delivery type: This field becomes active for delivered returns and for non-delivered returns it is set to delivery by default.

For delivered returns user will be able to choose a type from the following :
Pick up,
no pick up
and
delivery.

  • Transporter: User will be able to choose a transporter to fulfil the return request.
  • Reference no.: User may insert reference number for keeping more information.
  • Remarks: User may insert remarks in this field.
  • Refund remarks: User may insert refund remarks in this field.
  • Refund status: Check this to know the refund status.
  • Refund date: This gets populated with refund date and this is an indicative field.

    Action Button

  • Add New: User will be able to add a new return request.
  • Save: Saves the record. When a new record is saved, the status of the return request changes to Pending Confirmation.User needs to mention return quantities for an SKU. If there is a single SKU in a PO and user creates return request, then automatically return qty will be set to one. In all other cases return qty has to be specified by the user.
  • Confirm: User will be able to confirm the return request by pressing this button. The status of the return request changes to confirmed.
  • If the return request is in confirmed status, user will be able to inbound returned items.
  • Upon inbounding the returned items in the warehouse, the status of the return request changes to Closed automatically.
  • Once the PO is in closed status, the user will be able to refund the PO by choosing from the menu option. User needs to input details like Refund Remarks, Refund date for completing refund transaction in eRetail.
  • Cancel: By clicking on this user will be able to cancel the transaction.


Vin eRetail | POS

eRetail POS

Vin eRetail POS
Overview

POS (Point of Sale) is the place where the actual transaction is taking place on a particular time. Vin eRetail’s POS is a cloud based app enabling sellers to manage selling operations at a physical store location.

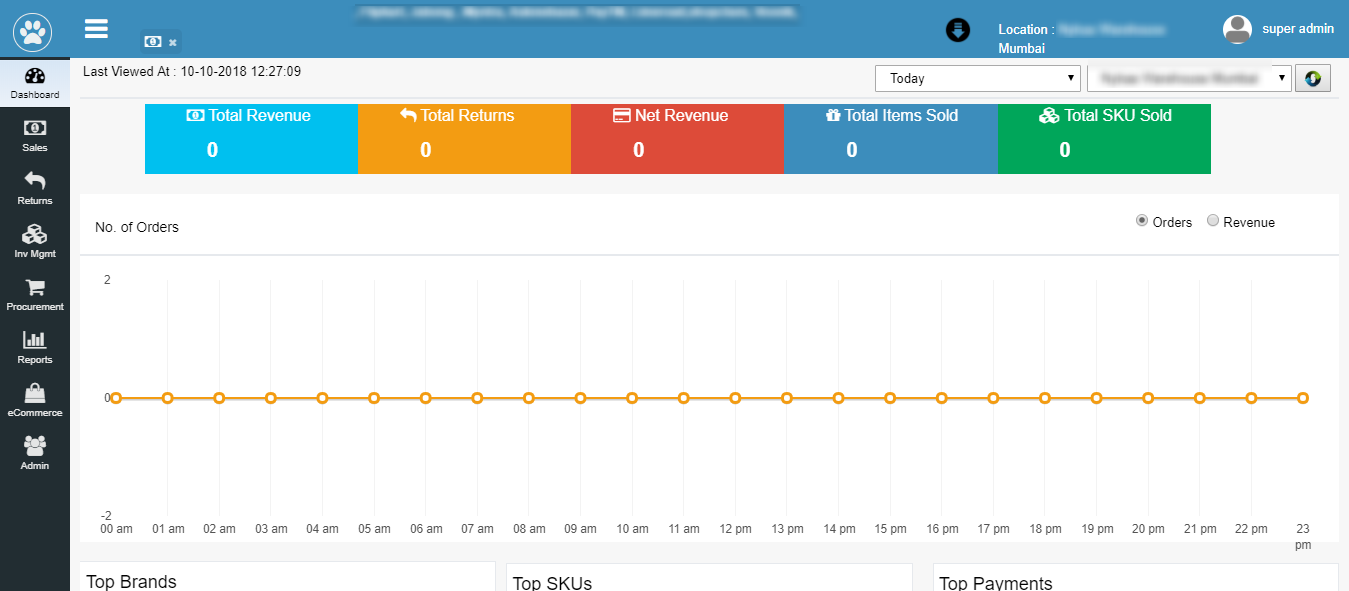
Dashboard shown in the above screenshot gives the gist of all the transaction’s data in a consolidated format along with the order and revenue graph.
It also consists of the filter for the user to choose the period for which he/she wish to view the data representation.
Lets move further section by section to understand POS.

It is divided into different sections:
-> Sales
-> Return
-> Inventory Management
-> Procurement
-> Reports 
-> eCommerce
-> Admin

1. SALES

Sales section here in POS provides all the information about sales enquiry, bills generation and refund related transactions.
This section is further divided into:
->Sales Enquiry
->Generate Bill
->Refund


1.1 Sales Enquiry
Sales enquiry section enables the user search and filter the sales enquiry based on various filter available.
Bill No: Bill number is the system generated unique number given to every bill as a identifier.
Order No: Order number is the order number given to an order in the eRetail.
Bill Amount: Bill amount is the total amount of transaction being carried out per order per bill number. User can search any sales entry on the basis of bill amount as well.
Bill Date: User can search and enquire for sales entries on the basis of their billing date. In the POS system their are pre defined fields of periods based on which the enquiry can be searched.
Customer Name: User can search the sales transaction on the basis of name of the customer.
Reprint Receipt: User can reprint the receipt from here.
Email Receipt: User can email the receipt from here.
Location: User can filter on the basis of location of the warehouse.

Action buttons:

1. Search : Clicking on the search button without entering any filter criterion will populate the list of all the sales transaction on default filter setting. User can further narrow down the search by using filter options to get any specific information.
2. Clear Search  : Clear search button will refresh the filter fields to default settings, i.e. to an initial state to start fresh search.
3. Download  
To download the filtered or searched result in CSV format which is displayed in the data grid.
4. Advance Search: Advance search further improves the search results of sales enquiry by providing more fields to filter from. Below fields get added for the advance search option of the Sales Enquiry:
->Customer Phone
->Customer Email


1.2 Generate Bill
Generate bills section enables the user to generate the bill from here and proceed with the payment of any transaction. It also enables the user to park the sale of a customer in case customer wishes to recheck the products, and in the meantime user can start the fresh sale transaction and can later retrieve the parked sale.
1.2.1 SKU Search
1.2.2 Add New Customer
1.2.3 Park Sale
1.2.4 Discard Sale

1.2.1 SKU Search
In any POS, to commence a transaction for payment, the first step performed is to search the SKU customer is ordering and then add it for further process.
User can type or scan SKUs bought by the customer. Pressing ‘Enter’ will open “SKU List” pop up. 
Below are fields based on which the SKU can be searched for scanning in POS.
SKU Code: 
Any unique code which a user gives to the SKU while creating it. This SKU code is a mandatory field and once created and saved cannot be changed and must be a unique number.
Description:
Details provided to each SKU which explains the feature of products.
Size & MRP:
User can search & filter the SKU on the basis of size an d MRP(Maximum Retail Price) as well.
Sale Price:
User can filter the SKU on the basis of sale price of the product.
Available Quantity:
The SKU’s can be filtered on the basis of available quantity to be further selected by the user for POS transaction.

Action Button
1. Search: Clicking on the search button without entering any filter criterion will populate the list of all theSKUs on default filter setting. User can further narrow down the search by using filter options to get any specific information.
2. Clear Search: Clear search button will refresh the filter fields to default settings, i.e. to an initial state to start fresh search.


1.2.2 Add New Customer
Add new customer section is has a great significance as from this section of the POS the user creates new customer or searches for the existing customer to commence the POS transaction.
To create Customer user will have to fill in the below basic details:
Customer Name
Customer Phone
Customer Email

To search for an already existing customer in the system for the transaction, the user can user the below filter/search field:
Customer Name
Customer Phone
Customer Email
Customer Create Date
Customer Code
Extra Info

Action Button
1. Search :Clicking on the search button without entering any filter criterion will populate the list of all the SKUs on default filter setting. User can further narrow down the search by using filter options to get any specific information.
2. Clear Search  :
Clear search button will refresh the filter fields to default settings, i.e. to an initial state to start fresh search.


1.2.3 Park Sale
Park sale is an awesome concept of parking the sale for sometime in case of customer wants to add or reduce some products in the current listing, so here user can park this customer in background for the time being and take up the next customer in queue for the transaction and then can retrieve the previous customer on hold.

1.2.4 Discard Sale
Discard sale is the process of removing the sale transaction created before proceeding for the billing. On the events where at the last moment buyer changes the mind about the product or user may have entered the wrong SKU and wants to remove the same, then in such cases discard sale feature can be useful.


2. RETURN
Return section here in POS provides all the information about return enquiry and return request creation.
This section is further divided into:
-> Return Enquiry
-> Create Return

2.1 Create Return
User can create the return of product purchased by the customer.
Below are fields which the user needs to fill in order to raise the return.
Bill Number: User will search and enter the bill number of the order /SKUs which needs to be returned. Entering the bill number will fetch the details of the products ordered in that bill. User will then select the products to be returned as per customer’s requirement proceed.
Return Category:
Category of return needs to be defined by the user as per customer’s requirement. Below are the three types of return out of which one can be processed.
-> Credit Coupon:
it is a receipt given by a the user/POS to a customer who has returned goods, which can be used by the customer against future purchases (may be valid upto a certain period)
-> Refund:
User/POS returning the amount paid by the customer against the SKU returned.
-> Replacement:
Customer replacing the SKU he wants to return with some other SKU that he wish to purchase by adjusting the previous amount paid here.
Reason:
POS user will be entering the reason of return by asking the same from the customer.
Enter Return Quantity:
Once the bill number is fetched for the return, and SKU is selected from that order then the user will be entering the quantity to be returned by the customer and click on Confirm Return.

ACTION BUTTON
New: To raise a new return request.
Confirm Return:
After filling in all the details, user uses confirm button to confirm the return request.

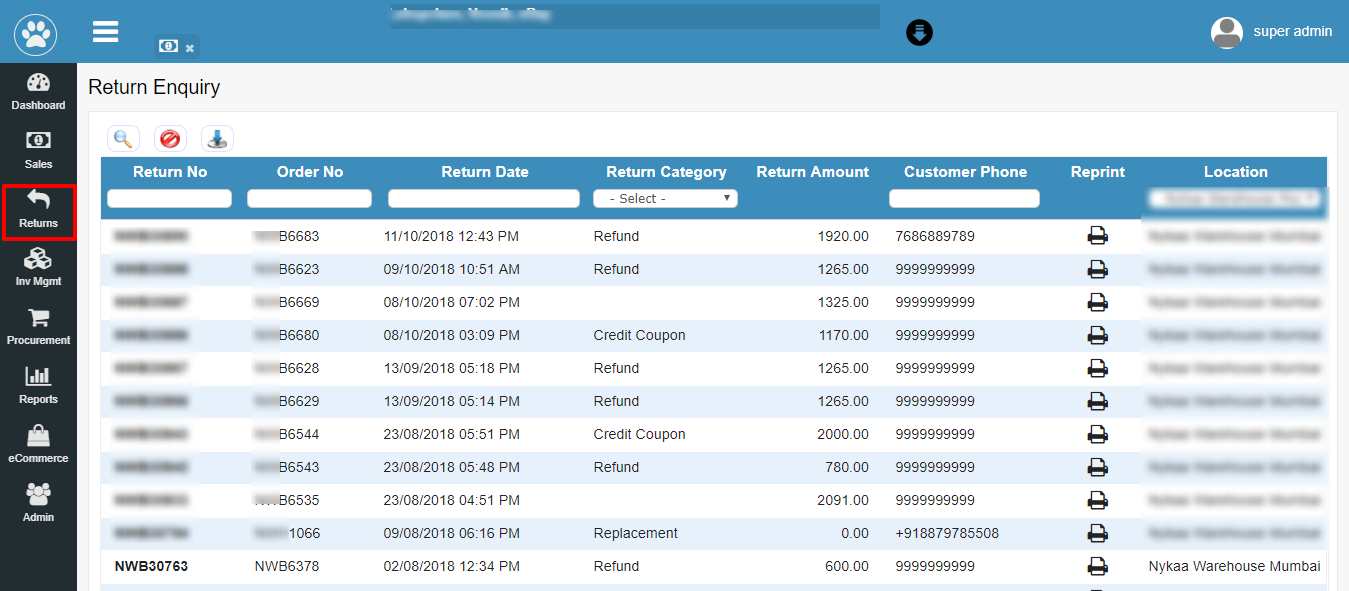
2.2 Return Enquiry
Return Enquiry section enables the user to search for the existing returns already raised by POS user. This section will be helpful in data analysis of all the returns created in the POS system.
Below are the fields based on which the returns requests can be searched, filetered & viewed.

Return No: Return number is the system generated unique number given to each return request for its identification.

Order No: User can enquire or filter the return enquiry by order number as well.
Return Date: By entering the date or date slot the user can search for the return request created during that period.
Return Category: Category of return needs to be defined by the user as per customer’s requirement. Below are the three types of return out of which one can be processed.
-> Credit Coupon: it is a receipt given by a the user/POS to a customer who has returned goods, which can be used by the customer against future purchases (may be valid upto a certain period)
-> Refund: User/POS returning the amount paid by the customer against the SKU returned.
-> Replacement: Customer replacing the SKU he wants to return with some other SKU that he wish to purchase by adjusting the previous amount paid here.
Return Amount: Search the return enquiry by return amount i.e. price of the product returned.
Customer Phone: Search the return enquiry by Customer phone number.
Reprint: to print the return invoice.
Location: Filter by the warehouse location.

ACTION BUTTON

a) Search : Clicking on the search button without entering any filter criterion will populate the list of all the return transactions on default filter setting. User can further narrow down the search by using filter options to get any specific information.
b) Clear Search  : Clear search button will refresh the filter fields to default settings, i.e. to an initial state to start fresh search.
c) Download  
To download the filtered or searched result in CSV format which is displayed in the data grid.


3. INVENTORY MANAGEMENT

3.1 Inventory View & Adjustment
Inventory view section enables the user to view real time status of inventory present in the warehouse. It shows item wise inventory for each of the products like total stock in hand, Free stock or available quantity. In inventory view section the inventory can be viewed or searched by SKU Code & by SKU IMEI.


3.1.1 Inventory view by SKU
In inventory view by scan user can search or filter SKU’s on basis of few fields, lets understand them in detail.
SKU Code: Any unique code which a user gives to the SKU while creating it. This SKU code is a mandatory field and once created and saved cannot be changed and must be a unique number.
SKU Description: User can filter and search the SKU on the basis of description given to it.
Hierarchy Code: Hierarchy code helps user to configure merchandising hierarchy for SKU from the list as they could be the sub category or sub-sub category of the SKU.
Inv Bucket: Inv bucket shows the status of the products in inbound and accordingly to be assigned the bucket. User will have to select the most suitable one out the given options.
Total Quantity:Total quantity of the SKU
Available Quantity: Actual available quantity of the SKU.
Brand Code:User can filter and search the brand code on the basis of brand code given to it .
Site Location: User’s selected warehouse location for the Inventory view will be getting displayed here. This field is automatically fed once the user logs in.

ACTION BUTTON
a) Search : Clicking on the search button without entering any filter criterion will populate the list of all the SKU code on default filter setting. User can further narrow down the search by using filter options to get any specific information.
b) Clear Search  : Clear search button will refresh the filter fields to default settings, i.e. to an initial state to start fresh search.
c) Download  
To download the filtered or searched result in CSV format which is displayed in the data grid.
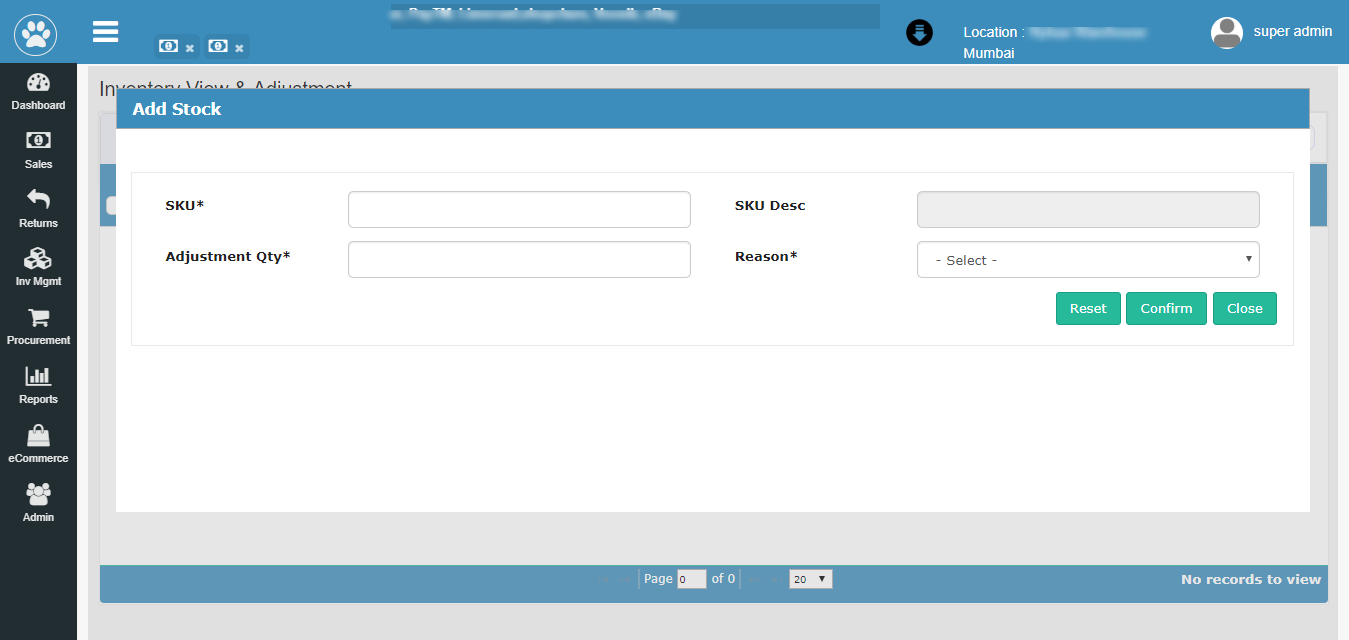
d) Add Stock  : By this action button user can add the stock to any particular SKU. Once this is clicked the user gets a form to fill in order to increase the stock.
SKU* : Enter the SKU name here in order to increase its inventory.
SKU Desc : Enter the SKU description.
Adjustment Qty*: Enter the Increased or adjusted quantity.
Reason*: Enter the reason for adjustment. For example: Order Shipment, Stock Take etc.

3.1.2 Inventory view by IMEI
In inventory view by IMEI user can search or filter SKU’s on basis of IMEI as well. Rest everything will be same as inventory view by SKU code but here the inventory can be viewed by IMEI as well.


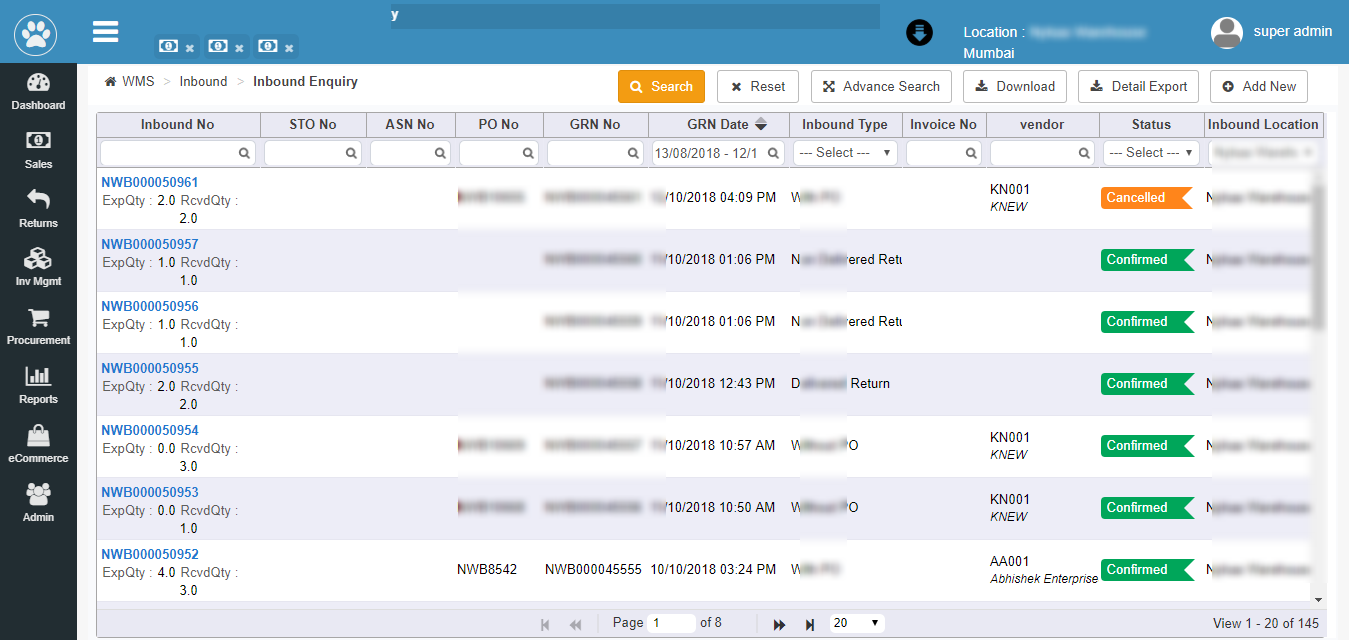
3.2 Manage Inbound
Overview
The inbound process starts when items arrives in the warehouse location, either received from external sources or from another company location. An order becomes an inbound shipment when a purchase order release is packed and it is physically ready to be shipped.

Inbound enquiry can be carried out by filtering the below data:
Inbound no: Inbound number is the unique identification system generated number given to every inbound created in the system.
STO no: User can search the inbound enquiry and can narrow down the search results by using STO no. as a filter.
ASN no: User can search the inbound enquiry and can narrow down the search results by using ASN no. as a filter.
PO no: Inbound can be searched with respect to the PO number generated for the same.
GRN no & Date: Inbound enquiry can be carried out by using the Goods Received Note and date.
Inbound Type: User can filter the inbound numbers based on their types and categories.

Invoice no: The inbound can be filtered on the basis of invoice number as well.
Vendor: User can filter the inbound enquiry by the vendor name as well.
Status: The inbound can also be searched with the status of the inbound entered in the system.
The Status based on which these inbound can be filtered are:
-> Cancelled
-> Confirmed
-> GRN in Process
-> GRN in QC
-> Pending Confirmation
->QC Done
Inbound Location: User can search and filter the result on the basis of inbound location.


3.3 Manage Stock Transfer

  • This section will enable the POS user to enquire and search an already existing STO’s and STO details. User can refine the search further by using filters as per requirement/s. Fields on the basis of which the Stock Transfer Orders can be searched:
  • STO number- Date- Type
    STO number is the system generated unique ID given to the STO & from the filter option the STO’s can be searched using STO as well.
    STO Date is the date on which the STO is created.
    STO type filter consists of two type STO, one is NORMAL STO which is created in case of normal transfer from one location to another & other type of STO is RETURN where the sales transfer order is created in case of order returns. STO can be filtered /searched on these bases as well.

Ship & Delivered Date
Ship Date & delivered date are the dates on which the STO was shipped and delivered respectively. The user can narrow down the search results by entering the ship date or delivered date.

Origin & Destination Site
User can also search the STO by entering the origin and destination site for the STO. And all the STO’s corresponding to that origin will be displayed as search result.

Status
STOs status changes at every stage with respect to the user’s action and STOs processing cycle.
The status through which an STO goes through is:
-Created: 
When the STO is created.
-confirmed: When the STO is Saved and confirmed.
-Allocated: When the STO is allocated for the WH location.
-Part Allocated: When not all the SKU’s of the STO but few are allocated for the WH location.
-Part Picked: When from an confirmed STO few SKU’s are picked and not the whole STO, then this is the part picked status of an STO.
-Pick Complete: 
When an STO is completely picked.
-Part Shipped: When from an STO few SKU’s are Shipped and not the whole STO, then this is the part Shipped status of an STO.
-Shipped Complete: 
When an STO is completely picked.
-Delivered: 
When the STO is delivered to destination then the status changes to delivered.
-On Hold: User can put the STO on hold if he wants, and in the search criterion the same can be treated as a parameter to narrow down the STO search results.

Action buttons

1. Search: Clicking on the search button without entering any filter criterion will populate the list of all the STO based on default filter setting. User can further narrow down the search by using filter options to get any specific information.
2. Reset: Reset button will refresh the filter fields to default settings, i.e. to an initial state to start fresh search.
3. Export/Download: 
To download the filtered or searched result in CSV format which is displayed in the data grid.
4. Advance Search: Advance search further improves the search results of STO by providing more fields to filter from. Below fields get added for the advance search option of the STOs.
5. Add New: 
To add a new STO to the database.
below tabs are present to capture all STO related information while creating it.
-> STO Order Detail
-> UDF
-> Outbound Delivery
-> Comment History
-> STO Order Tag

 STO Order Detail:
From STO order detail section the user will enter all the details for creating an STO and adds the SKU for STO from here.

Ext. STO No:
External STO number is the number given by the user OR order No provided by the sales channel/platform from where STOs are pulled into eRetail

STO Type:
There can be two type of STO, one is NORMAL STO which is created in case of normal transfer from one location to another & other type of STO is RETURN where the sales transfer order is created in case of order returns.
From Site:
The ‘from site’ is the warehouse location from where the SKU will be picked up.
To Site
The ‘to site’ is the warehouse location to where the SKU will be inward.
Reason
User will have to mention the reason for Stock transfer being done from one location to another.
Priority
User can set the priority while creating the STO as low priority or high priority based on the priority options.
On Hold Status:
User can put the STO on hold if he wants, and in the search criterion the same can be treated as a parameter to narrow down the STO search results.
Remarks:
User can mention the remarks for the STO being sent for the receiving warehouse to know about the same.
Status:
STOs status changes at every stage with respect to the user’s action and STOs processing cycle.
The status through which an STO goes through is:
-Created: 
When the STO is created.
-confirmed: When the STO is Saved and confirmed.
-Allocated: When the STO is allocated for the WH location.
-Part Allocated: When not all the SKU’s of the STO but few are allocated for the WH location.
-Part Picked: When from an confirmed STO few SKU’s are picked and not the whole STO, then this is the part picked status of an STO.
-Pick Complete: 
When an STO is completely picked.
-Part Shipped: When from an STO few SKU’s are Shipped and not the whole STO, then this is the part Shipped status of an STO.
-Shipped Complete: 
When an STO is completely picked.
-Delivered: 
When the STO is delivered to destination then the status changes to delivered.

UDF (User Defined Fields)
These are the custom fields which can be created by the User for customers in case of any extra information required.
Outbound Delivery
Outbound delivery number shows the details of order like from which Warehouse it has been shipped, the Shipping detail or ASN number.
The transporter can be changed for the order from this section.
STO Order Tag
User can enter the order tags which are nothing but important information about the STO order which also acts as the searchable keywords for those STOs.

Action buttons
1. Add New: 
To add a new STO to the database.
2. Save: Save the created the STO.
3. Confirm: To confirm the created STO.

Vin eRetail | WMS

WAREHOUSE MANAGEMENT SYSTEM

  1. WMS Overview

Use the WMS to configure your WMS Setup, Order Processing, Inventory, Logistics, Inbound, miscellaneous and configuring the zones, bins, lottables based on which the further transactions will run.

UTILITY:

  • In WMS, the WMS setup is the initial configuration process where all the warehouse management setup steps are performed on the basis of which the transactions will take place.
  • User can create and configure bins, zones, lottables which will be helping in business reporting and Interfaces.
  1. WMS Section Listing and Description

WMS consist of the below sections:
->Setup
->Order Processing
->Inventory
->Logistics
->Inbound
->Miscellaneous

2.1 SETUP
Overview
This section will enable user to search and create Zones, Bins, Lottables and check the lottable validations which we would be requiring further for Warehouse Management System.

UTILITY

  • This section will enable user to search and create Zones, Bins, Lottables and check the lottable validations.
  • User can perform the SKU print label and receipt validation.


2.2.1 ZONES
Zones are the divisions in which any warehouse is divided for the Stock keeping based on various attributes for one or multiple locations.
-> Zone enables defining the constraints for put away and picking of SKUs in the warehouse.
->Inventory Move, Stock Adjustment, Stock Take, Inbound and Returns take place with respect to the Zone.

NAVIGATION
WMS >> Setup >> Zones

In ZONE DETAIL section, below are the fields based on which the ZONES can be searched:
Zone Code: Zone code is the User defined name/code given to the zone. This is a mandatory field while creating a zone.
Description: User can describe the zone by providing the description here.
Pick to Bin: User will choose the bin from here in which the product will get picked and allotted for the Zone.
QC Bin: QC bin refers to the quality check bin which will be chosen from here by the user for the zone.
Status: User can mark the Zone while creation as Active or Inactive. Inactive Zones cannot be used for the inbounds and further process.
Zone Type:
User will have to choose the zone type from the drop down whether the zone user is creating is a normal zone or a sortation zone.
Sortation Zone:
A sortation zone is the zone where all the zones SKU’s are staged and then sorted from there to be shifted from their respective assigned zones.
Actions:
  User can choose to Edit and Audit the Zones from the Action section.

ACTION BUTTONS

1. Search: Clicking on the search button without entering any filter criterion will populate the list of all the ZONES based on default filter setting. User can further narrow down the search by using filter options to get any specific information.
2. Reset: Reset button will refresh the filter fields to default settings, i.e. to an initial state to start fresh search.
3. Add New: To add a new Zone to the database.


2.2.2 BIN ENQUIRY
This section will enable user to enquire and search an already existing Bin and related details. User can refine the search further by using filters as per requirement/s.
->User can take a download/export of all the data present on Enquiry screen at any point of time.

UTILITY
-> The BIN describes the position in the warehouse where the goods are or can be stored in the smallest available unit of space.
-> The Bins are the storage units under zones created to actualize the status of inbound SKUs.

NAVIGATION:
WMS >> Setup >> Bin Enquiry

User can search the bin or enquire about the bin using the below filters to narrow down the search:
Location: User will have to mention the location as the warehouse/physical location for the Bin while creation.
Bin Code:
Bin code is the unique code given by the user to the bin while creating the Bin. This is the mandatory field.
Zone:
User will be choosing the zone from the drop list showing the already created zones for the Bin.
Bin Bucket: Bin bucket is the field which shows the status and feature of the bin created. For example, the bucket can be with the name based on conditions like Good/Bad/Damaged etc.
Approx no. of Units:
This field describes the number of units any bin can hold/store.
Commingle Lot:
If user wants to put two or more different type of items in one lot, then this commingle lot requires to checked.
Commingle Item: If user wants to put different items in a single bin then the check box of commingle item required to be checked.

ACTION BUTTON

1. Search: Clicking on the search button without entering any filter criterion will populate the list of all the Bins Created on default filter setting. User can further narrow down the search by using filter options to get any specific information.
2. Reset:
Reset button will refresh the filter fields to default settings, i.e. to an initial state to start fresh search.
3. Download: To download the filtered or searched result in CSV format which is displayed in the data grid.
4. Add New:
To add a new Bin to the system.
5. Advance Search: Advance search further improves the search results of Bin enquiry by providing more fields to filter from. Below fields get added for the advance search option of the Bin.

  • BIN Type*
  • Quantity
  • Checkbox for: Default Bin for Inbound
  • Checkbox for: Default Bin for Inbound
  • Aisle


2.2.3 BIN CREATE/EDIT
Given below is the ‘Bin create/edit’ form
Bin Details
Site Location*: User’s selected warehouse location for the bin to be created will be getting displayed here. This field is automatically fed once the user logs in.
BIN Code*: Bin code is the unique code given by the user to the bin in order to differentiate the bin from one another.
BIN Type*: Bin type drop down displays the type of bin categories created by the user for different type of items based on various conditions. These types are created by the user in the database.
BIN Flag*: User can create the flags in the system for the bins and choose one flag per bin from here which will help to categories and find the bin.
Is Active: A checkbox to mark the bin status as active.
Zone*: User will mention name of the zone to which the bin will be allocated.
Aisle: user can define the position of bin being on aisle side.
Sequence No: User can provide sequence numbers to the bins in order to maintain the serial order.
Bin Coordinates
These coordinates for bin in the warehouse show the exact physical location of the warehouse with respect to the coordinates on scale:
X Coordinate
Y Coordinate
Z Coordinate

Other Details
Commingle Item: If user wants to put different items in a single bin then the check box of commingle item required to be checked.
Commingle Lot: If user wants to put two or more different type of items in one lot, then this commingle lot requires to checked.

Below are fields in which the user will input details related to the BIN’s physical size and space.
Default Bin for Inbound:
Cube Capacity
Weight Capacity
Default Bin for Return
Length-Width-Height
Loose ID
Approx. No of Units: User will enter the number of units that can be accommodated together in a particular bin.


2.2.4 LOTTABLE VALIDATION
Lots are the sub SKU’s or the parameters or the batches created in the warehouse system based on which the inventory lot will be moved out & Lottable Validation is the process of validating those parameters of lots.
For example: LIFO, FEFO, FIFO

UTILITY
–> User can further narrow down the search by using filter options of ‘Lottable Val Code’ and/or ‘Description’ to get any specific information.
–> User can add new lot and can validate the existing ones from here.

NAVIGATION

WMS >>> SETUP >>> Lottable Validation

Lots can be validated or searched on the basis of various filter options given:
Lottable Val Code: Lottable Validation code is the user generated code which is created while creating lottable validation. While enquiring or searching for the lottable Val Code detail this field can be used to input and narrow down the search.
Description:
By entering the description of lottables, the lottable validation can be searched.

ACTION BUTTON
1. Search: Clicking on the search button without entering any filter criterion will populate the list of all the Lottable Validation created so far based on default filter setting. User can further narrow down the search by using filter options to get any specific information.
2. Reset:
Reset button will refresh the filter fields to default settings, i.e. to an initial state to start fresh search.
3. Add New:
To add a new LOT to the system.


2.2.5 RECEIPT VALIDATION
Overview
Receipt validation section enables the user to validate the receiving/inward conditions with respect to the Purchase order.
So the conditions of receipt validations are created here by the user which are further chosen by the user while creating the Purchase Order.

UTILITY
User can further narrow down the search by using filter options to get any specific information.
User can export vendor details in CSV format for the searched or filtered records using download option.

NAVIGATION
WMS >>> Setup >>> Receipt Validation

ACTION BUTTON
1. Search: Clicking on the search button without entering any filter criterion will populate the list of all the Receipt Validation created so far based on default filter setting. User can further narrow down the search by using filter options to get any specific information.
2. Reset: Reset button will refresh the filter fields to default settings, i.e. to an initial state to start fresh search.
3. Save: To save the new created receipt.
4 . Export: User can export vendor details in CSV format for the searched or filtered records using download option.


2.2 ORDER PROCESSING
Overview
Order Processing enables user to allocate orders, generate and manage manifests, manage picklist and much more.

UTILITY
–> Enables you to create and edit/update manifests and picklists.
–> Also lets you to search and enquire for the orders for their allocation, bulk shipment, manifest generation and put away.


2.2.1 Order Allocation

  • This section will enable user to inquire and search an already existing order and get the details of the order status being in allocated or unallocated state.
  • User can import all the order data to the system from here.
  • The order will get automatically allocated after creation if the SKU in the order has inventory available in the systems.

    Navigation
    WMS –> Order Processing –> Order Allocation

UTILITY
Allocate the unallocated orders.
User can allocate & unallocated Multiple orders from here with a single click.
Order can further be searched by using Advance search option.
Orders can be imported in the CSV file from here.
Fields on the basis of which the Vendors can be searched:

Order Number: Order number are the system generated unique order Id’s given to each order to distinguish between them.
EXT Order Number:
External Order number is the number given in by the user in case where the orders are getting synced from a different platform/ or given by user.
Status:
Order can also be filtered on the basis of their status or stages. Few of status mentioned below:
-> Confirmed
-> Cancelled
-> Closed
-> Allocated
-> Delivered
-> Shipped
-> Partly Shipped
and so on.
Order Date: Date of order creation on system.
Site Location: Warehouse from which the order will be fulfilled.
On Hold:
Filter the orders on the basis of their Hold status. While creating the order checking this box will enable the user to put the order status on hold instead of confirmed.

ACTION BUTTON

1. Allocate: This is the bulk action button which helps the user to allocate all the selected orders from the listing with a single click.
2. Unallocated: This is the bulk action button which helps the user to unallocate all the selected orders from the listing with a single click.
3. Search: Clicking on the search button without entering any filter criterion will populate the list of all the Receipt Validation created so far based on default filter setting. User can further narrow down the search by using filter options to get any specific information.
4. Reset:
Reset button will refresh the filter fields to default settings, i.e. to an initial state to start fresh search.
5. Advance Search:
Advance search further improves the search results of order allocation by providing more fields to filter from. Below fields get added for the advance search option:
-> External Order No
-> Customer Email
-> Customer Phone
-> SKU Code
-> Order Tag
6 . Import: User can import all the order data into the system from here.


2.2.2 MANIFEST

Overview
A manifest in simple context is a list of items either delivered to or shipped from a warehouse or location. After the order is created and picked, then the manifest gets generated by the user stating the details of transporter and other necessary.
Above given image is the layout of manifest in eRetail.

UTILITY
User can search and create or add new manifest from here.
User can scan the delivery number/ tracking number and can even mention channel type.

NAVIGATION
WMS >>> Order Processing >>> Manifest
Fields on the basis of which the Manifest can be searched:

Manifest Number: Manifest number is the Outbound delivery number
Manifest Date:
Manifest can be filtered/ searched on the basis of Manifest creation date.
Transporter*:
Choose the transporter type from the drop-down list. This Transporter type will be fed in the system from the database.
Status:
Manifest can be either in pending confirmation state or it can confirm.
Location:
Location of the warehouse.
User: Name of the user from which the logging has been done.
Order Count & Print: Order Count field displays the info corresponding to the order line items.


2.2.3 DELIVERY SHIPPING
Overview

Delivery shipping section enables a user to view the details of all the order and various order processing stages. From here the user can select the OB delivery number and generate pick list in bulk, user can generate labels and invoices and much more.

Utility
* User can generate Pick list for multiple OB delivery numbers.
* User can generate labels and invoices.
* The delivery shipping screen has different fields like Order No, External Order No, Order Date,      Outbound Delivery No, Tracking no, Order Status and many more to filter and narrow down your search for orders & shipping.

Delivery Shipping tab is divided into below tabs:
(a) New: This section contains all the new orders whose picklist has not been generated as yet. From here all the detailed information about the Shipping, outbound delivery, dispatch and picking can be fetched from here.

Below are the options/filters based on which the search can be carried out to narrow down the search results.

Delivery Info: Whenever an order gets created in eRetail, the outbound delivery number gets assigned to the order. This delivery info displays the OB delivery numbers against which the Picklist needs to generated and whose picking has not yet been done.
Order Number: Order number is the system generated number provided to each order as its unique identifier.
External Order Number: External Order number is the number given in by the user OR order No provided by the sales channel/platform from where orders are pulled into eRetail.
Channel: This filter will specify the details about the channel from which the particular order or OB delivery belongs to.
Order Type: Order type filter contains the dropdown of type of order configured for that user. For example if the order is a COD order, or paid order, or consignment Order, or return order etc.
Picklist For: Here user can filter by choosing from the drop down the case for which the picklist is getting generated. If it is for RTV (Return to Vendor case) or it is for SO (Sales Order) or it is an STO (Stock Transfer Order).
Order Status: User can choose to filter between allocated and unallocated orders from here.
Transporter: Narrow down the search results by choosing the transporter from the drop down.
Order date & Ship by Date: User would be able to filter the order on the basis of order date and shipped date.

Action Button
Search: Clicking on the search button without entering any filter criterion will populate the list of all the New orders on default filter setting. User can further narrow down the search by using filter options to get any specific information.
Reset: Reset button will refresh the filter fields to default settings, i.e. to an initial state to start fresh search.
Advance Search: Advance search will enable the user to carry out the search based on external PO number and/or by channel name.
Export: To download the filtered or searched result in CSV format which is displayed in the data grid.
Generate Pick list: From here the picklist for multiple orders can be generated by selecting the checkbox against delivery number and then generating the picklist with this action button.

(b) Pick list Created
This section will display the orders whose pick list have been created but they are not yet picked and packed. All the filter options will be same here in the ‘pick list created Tab’ just as ‘new’ tab above.
The two action button options will get added:
Pack Order: From here the user can pack the orders in bulk by choosing the multiple orders and can click the pack button from the action button tab.
Print Pick list: With print pick list button the pick list can be printed. Pick list can be printed here in bulk for multiple orders at once.
This can be done in two ways:
-> SKU Wise Picklist
-> Order Wise Picklist


(c) Pick Pack
This section will display the orders which are picked but not yet shipped and manifest has not been generated yet. All the filter options will be same as above.
Few action button options will get added:
Pack Order:
User can pack the multiple order at once from here.
Ship Order: User can ship multiple orders from here after they are picked and packed.
Generate Manifest: Manifest generation can be performed from here.
Print Label & Print Invoice: User can print the label and invoices from here.

(d) MP Label Refetched:
This section will display the orders whose labels for some reasons have not been fetched at first from the Marketplace, and with the Refetch button the order can be selected for the label generation.
All the filter options will be same as above.
Few action button options will get added:
Refetched: With this action button the labels for the multiple Marketplace orders can be refetched.

(e) Shipped
All the shipped orders details can be searched from here with respect to different filters given.
All the filter options will be same as above.
Few action button options will get added:
Update POD: POD stands for proof of delivery. The Update POD action button enables the user to update the proof of delivery comment at the time of delivery.
Reship: If once the shipment has been failed to reach the client due to any reason so user can attempt the reshipment.
Print Label & Print Invoice: User can print the label and invoices from here.

(f) All
All the order and delivery shipment will be getting displayed here in all section. All the filter options will be same as above.
Few action button options will get added:


Generate gatepass: Gatepass is a outward/outbound document proof containing the detail of items while making any product movement outside the warehouse.
The gatepass can be generated from here.
Generate Manifest: Manifest is the proof of Shipping in the form of a document which contains details of transporter, sku name and customer address.


2.2.4 BULK ORDER SHIPMENT
Bulk order shipment section enables the user to import the data for Bulk shipment.
The import can be for 02 events:
-Bulk Pack
-Bulk Ship
The user will be choosing the event and then to import the data in the form of CSV, user will be required to follow below steps:
->Choose the event out of Bulk pack and bulk ship.
->Download the template.
->Enter the data in the template without disturbing the template fields.
->Upload that Excel/CSV file.


2.2.5 MANAGE PICKLIST
Overview
User can manage the picklist for orders from here. All the allocated orders SKU needs to be picked first. And to get picked it should have a picklist corresponding to that. From this section user can generate new picklist and can even enquire for the existing one.

Manage picklist section is majorly divided into:
->Enquiry Picklist
&
->Generate Picklist


ENQUIRY PICKLIST
Enquiry picklist section enables the user to enquire and search for any particular picklist based on below fields:
->Picklist number
->Picklist created Date
->Status of the picklist
->Pending
->Cancel
->Complete
->Processing
->Picklist Generated By
->Assign Picklist User
->Picklist Finish Time
->Picklist Quantity
->Process Quantity
->Cancel
->Unlock Picklist
->Location Code
->Picklist print date

ACTION BUTTON

Search: Clicking on the search button without entering any filter criterion will populate the list of all the picklist on default filter setting. User can further narrow down the search by using filter options to get any specific information.
Reset: Reset button will refresh the filter fields to default settings, i.e. to an initial state to start fresh search.
Advance Search: Advance search will enable the user to carry out the search based on advanced fields.
Export: To download the filtered or searched result in CSV format which is displayed in the data grid.

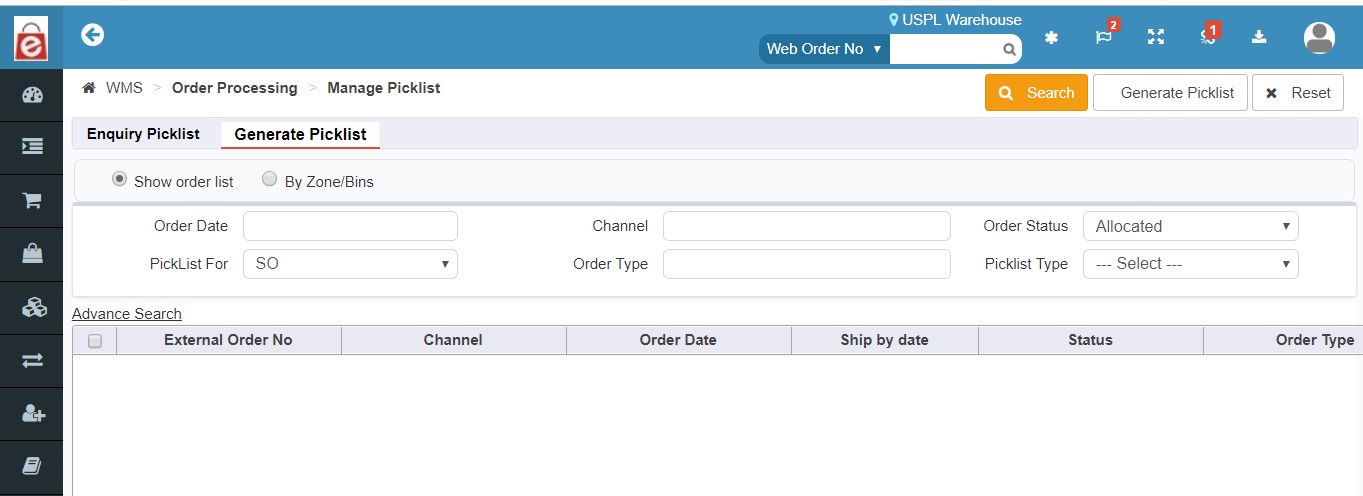
GENERATE PICKLIST
User can generate the picklist from this section by two ways:
-By Show Order List
-By Zones/Bins

Once the user chooses one of above two methods given, then comes the below fields in order to create the picklist:

Order Date: To create the Picklist firstly choose the date when the order was placed. This is mandatory field.
Channel: Then specify the channel under which the order was placed.
Order Status: Mention the order status: Allocated or part allocated.
Picklist For: User will have to choose the order for which the picklist is getting generated for. By default there comes the 03 options out of which the user will have to choose one, they are:
-STO
-SO
-RTV
Order Type: Here the user can select the order type to narrow down the results as it was the COD or prepaid or so on.
And then when the order comes as a result of all the above field entry, choose the order and click on generate picklist action button.

2.2.6 MANAGE PICKING
Manage picking section enables the user to scan the picklist by the picklist number generated and then pack the order.
From here user can get the details of last 20 processed orders.
Picking can be managed here:
-> by SKU
&
-> by ORDER

Once you enter the picklist number and scan the same, you get the option to fill it in order to pack the same. Below are information which are required to pack the picklist.
Order: Scanning the picklist number automatically generates the corresponding order number with respect to the picklist generated against the same.
Delivery No: Delivery number gets auto populated here which is the OB delivery number which gets assigned to the order the moment it gets created
Transporter: User will choose the Transporter for the packing of order from here.
Tracking No: Subsequently the user will enter the tracking number for the transporter or in some cases depending upon the transporter chosen, the tracking number will be auto populated.
No of Boxes-Weight: Mention the number of Boxes in which the user will be packing the order and weight of SKU.
LBH: User will mention the Length, Breath & Height of the Box.
Shipping Address-Image: User will enter the shipping address details and upload the image if any.
Then User will click on confirm Packing button, with which the order will move from pick to pack stage and the Invoice and label can be printed for the same.

INVENTORY
Overview
Inventory section under WMS provides all the details about each inventory present in the system. This section also enables the user to monitor the inventory move, inventory scan and much more.

UTILITY
-Enables the user to move inventory by scan and by history.
-Cycle count feature can be used by the user to match & Verify inventory.
-Enables the user to adjust the inventory in warehouse locations.
-Outbound memo enquiry by user.

NAVIGATION
WMS –> Inventory
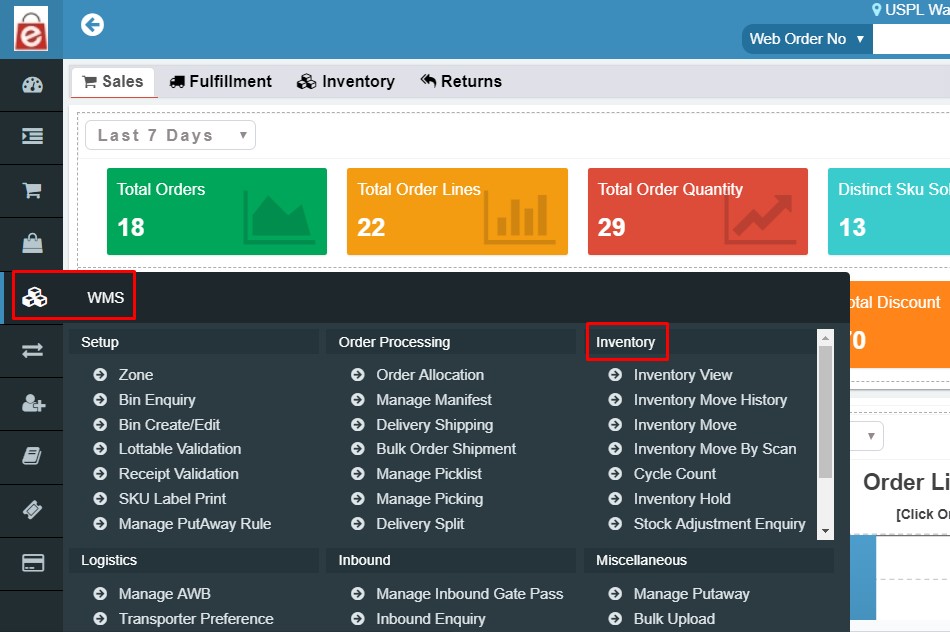
Inventory section is further divided into various sections, lets understand them all:


2.2.1 INVENTORY VIEW
Inventory view section enables the user to view real time status of inventory present in the warehouse. It shows item wise inventory for each of the products like total stock in hand, Free stock or available quantity.

In inventory view section the inventory can be viewed or searched by SKU, by SKU Bin, by Description, by Mfg SKU code etc. Lets understand each in detail.

By SKU
Here user can get the inventory detail by searching the inventory by SKU based on below fields.
SKU Code
SKU Description
Mfg SKU Code
Hierarchy Code
Brand Code
Vendor Code

By SKU BIN
Here user can get the inventory detail by searching the inventory by SKU BIN based on below fields.
SKU Code
SKU Description
Mfg SKU Code
BIN
Inv Bucket
Zone

Subsequently the inventory can be searched based on below mentioned tabs and to narrow down the search the filter fields can be used in each tab.
By SKU LOT
By SKU BIN LOT
By SKU IMEI
By SKU UNIQUE NO
Market Place Inventory
By SKU BOM


2.3.2 INVENTORY MOVE HISTORY
This section enables the user to view the full history of events when a particular inventory has been moved from one zone to another or one bin to another. Also it enables the user to view the different transactions made in the system during the movement of inventory from one location in the warehouse to another.

On the inventory move history screen, the user by clicking on the search button without entering any filter criterion will get the list of all the inventory move history based on default filter setting. User can further narrow down the search by using filter options to get any specific information.

Fields based on which the inventory move history can be searched:

SKU CODE: Any unique code which a user gives to the SKU while creating it. This SKU code is a mandatory field and once created and saved cannot be changed and must be a unique number.
SKU DESCRIPTION: User can search or filter the inventory history based on the SKU description of each SKU.
MOVE DATE: Search or filter the inventory move history based on the move date.
SITE LOCATION: User can choose the warehouse location for which the user is enquiring about the inventory move history.
MOVE QUANTITY: Mention the move quantity.
FROM ZONE & TO ZONE: User can view the inventory move history from zone and to zone.
FROM BIN & TO BIN: User can view the history of inventory move from one bin to another.
PUTAWAY NUMBER: Inventory move history can also be searched or filtered based upon the putaway number.

ACTION BUTTON
1.Search: Clicking on the search button without entering any filter criterion will populate the list of all the Inventory move history based on default filter setting. User can further narrow down the search by using filter options to get any specific information.
2. Reset: Reset button will refresh the filter fields to default settings, i.e. to an initial state to start fresh search.
3. Export: To download the filtered or searched result in CSV format which is displayed in the data grid.
4. Add New: To add a new Inventory Move to the database.
5Advance Search: Advance search further improves the search results of Inventory move history by providing one more fields to filter from i.e. Style Code.

2.3.3 INVENTORY MOVE
This section enables the user to view the full history of events when a particular inventory has been moved from one zone to another or one bin to another. Also it enables the user to view the different transactions made in the system during the movement of inventory from one location in the warehouse to another.

2.3.4 INVENTORY MOVE BY SCAN
Inventory move section is used to adjust and update the system inventory according to any changes being made in the physical inventory in the warehouse.
User will be scanning the inventory to be moved from one bin to another.

NAVIGATION
WMS –> Inventory –> Inventory Move by Scan

It can be done in two ways:
->INVENTORY MOVE BY SCAN
&
->EACH PIECE MOVE

INVENTORY MOVE BY SCAN
Inventory move by scan can be performed by filling in the below details:
SKU Code*: Any unique code which a user gives to the SKU while creating it. This SKU code is a mandatory field and once created and saved cannot be changed and must be a unique number.
SKU Desc: User can search or filter the inventory history based on the SKU description of each SKU.
From Bin*: Name of the existing bin w.r.t. the inventory.
Quantity*: Quantity to be moved.
To Bin*: Name of the bin where the inventory is getting transferred to.

ACTION BUTTONS:
Add: Add Inventory/SKU which will be moved or transferred from one bin to another.
Reset: Reset button will reset the fields to default settings, i.e. to an initial state to start fresh move.
Confirm Move: User will use this button to confirm the inventory move.

EACH PIECE MOVE
Inventory move by each piece can be performed by filling in the below details:
From Bin*: Name of the existing bin w.r.t. the inventory.
To Bin*: Name of the bin where the inventory is getting transferred to.
SKU Code*: Any unique code which a user gives to the SKU while creating it. This SKU code is a mandatory field and once created and saved cannot be changed and must be a unique number.
Quantity*: Quantity to be moved.


2.3.5 CYCLE COUNT
Cycle count is the process to verify the actual existence of SKU’s in a particular bin with respect to that of system count. This process enables the verification of physical quantities and updated ones in the system.
The primary inference is that the accuracy of the items in the cycle count can be used to determine the accuracy of the items in the warehouse.
Cycle count section is divided into two parts:
-CYCLE COUNT ENQUIRY
-CYCLE COUNT CREATE/EDIT

Cycle Count Enquiry
Clicking on the search button without entering any filter criterion will populate the list of all the cycle count based on default filter setting. User can further narrow down the search by using below given filter options to get any specific information.

Cycle ID: Cycle ID is the unique identification given to any particular cycle count process by the system.
Type: From here the user selects the type of cycle count enquiry to be searched.
Status: User can filter the cycle count results based on cycle count status, that is: Confirmed, Cancelled and WIP.
Updated Date: The last updated date for the cycle count is also one factor to filter the search results of cycle count.
Bin: Bin wise filter.
User: Filter the cycle count search based on the user name.

Cycle Count Create/Edit
This section will enable the user to create the cycle count for any particular bin.
User will have to enter the type of count and then the bin name to carry out its cycle count and then click on confirm button.


2.3.6 STOCK ADJUSTMENT
Stock Adjustment is the process of increasing or decreasing the inventory of an existing product in the system.
If there is a mismatch or difference between the stock as per eRetail and physical stock (present in the warehouse) during cycle counting, Stock adjustment option helps us adjust the stock levels as per inventory available.
Stock Adjustment is divided into two sections primarily:
-Stock Adjustment Enquiry
&
-Stock Adjustment create/edit


Stock Adjustment Enquiry
In the Stock adjustment enquiry, the list of all the stock adjustments done in past will get displayed here based on the filter settings used by the user.
User can search the stock adjustments on the below basis:
->SKU Code
->Date
->Booked Stock
->Adjusted Stock
->Bin
->User
->Reason
->Status
->Remarks
->Site Location.

ACTION BUTTON:
1.Search: Clicking on the search button without entering any filter criterion will populate the list of all the Stock adjustment based on default filter setting. User can further narrow down the search by using filter options to get any specific information.
2. Reset: Reset button will refresh the filter fields to default settings, i.e. to an initial state to start fresh search.
3. Export: To download the filtered or searched result in CSV format which is displayed in the data grid.
4Advance Search: Advance search further improves the search results of Stock Adjustments by providing two more fields to filter from i.e. Stock adjustment Mode [Increase or decrease] or SKU description.
5. Confirm Adjustment: User can mark the multiple stock adjustment entries from the result displayed and can confirm them in one go with this confirm adjustment action button.
6. Cancel Adjustment: User can mark the multiple stock adjustment entries from the result displayed and can cancel those adjustments in one go with this cancel adjustment action button.
7. Add New: To add a new Stock Adjustment to the database.
User will have to fill in the form with below mentioned fields to create the stock adjustment.
It can be done by two methods:
-Stock adjustment by scan
&
-Import

Stock adjustment by Scan
Stock Adjustment Mode: User can choose the mode for which he wants to adjust the stock. I.e. he can either increase the stock under adjustment or decrease the stock under adjustment.
SKU Code: Any unique code which a user gives to the SKU while creating it. This SKU code is a mandatory field and once created and saved cannot be changed and must be a unique number.
SKU Description: User can search or filter the inventory history based on the SKU description of each SKU.
Reason: The drop down contains the values of different reasons behind the adjustment like stock take, Order shipment, Damaged in warehouse, Miscellaneous etc.
Adjusted Bin: The field is used to input the Bin number from where the adjustment needs to be made.
Adjusted Id: Adjusted Id is the system generated Id given for each adjustment made.
Lot: The drop down contains the values for all the lots for that SKU that are existing in the system.
Adjusted Quantity: The Field is used to input the quantity of the SKU that needs to be adjusted.
Book Stock: The field displays the total number of items for the SKU in the system.
Adjusted Stock: The field displays the total number of items that have to be adjusted.
Free Stock: The field displays the total number of items that are available for allocation.


2.4  LOGISTICS

2.4.1 Manage AWB
This screen enables user to search for a AWB number based on various search criteria. This is useful when users are using offline transporters. Here user can add AWB bank obtained from offline transporter.
Various fields in this screen are the following:
Site Location: This will be set to default site location of the user in which he is logged into.
Transporter: User may filter records based on a transporter.
Order type: Search results may be narrowed using order types: Prepaid, COD
Status: Search results may be narrowed by using the following status: Free, Issued
AWB No.: Search results may be narrowed by using the AWB No.
Courier Type: User may choose following courier types: Forward and reverse to narrow down the search results.

Action buttons in the screen are given below:
Search: By pressing this button, search results are displayed.
Reset: Reset button will reset the search criteria to default for a fresh search.
Export: Exports the search results in an excel sheet.
Delete: Deletes the selected AWB numbers.
Add New: This opens a new screen where AWB numbers can be added.

Adding New AWB in the system:
This screen enables user to create AWB number or add AWB series for a transporter in eRetail and thus enabling user to work with offline transporter.
Various fields in this screen are the following:

Site location: This is set to user’s logged in location.
Transporter: User may choose a transporter for which this AWB will be created.
Order type: User may choose a particular order type: Prepaid and COD for which AWB will be created.
Status: User will choose the status of the AWB getting created, it is either Free State or in issued state.
Add Single AWB: User will select this checkbox if the single AWB needs to be added.
Add AWB series: In case user is required to add a full series of AWB then user will check this option.


2.4.2 Transporter Preferences
This section will display the list of transporter preference based on the warehouse location and various other filters.
The search results can also be downloaded from here for future references.
Below are the fields based on which the transporter preferences can be searched.
-From Location
-Destination Pincode
-Order Type
-Transporter
-Preference Order
-Created By
-Record Updated By
-Record Update date

ACTION BUTTON
1.Search: Clicking on the search button without entering any filter criterion will populate the list of all the transporters and logistics info based on default filter setting. User can further narrow down the search by using filter options to get any specific information.
2. Reset: Reset button will refresh the filter fields to default settings, i.e. to an initial state to start fresh search.
3. Export: To download the filtered or searched result in CSV format which is displayed in the data grid.

2.5  INBOUND

2.5.1 Inbound Enquiry
Overview
The inbound process starts when items arrives in the warehouse location, either received from external sources or from another company location. An order becomes an inbound shipment when a purchase order release is packed and it is physically ready to be shipped.

Navigation
WMS –> Inbound –> Inbound Enquiry

Inbound enquiry can be carried out by filtering the below data:
Inbound no: Inbound number is the unique identification system generated number given to every inbound created in the system.
STO no: User can search the inbound enquiry and can narrow down the search results by using STO no. as a filter.
ASN no: User can search the inbound enquiry and can narrow down the search results by using ASN no. as a filter.
PO no: Inbound can be searched with respect to the PO number generated for the same.
GRN no & Date: Inbound enquiry can be carried out by using the Goods Received Note and date.
Inbound Type: User can filter the inbound numbers based on their types and categories.

Invoice no: The inbound can be filtered on the basis of invoice number as well.
Vendor: User can filter the inbound enquiry by the vendor name as well.
Status: The inbound can also be searched with the status of the inbound entered in the system.
The Status based on which these inbound can be filtered are:
-> Cancelled
-> Confirmed
-> GRN in Process
-> GRN in QC
-> Pending Confirmation
->QC Done
Inbound Location: User can search and filter the result on the basis of inbound location.

ACTION BUTTON
1.Search: Clicking on the search button without entering any filter criterion will populate the list of all the inbounds done based on default filter setting. User can further narrow down the search by using filter options to get any specific information.
2. Reset: Reset button will refresh the filter fields to default settings, i.e. to an initial state to start fresh search.
3. Export: To download the filtered or searched result in CSV format which is displayed in the data grid.
4Advance Search: Advance search further improves the search results of Stock Adjustments by providing two more fields to filter from i.e. Creation date, Lot number, SKU code, Order Number.
Detailed Export: Detailed export will take you to the report page where all the reports are getting downloaded.
Add New: Adding a new inbound in the system. The details of which can be seen in coming section.


2.5.2 INBOUND CREATE/EDIT
Inbound Create edit section is majorly divided into two parts:
->Inbound Create/ Edit
->Import

Inbound Create/Edit
To initiate the Inbound create/ edit, the first step required is entering the PO number.


After entering the PO number, the user can do inbound for the selected products.

Inbound Create Edit Process is divided into four tabs:
->Inbound Create/edit
->User Defined Field
->Attached Document
->Import

Inbound Create/Edit

PO No*: The PO number entered by user will populate here which the user has entered while creating the Inbound.
Transporter Code: Enter the Transporter Code with respect to the inbound.
Remarks: Remarks if any.
Invoice No-Date-Tax-Amount: User will have to enter the Invoice number for the inbound, date of inbound, tax calculated for the products of inbound and the Invoice amount of that inbound.
Gross Weight: Weight of products to be inbound.
Inv Bucket: Inv bucket shows the status of the products in inbound and accordingly to be assigned the bucket. User will have to select the most suitable one out the given options.
No. of Boxes: Total number of boxes to be inbound.
Material Rec Date: Date on which the consignment was received.
Ext Inbound No: External inbound number is given in case inbound numbers are getting synced from a different platform.

User Defined Field
These are the custom fields which can be created by the User for inbounds in case of any extra information required.

Attached Document
Any important document with respect to any particular inbound which needs to be canned and attached can be done from here.  Attached document section lets user to attach any important document/contract for the vendor.


2.5.3 INBOUND REAL TIME
Inbound Real time can be done with four types:
With ASN
Direct Inbound
With Gate Pass
With PO

With ASN: Inbound with ASN that is Advance Shipping Note is the case where the goods arrive earlier than expected and the inbound for the same needs to be done. In this case here the ASN number will be required instead of the PO number to start the Inbound process.
Please refer the clip below:

Direct Inbound : Direct Inbound is the scenario where inbound is done without PO, which means directly inward of the products received. Here the Vendor code is required for the inbound to be done. Lets understand via this video clip:


2.5.4 INBOUND QC
The Inbound QC process is carried out in order to do the quality check of the SKU’s inward during inbound.
User carries out this process with the help of inbound numbers for the inbound already registered in the system. Refer to the clip below:

2.5.5 DIRECT INBOUND
Direct Inbound is the scenario where inbound is done without PO, which means directly inward of the products received. Here the Vendor code is required for the inbound to be done.

NAVIGATION
WMS –> Inbound –> Direct Inbound

The Direct inbound can be done:
By Vendor
&
By ASN
Or
The Direct inbound can be done IMPORT.


2.5.6 STO INBOUND
STO inbound is done in case of stock transfer order received at the warehouse. User with multiple locations or warehouses require to transfer the stock from one warehouse to another for orders & the inbound for such cases is done here.

NAVIGATION
WMS –> Inbound –> STO Inbound

Process :
Here the User will enter the STO number or will import the STO numbers for bulk STO inbounds.
Once the STO is entered then the regular process of inbound will be carried out by the user.


2.5.7 RETURN INBOUND CREATE/EDIT

Return inbound is done in case of Customer returns or delivery failure, as in both these cases the order is received back at the warehouse. When the order is received in the warehouse as customer return then again the inbound for that return is done to re allocate the bins and zone to the returned orders.

NAVIGATION

WMS –> Inbound –> Return Inbound

Process :
Here the User will enter the Customer Return number or can bulk upload the RTO for Inbound.
Once the customer return number is entered then the regular process of return inbound will be carried out by the user.


2.6  MISCELLANEOUS

2.6.1 Manage Putaway
Putaway is the process that defines the location of SKU in internal logistics process from receiving of an SKU to stocking these items to their designated location (Bin/Zone) in the warehouse. This section enables the user to view and search or filter the list of all the putaway done and look into their details if required.

NAVIGATION
WMS —>Miscellaneous —> Manage Putaway

Putaway Enquiry
Putaway enquiry can be searched based on below filters:

PutAway No. : Putaway number is the system generated unique number given to each putaway done for its identification. User can narrow down the search with putaway number as a filter.
Status: User can search the putaway by choosing one of the status options as a filter. Below are the status based on which the user can narrow down putaway enquiry.
Cancelled
Closed
Confirmed
Open
Part Confirmed.
Created Date: The Putaway can also be searched based on the date created by entering the date or date slot and can search for the putaway request created during that period.
Confirmed Date: The Putaway can also be searched based on the date on which it was confirmed by entering the date or date slot and can search for the putaway request created during that period.
Putaway Type: Putaway can be searched based on its type as well.Putaway can be of 2 types:
a) Selected Inbound
Whenever items are inbound into the warehouse, Selected Inbound’ type of Putaway is created. Where simply the inbound number is fetched and putaway for the same is processed further.

b) Cancelled orders
Orders which are cancelled by customers and are to be returned to the warehouse. This also includes orders / items which got cancelled after their pick up process was complete but were yet to be packed and dispatched from the warehouse. Since these items have been moved from their designated bins to the picking area, these are required to be put back into their designated places.

Location Code: Filter on the basis of Warehouse Location where it was generated.


ACTION BUTTON
1.Search: 
Clicking on the search button without entering any filter criterion will populate the list of all the Putaway based on default filter setting. User can further narrow down the search by using filter options to get any specific information.
2. Reset:
 Reset button will refresh the filter fields to default settings, i.e. to an initial state to start fresh search.
3. Advance Search: Advance search further improves the search results of Putaway by providing few more fields to filter from :
Inbound No.
Confirmed Date
SKU
PO No.
Order No.
Bin (From-To)
To Zone
4. Download: To download the filtered or searched result in CSV format which is displayed in the data grid.
5. Add New: 
To add a new Putaway to the database. Putaway can be created by two ways.
While adding user will be asked to choose the type of putaway to be created first.
Putaway types:
a) Selected Inbound
Whenever items are inbound into the warehouse, Selected Inbound’ type of Putaway is created. Where simply the inbound number is fetched and putaway for the same is processed further.
b) Cancelled orders
Orders which are cancelled by customers and are to be returned to the warehouse. This also includes orders / items which got cancelled after their pick up process was complete but were yet to be packed and dispatched from the warehouse. Since these items have been moved from their designated bins to the picking area, these are required to be put back into their designated places.

Choosing the type, then user will be taken forward to enter the details for Putaway.
Putaway Type: Putaway type will be auto populated based on user’s selection in prior step.
Inbound No.: User will search and enter the Inbound number against which Putaway needs to be generated. When the user searches the required inbound number in ‘Inbound pick list’ pop up, only those inbound numbers will be shown in search results for which bin bucket is of type ‘in process’.
Putaway Mode: User can choose putaway mode from the below two options given:
User Defined Putaway: User defined Putaway is the putaway where user manually enters the Bin where he/she wants to do the putaway for the inbound SKU.
System generated Putaway: here system will suggest the Putaway bin to user. Though this field will be editable, system will automatically provide the Putaway bin.
QC Status: QC status is the quality check status which the user selects for the putaway.
These status can be created from Settings.
Navigation for Settings Menu:
Admin –> Settings –> Inbound / QC / Putaway

Right after this, user will be asked to enter the Bin in which he wants to putaway the SKU.
Putaway Bin: Putaway Bin is the bin where the SKU’s will be kept for putaway.
SKU Code: SKU code needs to be scanned by the user to proceed further.
Putaway Quantity same as Qty for Putaway: This checkbox implies that the quantity of items to be put away is the same as quantity of items received in inbound.
To Bin: The bin where the inbound items are to be stocked.
User has the option to scan each item for Putaway or scan items in bulk. For this, user will be required to select ‘Bulk’ or ‘Each’ form “Qty Setting” pop up which appears after clicking on settings icon as shown in the screenshot below:

Refer this video clip:


Vin eRetail | Transfers

TRANSFER

  1. TRANSFER
    Overview
    User with multiple locations or warehouses require to transfer the stock from one warehouse to another for orders. This process is taken care in the Transfer section of the app.

UTILITY

  • User can create the STO’s to transfer the Stock or inventories from one warehouse to another.
  • The STO order process act as a normal order processing and once the inventory reaches the warehouse location its direct Inbound is done.
  1. Listing and Description
  • Stock Transfer Enquiry
  • STO Create/Edit


2.1 STOCK TRANSFER ENQUIRY

  • This section will enable user to enquire and search an already existing STO’s and STO details. User can refine the search further by using filters as per requirement/s.
  • User can take a download/export all the data present on Enquiry screen at any point of time.

Navigation
Transfers –> Stock Transfer Enquiry

Utility

  • Enables the user to maintain the Stock globally during the stock transfers between multiple locations.
  • No Purchase order is required for STO, instead direct Inbound is done in this case to inward the stock in warehouse.

Related Links
Direct Inbound
Purchase Order

Fields on the basis of which the Stock Transfer Orders can be searched:

  • STO number- Date- Type
    STO number is the system generated unique ID given to the STO & from the filter option the STO’s can be searched using STO as well.
    STO Date is the date on which the STO is created.
    STO type filter consists of two type STO, one is NORMAL STO which is created in case of normal transfer from one location to another & other type of STO is RETURN where the sales transfer order is created in case of order returns. STO can be filtered /searched on these bases as well.

Ship & Delivered Date
Ship Date & delivered date are the dates on which the STO was shipped and delivered respectively. The user can narrow down the search results by entering the ship date or delivered date.

Origin & Destination Site
User can also search the STO by entering the origin and destination site for the STO. And all the STO’s corresponding to that origin will be displayed as search result.

Status
STOs status changes at every stage with respect to the user’s action and STOs processing cycle.
The status through which an STO goes through is:
-Created:
When the STO is created.
-confirmed: When the STO is Saved and confirmed.
-Allocated: When the STO is allocated for the WH location.
-Part Allocated: When not all the SKU’s of the STO but few are allocated for the WH location.
-Part Picked: When from an confirmed STO few SKU’s are picked and not the whole STO, then this is the part picked status of an STO.
-Pick Complete:
When an STO is completely picked.
-Part Shipped: When from an STO few SKU’s are Shipped and not the whole STO, then this is the part Shipped status of an STO.
-Shipped Complete:
When an STO is completely picked.
-Delivered:
When the STO is delivered to destination then the status changes to delivered.
-On Hold: User can put the STO on hold if he wants, and in the search criterion the same can be treated as a parameter to narrow down the STO search results.

Action buttons

1. Search: Clicking on the search button without entering any filter criterion will populate the list of all the STO based on default filter setting. User can further narrow down the search by using filter options to get any specific information.
2. Reset: Reset button will refresh the filter fields to default settings, i.e. to an initial state to start fresh search.
3. Export/Download:
To download the filtered or searched result in CSV format which is displayed in the data grid.
4. Add New:
To add a new STO to the database.
5. Advance Search: Advance search further improves the search results of STO by providing more fields to filter from. Below fields get added for the advance search option of the STOs.

  • Site Location
  • SKU Code


2.2 STO CREATE/ EDIT
To create a new STO or to edit/update an existing STO.

UTILITY

  • User can create STOs from here
  • In Manual one’s case AWB Banks are uploaded to assign.
    Navigation:
    Transfers —-> STO Create/edit

On the STO Create/Edit screen, below tabs are present to capture all STO related information.
-> STO Order Detail
-> UDF
-> Outbound Delivery
-> Comment History
-> STO Order Tag

2.2.1 STO Order Detail:
From STO order detail section the user will enter all the details for creating an STO and adds the SKU for STO from here.

Ext. STO No:
External STO number is the number given by the user OR order No provided by the sales channel/platform from where STOs are pulled into eRetail

STO Type:
There can be two type of STO, one is NORMAL STO which is created in case of normal transfer from one location to another & other type of STO is RETURN where the sales transfer order is created in case of order returns.
From Site:
The ‘from site’ is the warehouse location from where the SKU will be picked up.
To Site
The ‘to site’ is the warehouse location to where the SKU will be inward.
Reason
User will have to mention the reason for Stock transfer being done from one location to another.
Priority
User can set the priority while creating the STO as low priority or high priority based on the priority options.
On Hold Status:
User can put the STO on hold if he wants, and in the search criterion the same can be treated as a parameter to narrow down the STO search results.
Emarks:
User can mention the remarks for the STO being sent for the receiving warehouse to know about the same.
Status:
STOs status changes at every stage with respect to the user’s action and STOs processing cycle.
The status through which an STO goes through is:
-Created:
When the STO is created.
-confirmed: When the STO is Saved and confirmed.
-Allocated: When the STO is allocated for the WH location.
-Part Allocated: When not all the SKU’s of the STO but few are allocated for the WH location.
-Part Picked: When from an confirmed STO few SKU’s are picked and not the whole STO, then this is the part picked status of an STO.
-Pick Complete:
When an STO is completely picked.
-Part Shipped: When from an STO few SKU’s are Shipped and not the whole STO, then this is the part Shipped status of an STO.
-Shipped Complete:
When an STO is completely picked.
-Delivered:
When the STO is delivered to destination then the status changes to delivered.

2.2.2 UDF (User Defined Fields)
These are the custom fields which can be created by the User for customers in case of any extra information required.

2.2.3 Outbound Delivery
Outbound delivery number shows the details of order like from which Warehouse it has been shipped, the Shipping detail or ASN number.
The transporter can be changed for the order from this section.

2.2.4 STO Order Tag
User can enter the order tags which are nothing but important information about the STO order which also acts as the searchable keywords for those STOs.

Action buttons
1. Add New:
To add a new STO to the database.
2. Save: Save the created the STO.
3. Confirm: To confirm the created STO.


Vin eRetail | Admin

ADMIN

  1. ADMIN Overview

Admin section enables the admin to create and manage the users and limit their access rights, manage the audit logs, manage APIs and much more.

UTILITY

  • Create and manage users and provide them different access rights based on the work areas.
  • The audit logs can be viewed & details can be exported from Admin section.
  • API can be activated and the access rights as well as the location can be entered.
  1. Listing and Description
  • USER MANAGEMENT
  • AUDIT LOG
  • MANAGE API
  • ORDER IMPORT


2.1 USER MANAGEMENT

  • This section will enable admin to enquire and search the already existing Users and User details with whom he has shared the access rights based on utility/work genre. Admin can refine the search further by using filters as per requirement/s.
  • Admin can also create as many users and give them all different set of access right issues to enable the users to perform different action.

Navigation
Admin —> User Management

Utility

  • Enables the Admin to maintain the records of users created and refer the rights provided whenever required.
  • Admin can also create and edit the existing roles for the user.


2.1.1 USER ENQUIRY

This section will enable admin to inquire and search the already existing Users and User details with whom he has shared the access rights based on utility/work genre.

Navigation
Admin —> User Management —> User Enquiry


Fields on the basis of which the Users can be searched:
USER NAME: User name is the name given by the admin for any user while creating the user. This is unique identifier user differentiates one user from another & no two different user can have the same user name.
FIRST NAME & LAST NAME: In the User enquiry section the users can be searched by entering the first and the last name as well.
STATUS: The user can be searched from status.
EMAIL: The user can be searched from their email address.
USER TYPE: Admin while creating the users can define the user type. These can be types based on which they are characterized and differentiated, for example: admin, distributor, seller, seller admin etc.

ACTION BUTTON
Advance Search:
Advance search further improves the search results of User Management by providing more fields to filter from. Below fields get added for the advance search option of the users.
->Role
->Company
->Location

Search: Clicking on the search button without entering any filter criterion will populate the list of all the user based on default filter setting. User can further narrow down the search by using filter options to get any specific information.
Reset: Reset button will refresh the filter fields to default settings, i.e. to an initial state to start fresh search.
Export: To download the filtered or searched result in CSV format which is displayed in the data grid.


2.1.2 USER CREATE/ EDIT
This section will enable admin to create new users and edit or update the already existing Users.

NAVIGATION
Admin —> User Management —> User create/edit

The user create / edit section is primarily divided into three sections.

USER DETAILS

USER NAME:
User name is the name given by the admin for any user while creating the user. This is unique identifier user differentiates one user from another & no two different user can have the same user name.
FIRST NAME & LAST NAME:
In the User enquiry section the users can be searched by entering the first and the last name as well.
TITLE:
DATE OF BIRTH:
STATUS:
The user can be searched from status.
USER TYPE:
Admin while creating the users can define the user type. These can be types based on which they are characterized and differentiated, for example: admin, distributor, seller, seller admin etc.
PURCHASE ORDER LIMIT:

CONTACT DETAILS
Below are the fields to be filled while entering the contact details of the user which consists of Full address and details of contact number and email Id.

Address 1 *
Address 2
Address 3
Country *
State *
City *
PinCode
Phone *
Alternate Phone
Email *
Alternate Email


2.2 AUDIT LOG

With Audit Log section user can search the maintained record of all the changes made Vendor Maintenance & SKU Maintenance process groups. From here user can get the clear idea of all the time when the process of Vendor management had happened, the action associated with it whether insert or update or delete and much more.

NAVIGATION
ADMIN —> AUDIT LOGS

Below filter fields can help in narrow down the search results.

Date: Choose the date range from the drop down to narrow the search results and specify the period of which you want to analyze the record. User can choose the date as today, tomorrow, last 07 days, last month, and user can define the custom range where the specific period of 90 days can be described.

Process group: This field is used to select the process group for which the user intends to check the logs.
This is primarily divided into tow sections:
Vendor Maintenance.
&
SKU Maintenance.

Action: User can search the audit logs on the basis of action associated with it. The actions are categorized in three parts:
-Insert
-Update
-Delete

Attribute: User can select the attributes/fields for which the audit logs are required.

User: This field is used to enter the user name in case the audit logs are required in reference to some particular user ID.

ACTION BUTTON
Search: Clicking on the search button without entering any filter criterion will populate the list of all the Audit Logs based on default filter setting. User can further narrow down the search by using filter options to get any specific information.
Reset: Reset button will refresh the filter fields to default settings, i.e. to an initial state to start fresh search.
Export: To download the filtered or searched result in CSV format which is displayed in the data grid.


2.3 MANAGE API

Manage API section enables the user to manage the integrated APIs in the system and also enables the users to add new APIs. Users can manage & do the settings based upon the requirement of their business.

UTILITY
– User can Activate or deactivate any integrated API from here.
-Users can add new API from here.
– The API key along with the API owner name, addition date and expiry is mentioned on the landing page of this section.
-User can manage the setting of any API by choosing and enabling the access rights for that API along with choosing the locations for the same.

NAVIGATION
Admin — > API — > Manage API
Let’s Understand all the fields in detail:

ADD NEW: Clicking on ‘Add’ button the users will get the list of APIs available with eRetail. They can choose the API they want to integrate — > then check the check box of access rights in case the user wants to enable the access right on the API — > and then setup the location.
In Location section there will be all the unmapped locations getting displayed w.r.t. to that API, user will choose the unmapped API and then map them.
API Key: On the Manage API section’s landing page user will see all the integrated API’s along with their API keys. An API key is the code passed to call the API and to identify the calling program or website.
API Owner: Name of the API owner will be displayed here.
Created Date & Expiry Date: API creation and expiry date.
Status: User can see the status of API from here, whether the API is active or not.
Settings: With settings, user can edit or change the access rights and can manager and change the mapped and unmapped locations. In Location section there will be all the unmapped locations getting displayed w.r.t. to that API, user will choose the unmapped API and then map them.

2.4 ORDER IMPORTS

Order Imports enable the user to import the data in bulk for Order cretion, order updation, POS orders and much more.
User will simply have to download the template, fill in the details and then upload the file.

This Screen also displays the success and Failure of the records imported.

Vin eRetail : Master Data Setup

MASTER DATA SETUP

  1. MASTER DATA SETUP OVERVIEW

Use the Master data setup to configure your Masters related to trading partners, SKU management, creating pricing events, promotion management and configuring the tax setup based on which the future transactions will run.

UTILITY:

  • Master Data setup is the initial configuration process where all the primary setup steps are performed on the basis of which the transactions will take place.
  • Although it is an initial setup, the user can update this time to time as per updates & business requirements.

    Configuration Section Listing and Description

2.1 TRADING PARTNERS

Overview
Trading partners enables user to setup the vendors, transporters and other parties which we would be requiring further for multiple transactions in system.
Trading Partners Sections & Utility

  • Enables you to create and edit/update new vendors, transporters, Customers and Clients.
  • Also lets you to search and enquire for the already existing vendors, transporters, Customers


2.1.1 VENDOR ENQUIRY

Utility

  • Use enquiry screen to search for any vendor created in the system in past.
  • Vendor information is mandatory while creating Purchase Order from single location or back order
  • Vendor can be selected directly to create an RTV (Return to Vendor) in system without any dependency on PO
  • User can export vendor details in CSV format for the searched or filtered records using download option.

Fields on the basis of which the Vendors can be searched:

1. Vendor Code: Vendor Code is the unique code provided by the system to each vendor and helps differentiating 2 or more records. Once Vendor is saved, vendor code becomes un-editable.
2. Vendor Name: User given name to the Vendor with which he is registering in the system.
Vendor Names can be identical and hence we require the vendor codes to differentiate.
3. Credit Days: This is the number of days or time limit each vendor provides to the company to pay off the his/her dues. This may differ from vendor to vendor depending upon the individual contract.
4. Country – State – City: These three fields explain the location from where the vendor belongs to.
5. Status: All vendors currently active in system are in ‘Confirmed’ Status. When a new vendor record is saved in system, the status is updated as ‘pending confirmation’. A vendor in ‘Deactivated’ status can no longer be used for any transactions.

ACTION BUTTONS:

1. Search: Clicking on the search button without entering any filter criterion will populate the list of all the vendors based on default filter setting. User can further narrow down the search by using filter options to get any specific information.
2. Reset: Reset button will refresh the filter fields to default settings, i.e. to an initial state to start fresh search.
3. Download:
To download the filtered or searched result in CSV format which is displayed in the data grid.
4. Add New: To add a new vendor to the database.

RELATED LINKS

  • Purchase Order
  • RTV (Return To Vendor)

2.1.2 ADD/ UPDATE NEW VENDOR
To create a new vendor or to edit/update an existing vendor

Utility

  • If Vendor is a drop ship vendor then that vendor will be the seller in Marketplace.
  • For outright purchase scenario, vendor should be created as outright purchase type.
  • Vendor can directly be selected to make an inbound against any item received in the warehouse
  • Select a vendor to update all information related to GRN and Invoice on the Manage Vendor Invoice screen.

RELATED LINKS

  • Seller Panel
  • Invoice Creation & enquiry
  • Direct Inbound
  • GRN

Navigation:
Masters —-> Trading Partners —- > Vendor enquiry —> Add New.

On the Vendor Create/Edit screen, below tabs are present to capture all vendor related information.
1. Vendor Master
2. Address
3. User Defined Fields
4. Attached Documents
5. Terms and conditions
6. Seller Details

1. Vendor master: Here all fields with asterisk mark on them are mandatory.

Vendor Code*: Vendor Code is the unique code provided by the system to each vendor and helps differentiating 2 or more records. Once Vendor is saved, vendor code becomes un-editable.
Vendor Name*: User given name to the Vendor with which he is registering in the system.
Vendor Names can be identical and hence we require the vendor codes to differentiate.
CST Regi. No.:  to capture Vendor’s Central Sales Tax registration number. This is not a mandatory field
VAT Regi. No.: to capture Vendor’s Value added Tax registration number. This is not a mandatory field
Credit Days:  This is the number of days or time limit each vendor provides to the company to pay off the his/her dues
Tax Zone*: State/city/county under which a particular vendor is registered becomes the tax zone for that vendor.
Status: When a new vendor ‘is created’ the status of that vendor is created. All those vendors currently active in system are in ‘Confirmed’ Status. When a new vendor record is saved in system, the status is updated as ‘pending confirmation’. A vendor in ‘Deactivated’ status can no longer be used for any transactions.
Return: Select this checkbox if the vendor supports the return of products, else leave it blank.
GL Code:  GL code means the general ledger code to be entered for a vendor. It is a set of numbered accounts a business uses to keep track of its financial transactions and to prepare financial reports.
Currency Code *: This field will display the list of currency supported in the area and Vendor will have to choose his preferred currency to trade in.
GST No.:  GST no means the Goods & Service Tax Number GSTIN of the Vendor. This is assigned to every GST registered dealer for the commerce/trade happening.
Min Order Value: Minimum Order value is the amount below which the seller would not accept the order.
Vendor Type*: There are two types of vendor option a) Marketplace type and b) Outright Purchase type of vendor.

  • If Vendor is a drop ship vendor then that vendor will be the seller in Marketplace.
  • For outright purchase scenario, vendor should be created as outright purchase type.

SOR Days :  SOR is sale or return type of transaction where user defines the number of days for which he can keep SKU’s of vendor for a certain period, whatever user will be able to sell the user will pay to vendor for that, and for remaining it will be returned to the vendor.
IsCostbasedon Margin : If this is true then user can define the Margin in SKUvendorLink and MRP. Based on MRP and Margin then the system calculates the cost.
BankDetails : The Below mentioned bank account details  of vendors are required for the further transactions :

  • Bank Name
  • Account No
  • Branch Name
  • Branch Address
  • IFSC Code
  • Swift Code
  • MICR Code
  1. Address
    Shipping Address Details & Billing Address Details: Vendor’s full shipping and billing address required here in these tabs for the case of returns and other related activities.
    The fields marked with asterisk are the mandatory ones.
  • Address 1*
  • Address 2*
  • Address 3
  • Contact Person*
  • Phone*
  • Email*
  • Country*
  • State*
  • City
  • Pin Code*

3.User Defined Fields: These are the custom fields which can be used to capture any additional information as per requirement.
4. Attached Documents: Attached document section lets user to attach any important document/contract for the vendor.
5.Terms and conditions: User defines the terms and conditions for the transactions and process here for all the vendors to abide by.


2.1.3  TRANSPORTER ENQUIRY

  • This section will enable user to enquire an already existing Transporter/Shipping Partner using filter to get data as per requirement/s.
  • User can take a download/export all the Transporter related data present on Enquiry screen at any point of time.

Navigation
Masters –>Trading partners –>
Transporter Enquiry

Utility

  • Use enquiry screen to search for any transporter created in the system in past.
  • Transporter information is relevant in case of order shipping and order returns.

Fields based on which the Transporter can be searched:

  • Transporter Code
  • Transporter Name
  • Transporter Company
  • Type
  • Country-State-City
  • Status

ACTION BUTTON:

1. Search : Clicking on the search button without entering any filter criterion will populate the list of all the Transporters  based on default filter setting. User can further narrow down the search by using filter options to get any specific information.
2. Reset: Reset button will refresh the filter fields to default settings, i.e. to an initial state to start fresh search.
3. Download:
To download the filtered or searched result in CSV format which is displayed in the data grid.
4. Add New: To add a new Transporter to the database.

2.1.4  TRANSPORTER CREATE/ EDIT
To create a new Transporter or to edit/update an existing Transporter.

Utility
User can add two types of Transporter which are already API integrated in system.
Manual ones: In Manual scenario AWB Banks are uploaded to assign.

Related Links
Order Management
Return Management

Navigation:
Masters —-> Trading Partners —- > Transporter enquiry —> Add New.

On the Transporter Create/Edit screen, below tabs are present to capture all vendor related information.
1. Transporter Detail
2.UDF
3.Configure API Detail

1. TRANSPORTER DETAIL

Transporter Type*: Choose the transporter type from the drop-down list. This Transporter type will be fed in the system from the database. In case of the desired transporter is not mentioned in the dropdown list, choose others.
Transporter Code*: Transporter Code is the unique code provided by the User to each transporter and it helps differentiating 2 or more records. Once saved, vendor code becomes un-editable.
Transporter Name*: User will enter name of the Transporter.
Company Name: Company name can be name of the company for how it is known locally. It is not a mandatory field.
Max Load/day/WH: User to define the maximum limit of load that a transporter would be able to carry per day per warehouse.
Validate Service Loc: Check this option to validate the delivery pin code/location for the selected transporter in the system.
Reverse Validate Service Loc: Reverse Validate is checked to validate the pin code /location at the time of returns by the customer.
Delivery Mode: User to select the delivery mode to be used by the transporter. For example: Air or Surface.
Upload AWB series: User will check this if the transporter’s AWB entry will be manual and the AWB bank henceforth also will be imported manually.
Allow Update Tracking after ship: Check this checkbox to allow the tracking status to get update after shipping.

2.USER DEFINED FIELD (UDF)
These are the custom fields which can be created by the User for Transporters in case of any extra information required.

3.CONFIGURE API DETAIL
Here in this section user will input the Tracking API details, Manifest API details and other API details of the selected transporter. Any client dealing with a transporter gets his account specific details from that transporter. The same details are required for API integration.


2.1.5 CUSTOMER ENQUIRY

  • This section will enable user to enquire and search an already existing customers and customer details. User can refine the search further by using filters as per requirement/s.
  • User can take a download/export all the data present on Enquiry screen at any point of time

Navigation
Masters –> Trading partners –> Customer Enquiry

Utility

  • Customer information is required to create an order and while order processing.
  • Customers can be of different types for example: B2B, B2C etc.

Below are the fields on the basis of which you can search the customers:

Customer Code: Customer Code is the unique code provided by the system to each customer and helps differentiating 2 or more records. Once customer is saved, customer code becomes un-editable.
Customer Name:  User given name to the Vendor with which he is registering in the system.
Vendor Names can be identical and hence we require the vendor codes to differentiate.
External Customer Code: External Customer code is the code given in case where the customers are getting synced from a different platform.
Type:  Customer Type here in drop down will be the type of customer categories created in the database by the user. For example: B2B type, B2C, any other type etc.
Status:
User can filter based on Active and Inactive Customer status. Only the active customers with activated transactions will be displayed on selecting active as an option and vice versa.
Primary Contact & Primary Email: User will have to enter the primary contact & email id of the customer as contact detail.
Created Date: Filter the customers based on the date of creation.

ACTION BUTTONS

1.Search: Clicking on the search button without entering any filter criterion will populate the list of all the Customers based on default filter setting. User can further narrow down the search by using filter options to get any specific information.
2. Reset:Reset button will refresh the filter fields to default settings, i.e. to an initial state to start fresh search.
3. Download: To download the filtered or searched result in CSV format which is displayed in the data grid.
4. Add New: To add a new Customer to the database.

2.1.6  CUSTOMER CREATE/ EDIT

To create a new Customer or to edit/update an existing one.
It is divided into three tabs:
->Customer Details
-> Address
-> Other Shipping Address
->UDF

Navigation:
Masters —-> Trading Partners —- > Customer enquiry —-> Add New

1. Customer Details

Customer Code: Customer Code is the unique code provided by the user to each customer and helps differentiating two or more records. Once customer is saved, customer code becomes un-editable.
Customer Name*: Name of the customer could be similar with one another, that is why we have codes to differ the customers with same name.
Is Active: Check this to mark a customer as active one and vice versa.
Parent Customer: Parent customer is the primary customer who can further have the customers within itself.
Ext Customer Code: External Customer code is the code given in case where the customers are getting synced from a different platform/ or given by user.
Payment Terms: Payment terms could be the option of number of days to choose from for the payment settlement.
GL Code: GL code means the general ledger code to be entered. It is a set of numbered accounts a business uses to keep track of its financial transactions and to prepare financial reports
Tax Zone: State/city/county under which a particular vendor is registered becomes the tax zone for that Customer.
Type*: Customer Type here in drop down will be the type of customer categories created in the database by the user. For example: Marketplace type, B2B type, B2C type etc.
PAN No.: PAN number of the customer for financial recordings. For example: in India the pan card becomes mandatory for the Transactions above certain limit.
GST No.: GST no means the Goods & Service Tax Number GSTIN of the Vendor. This is for the B2B customers.
Invoice Report: Choose from the dropdown menu, the Invoice template which would be applicable for the customer.
Shipping Address Details & Billing Address Details: Customer’s full shipping and billing address required here in these tabs for the case of returns and other related activities.

The fields marked with asterisk are the mandatory ones.

  • Address 1*
  • Address 2*
  • Address 3
  • Contact Person*
  • Phone*
  • Email*
  • Country*
  • State*
  • City
  • Pin Code*

User Defined Fields: These are the custom fields which can be created by the User for customers in case of any extra information required.

2.2  SKU MANAGEMENT

Overview
SKU Management enables you to create and manage SKU, provides you the subscriber details and provides the SKU group information. Enables the user to manage merchandising hierarchy and vendor SKU catalog as well.

Create, Edit, Enquire and Import SKU

  • Enables you to create, edit/update search and enquire for SKU’s.
  • SKU can be imported from the SKU import section by using the default CSV template.

Let’s understand each section in detail:


2.2.1 SKU CREATE/ EDIT
This section will enable user to add new items into the system

Utility

  • SKU is classified in four major categories: Normal, Bundled, Style (and Variant) and Prepack.
  • The Stock for an SKU after the PO or inbound can be adjusted from the WMSà Inventory section.
  • SKU’s once created and allotted to a specific bin can be changed afterwards from the SKU Lot Transfer
  • To create the PO for vendor, user will be required to add the SKU in it.

RELATED LINKS
SKU Classification
WMS
Inventory Section
SKU Lot Transfer
Purchase Order

On the SKU Create/Edit screen, below tabs are present to capture all vendor related information.

  1. SKU DETAIL

It is further divided into four sections.

-> Product Detail
-> Pricing Detail
-> Dimension Detail
-> SKU Image

SKU DETAIL section will consist of all the primary information related to the SKU.
SKU Code: Any unique code which a user gives to the SKU while creating it. This SKU code is a mandatory field and once created and saved cannot be changed and must be a unique number.
SKU Name & SKU Short Name: Enter the SKU name & Short name.
SKU Classification: SKU type out of the four types will be defined here initially when you click on create SKU button.
SKU Source: To mention the source of SKU here by selecting from the drop down whether it is a consignment product or an outright purchase.
Attribute Set-Size Group-Size-Color-Material: All these fields input values which appear in drop down are created & configured by user from the Other Masters of the Master section.
Primary UPC/EAN: UPC (Universal Product Code) or EAN (European Product Code) are the bar code for the SKU which will be entered here. Multiple barcodes can be supported by the single SKU.
Base UOM:  UOM is the Unit of Measurement in which the SKU will be measured or weighed which is used in advanced Shipment Notice, Invoice, Purchase Order documents etc.
Pack Size: Pack size again is the field which is configured from the Other masters by the User defining the size of the SKU.
Hierarchy Code: Hierarchy code helps user to configure merchandising hierarchy for SKU from the list as they could be the sub category or sub-sub category of the SKU.
Primary Vendor: Every SKU in system is linked to a Primary vendor which is a mandatory field. There can be multiple other secondary vendors also linked to the same SKU.
Is Approved:  Mention the status of the Vendor.
Country of Origin: Enter the country of origin of SKU by choosing from the down.

PRICING DETAIL

In this section below given pricing related details of the SKU will be entered.

  • MSRP/MRP
  • Sale Price
  • Base Cost
  • Std Margin %
  • Tax Category
  • SKU Level Tax

DIMENSION DETAIL
All the below given dimension criterion will be filled in w.r.t. to each SKU as this information is further required for the Shipping purposes.

Height (CM)
Length (CM)
Width (CM)
Cube
Weight (KG)

SKU IMAGE
Image URL
Product Page URL

2. USER DEFINED FIELD 

These are the custom fields which can be created by the User for SKU in case of any extra information required.

3. OTHER DETAIL
Other Detail section is further divided into two sections:

Detail 1: This section requires the user to input all the details of the product related to its shelf life and nature of the product w.r.t. shelf life. Below are the list of fields which needs to be filled or checked by the user in detail-1 section.

  • Shelf Life
  • Shelf Life Type
  • Total Shelf Life
  • Shelf Life on Receiving
  • Shelf Life on Picking
  • Serial Tracking
  • Stackable
  • Hazardous
  • Poisonous
  • Is Purchasable
  • Is Saleable
  • Is Stocked

– Detail 2: This section requires the user to input all the details of the product related to the SKU rotation and validation. Below is the list of fields which needs to be filled or checked by the user in detail-1 section.

  • Lottable Validation
  • SKU Rotation
  • Rotate By
  • Validation Code
  • Picking Instructions
  • Shipping Instructions
  • Threshold Alert Required
  • Threshold Qty
  • Fulfillment Type
  • Shipping Charges
  • Handling Charges
  • Def Source WH
  • Is Unique barcode

4. CASE PACK
Case packs are the packs where normal SKU is accumulated to be sold in one or more copies.Below are the list of fields which are required to be filled by user to enable case packs.

  • UOM
  • Barcode
  • Case Size
  • Is Purchasable
  • Is Saleable
  • Sale Price


    5. ARS DETAIL

    ARS is Auto Replenishment System is used for automatic purchase order creation and auto-delivery of products directly. Hence forth in this tab you will be required to check the ARS required in case it is required and then mention the ARS method and stock details.
    Below are the list of fields which needs to be filled or checked by the user in ARS Detail section.
  • Is ARS Applicable? If User check this, the ARS will hold true. Which means that the stock will be automatically replenished based on stock setting and PO for the same will be raised automatically.
  • Follow StyleUser will check this in case user requires the ARS to hold true for the style product.
  • Last ARS Run DateThis shows the last time when the Auto replenishment process was implemented.
  • ARS Calculation MethodThere are two methods based on which the ARS is calculated.
    If you choose FIXED from the drop down then you will enter the fixed stock value and when the stock will reach that value then a PO will automatically be generated for those SKU replenishments. & If user chooses FROM HISTORY from the drop-down option then based on sale’s history the system will automatically determine critical stock levels and raise a PO for model stock quantity.
  • Fixed Stock: Fixed Stock is the stock that user enters and reaching that value the ARS process runs.


2.2.2 SKU ENQUIRY

  • This section will enable user to enquire and search an already existing SKU’s & its details.
  • User can refine the search further by using filters as per requirement/s.
  • User can take a download/export all the data present on Enquiry screen at any point of time

Navigation
Masters –> SKU Management –> SKU Enquiry

Utility

  • Use enquiry screen to search for any SKU created in the system in past.
  • SKU information is mandatory while creating Purchase Order from single location or back order
  • SKU can be selected directly to create an RTV (Return to Vendor) in system.
  • User can export SKU details in CSV format for the searched or filtered records using download option.
  • Further improved enquiry results with Advance search option.

Related Link

-> Purchase Order
-> RTV
-> Advance Search

ACTION BUTTON

1.Search: Clicking on the search button without entering any filter criterion will populate the list of all the Transporters based on default filter setting. User can further narrow down the search by using filter options to get any specific information.
2. Reset: Reset button will refresh the filter fields to default settings, i.e. to an initial state to start fresh search.
3. Download: To download the filtered or searched result in CSV format which is displayed in the data grid.
4. Add New: To add a new SKU to the database.
5. Advance Search: Advance search further improves the search results of Transporter by providing more fields to filter from. Below fields get added for the advance search option of the Transporter.

  • Site Location
  • Approved Status
  • Vendor Type
  • SKU Source


2.2.3 SKU IMPORT

User can import the Bulk SKU from the SKU Import section by using the template CSV given in the import section.
Note: Max 500 rows can be imported in one single attempt of Import.

NAVIGATION
Masters —>
SKU Management —> SKU Import.

The SKU Import Section consists of two sections:
IMPORT
&
DOWNLOAD

-> IMPORT
Import section will let the user to import the SKU’s Bulk via CSV.
Import Type: User will define here the type of Import of the CSV for SKU by choosing the purpose of import. To choose any one option from the 03 options given:

Create Update       -> If it is a Create or update SKU import
Cost Price Update -> If the Import is to update the price of the BULK SKU’s.
BOM Link Update -> If the Import is for Bundled SKU.

Attribute Set *:  User will select the attribute set for SKU import from here.  The SKU imported from here will be assigned to the selected attribute.
Upload Template: From here the CSV will be uploaded for the SKU Import.

DOWNLOAD
Download SKU section will let you download the uploaded CSV’s of SKU import by first searching them on the basis of file name, file upload date, status of upload and other similar criterion.

2.2.4 SKU CLASSIFICATION

Overview
SKU’s are classified majorly in 4 genre. Each type of SKU has its own purpose and feature.
Let us understand all four in detail.

NAVIGATION
Masters —> SKU Management —>SKU Create/edit —> SKU Classification from the Dropdown.

-> Normal SKU: Normal SKU’s are general physical SKU’s added by the user. It does not have any other attribute and classified feature added to it.
-> Style SKU: Style SKU let the user to create the attributes based on styles (fed by user at backend) for the SKU. This Style SKU eases the process of creation of attributes for any SKU.
For example:  Colour & Size as styles.
-> BOM SKU: BOM SKU also known as Bundled SKU are those in which different already created SKU’s are bundled up together as one SKU for the sale.
For example: 01 Blue Pen is an SKU on its own, A ruler is another SKU, 01 Pencil is another SKU, and a pencil box is also an SKU. All these four SKU’s are individual SKU.

Now user will create the BOM product named Stationary 101 which will consist of all these four SKU’s mentioned above.

Prepack SKU: Prepack type of SKU are the ones where Individual SKU’s are prepacked together as any offer by the manufacturer to be sold. They cannot be sold separately.
For example : At times you may encounter the pre pack products like a Tomato Ketchup and a pasta pack, separate SKU but packed together as any offer .

2.2.5 SKU BARCODE


Overview

Enables the User to enter /upload the list of barcodes to be assigned to the SKU’s.
These Barcodes provide a method to track and store information about SKUs from individual items to large stocks of millions in Warehousing and Order management.

Utility

  • Barcodes helps in returns at the time of RTV’s.
  • SKU Barcode provide the method to track and store information of innumerable SKU’s.
  • Helps the user to manage each unit of product in there efficiently.
  • Keep Track of the orders, Shipments and Inbounds.

NAVIGATION
Masters –> SKU Management –> SKU Barcode.

It can be Uploaded one by one and also can be Bulk imported in the system.
1. SKU Barcode Create /Edit
2. SKU Barcode Import

Let’s Understand this in detail.

  1. SKU BARCODE CREATE/ EDIT
    This section will enable you to enquire and search an already existing Barcodes and their detail. User can refine the search further by using filters as per requirement/s.
    User can take a download/export all the data present on Enquiry screen at any point of time.
    Below are the fields based on which the barcodes can be searched.
    SKU Code
    SKU Name
    SKU Barcode
    UOM
    Barcode Type
    Status
    ACTION BUTTON
    1. Search:
    Clicking on the search button without entering any filter criterion will populate the list of all the barcodes based on default filter setting. User can further narrow down the search by using filter options to get any specific information.
    2. Reset: Reset button will refresh the filter fields to default settings, i.e. to an initial state to start fresh search.
    3. Download:
    To download the filtered or searched result in CSV format which is displayed in the data grid.
    4. Add New: To add a new barcode to the database.

    2. SKU Barcode Import
    User can import the barcodes from this section in bulk by uploading the CSV.
    This CSV must be in the format of default template given here.

2.2.6 MANAGE ATTRIBUTE
Overview
Manage attribute enables the user to create and manage the attributes already created. These Attributes are related to the product/SKU being created in the system.

  • NAVIGATION
    Masters –> SKU Management –> Manage Attribute

    Clicking on Manage attribute, user will be landed on to the attribute enquiry page where all the already created attributes will get listed and can be filtered from the same screen as well.

    ACTION BUTTONS

    1. Search: Clicking on the search button without entering any filter criterion will populate the list of all the Attributes created so far based on default filter setting. User can further narrow down the search by using filter options to get any specific information.
    2. Reset: Reset button will refresh the filter fields to default settings, i.e. to an initial state to start fresh search.
    3. Add New: To add a new attribute to the system.
    Add New Attribute section is divided three Parts
    Attributes


    Attribute Code*:
    Attribute code is the system generated unique code for the attribute created.
    Description*: User will have to enter the attribute description describing the attribute that the user is creating.
    Label*: User will enter the label for this attribute here in this field.
    Scope*: In the scope section User will have to enter the type like Company/Seller Panel / enterprise and so on.
    Input Type*: User can choose the Input type from here for the attribute, whether it will be a free text or a drop down etc.
    Input Validation Rule*: Choose the rule to be either Alphanumeric or Numeric or email/ decimal/ integer etc.
    Applicable SKU : User can define that on which SKU will this be applicable on. The SKU category needs to be selected here. for example: Free/ Normal/ Style/ Variant/ Bundeled/ PrePack/BOM
    isActive: Check this to activate.
    Update Variant: User will check this option to update the Variant.
    Push To Magento: To push this attribute to magento, check this option.

    Data Values

    This section will enable the user to enter the below information and rule:
    -Attribute Value Description
    -Position
    -Default or Not
    -External Attribute Value
    -External Attribute Value Code

    User Defined Fields
    These are the custom fields which can be created by the User for these attributes in case of any extra information required to be stored.

    2.3 Promotion Management

2.3.1 Overview
Promotion management enables user to setup, create and manage the promotional offers/discounts on the transactions.

It is further divided into two parts:  Sales Promotion Enquiry & Vendor Promotion Enquiry.

2.3.2 Utility

  • Enables you to create, enquire and edit/update the promotional offers/discounts on the transactions.
  • The discount offers can be created by the user for the sales promotion as well as for the vendor promotion also.

NAVIGATION
Masters –> Promotion Management –> Promotion Enquiry


SALES PROMOTION ENQUIRY

User can search the already created sales promotions offers from this section.
Below are the fields based on which the promotional offers can be searched.

Location       
Promo Key
Description
Status
Created Date
Active Date
Promo Type

VENDOR PROMOTION ENQUIRY

User can search the already created discounts for vendor promotion from here.
In vendor promotion enquiry tab, the vendor name field gets added along with all the other search fields of sales promotion enquiry.

ACTION BUTTON

1. Search:
Clicking on the search button without entering any filter criterion will populate the list of all the promotion codes created so far based on default filter setting. User can further narrow down the search by using filter options to get any specific information.
2. Reset: Reset button will refresh the filter fields to default settings, i.e. to an initial state to start fresh search.
3. Add New: To add a new promotional code to the system.

PROMOTION CREATE/EDIT

From this section user will create the promotions.
User will be filling in all the basic fields and then proceed further to create the promotion.


Description:
User will have to describe or Name the Promotion they are trying to create.
Promo Type*
:  User can select from below promotion types.
Line Item Wise: promo will be applicable on the line item and not on the entire bill.
Bill Buster Type: Through this, user can give free items or bonus buy.
Start Date* & End Date*: Enter the Promotion start and end date.
Link to All (Checkbox): If selected, this promotion will be linked and applicable on all POS locations.
***Note: If any new location is added post the promotion has been created, then by default the promotion won’t be applicable for that new stores.

Line Item Wise and Bill Buster type in detail.

a) LINE ITEM (PROMO TYPE)
When the line item is chosen as the promo type this means that the promo will be applicable on the line item and not on the entire bill.

This is divided into 5 tabs
-Add buy & get lines
-Add Tiers
-Add Exclusion
-Day & Time
-Add Exclusion

ADD BUY & GET LINES

Line Type *: This field is by default set as GET.
Condition Type *: There are various type of conditions and combination of conditions based on which the promotion can be applied.
(a)Category wise selecting this, the user will be able to apply the line wise promotion onto specific category/categories.
(b)Product wise selection will enable the user to apply the promotion on product(s).
(c) SKU Group : Select this type to apply the promotion based on SKU Group.
(d)Brand : Select this type to apply the promotion brand wise.
Condition *        :  On the basis of the Condition type chosen, this condition will get defined. For example, if the condition type is selected as category wise, then in the condition field user will choose the category.
Qty*: Quantity by default will be 01.
Promotion Type *: User will choose from the promotion type drop down that whether the promotion will be an absolute value OR in Percentage Or a Fixed value.
Absolute Value A value will be defined as the promotion to be applied on sales price & that value will be absolute to be deducted from the price of the product irrespective of its sales price.
E.g. If Promotion Value is 5, then final selling price will be promotioned by Rs. 5.00
Percentage: a defined percentage will be deducted in this case from the product’s value/price.
E.g. If Promotion Value is 5, then final selling price will be increased by 5 %
Fixed Value: No matter what the price of the product is, it will be sold on the Fixed value defined here.
E.g. If Promotion Value is 5, then final selling price will be Rs. 5.00     

Promotion Value *: Subsequently enter the promotion value w.r.t. to the promotion type chosen.

ADD TIERS
This section will enable the user to add the ranges on the basis of which the promotion can be applied.
This tab is not applicable in Line type promotion .

ADD EXCLUSION
If User wants to exclude any product or category from the category or Brand Chosen, then user can specify the same here by selecting the condition type and then mentioning the condition with respect to the condition type selected.
For example : if in the condition type you have chosen the condition as product to be excluded then in the condition you will select the SKU on which the Promotion will not be applied.

DAY & TIME
In this section all the seven days of weeks with a checkbox in front of them and a timer below them will be displayed.
User will have to select the days and specify the time [start and end time] duration for each day to run the promotion

ADD LOCATION
Choose the store location and click on add button to add the locations on which you want this promotion to be applicable specifically. If user doesn’t wish to run promotions on All locations, then choose the specific locations where promotions should apply.
**Click on save and confirm to confirm the configuration made for the promotions.


BILL BUSTER (PROMO TYPE)
Bill Buster Promo type enables user to Create promotions to  give free items or bonus buy

This is majorly divided into 5 parts or 5 tabs
-Add buy & get lines
-Add Tiers
-Add Exclusion
-Day & Time
-Add Location
From the above 05 tabs;  ‘Add Exclusion’ , ‘Day & Time’ , ‘Add Location’ will be same as LINE ITEM type.

ADD BUY & GET LINES
Line Type *: This field is by default set as BUY.
Condition Type * : By default there are type of conditions based on which the promotion will be applied.
(a)Category wise selecting this, the user will be able to apply the line wise promotion onto specific category/categories.
(b)Product wise selection will enable the user to apply the promotion on product(s).
(c) SKU Group : Select this type to apply the promotion based on SKU Group.
(d)Brand : Select this type to apply the promotion brand wise.

Condition *      :  On the basis of the Condition type chosen, this condition will get defined. For example, if the condition type is selected as category wise, then in the condition field user will choose the category.

ADD TIERS
This section will enable the user to add the ranges based on which the promotion can be applied.
User will enter the ‘from’ and ‘to amount’ and choose the ‘promotion type’ and ‘promotion value’.
From Amount
To Amount
Promotion Type *
Promotion Value *

For example:
User want Category A to have range of promotions.
So user will add the tiers and ranges based on product prices and then choosing the promotion on them. Few range as an example:

0 MRP – 1000 MRP – Promotion type PERCENTAGE  Promotion Value 5%
1001 MRP – 10000 MRP –> Promotion Type PERCENTAGE –> Promotion Value 10%
10001 MRP – 20001 MRP –> Promotion Type PERCENTAGE –> Promotion Value 12%

**Click on save and confirm to confirm the configuration made for the promotions.


2.4  Vendor Promotion Management

2.4.1 Overview
Vendor promotion management lets user to manage the promotional offers and discounts given or extended by the Vendor on the SKU’s or product categories.

2.4.2 Utility
Enables user enquire and edit/update the promotional offers/discounts on the transactions which are provided or extended by the Vendor.
These Promotional offers or discount can be on a particular SKU or any category or sub category or any brand.
Vendor Promotion management is further elaborated in two parts:

–> Vendor Promotion Enquiry
–> Vendor Promotion Create/Edit

2.4.3 Vendor Promotion Enquiry
Vendor Promotion enquiry section will enable the user to search for the already created Vendor promotion codes.

NAVIGATION
Masters –> Vendor Promotion Management –> Enquiry

Let’s understand the below search fields in detail based on which these can be searched.

Delivery Location: The delivery location only for which the user requires to search the promotional offer needs to be selected from this location drop down.
Promotion Code & Name: Enquire with promotion code or name for the desired promotion code result.
Start Date & End Date: User can also enter the start and end date to search the related significant records.
Promo Type: User can search the promotional code or record by choosing the promo type as well. These Promo types are the type of SKU on which the promotion is applicable.
for example: line item promo type.
Vendor Code:  the entering the vendor code all the promotions extended by that vendor will get listed.

ACTION BUTTON

1. Search:
Clicking on the search button without entering any filter criterion will populate the list of all the vendor’s promotion based on default filter setting. User can further narrow down the search by using filter options to get any specific information.
2. Reset: Reset button will refresh the filter fields to default settings, i.e. to an initial state to start fresh search.
3. Download:
To download the filtered or searched result in CSV format which is displayed in the data grid.
4. Add New: To add a new Promotional code to the database.

2.4.4 Vendor Promotion Create/Edit
From here the user will create/edit the vendor promotion.

NAVIGATION
Masters –> Vendor Promotion Management –> Vendor Promotion Create/Edit

Let us understand each field with which the vendor promotion will be created.

Vendor Code*:  Enter the Vendor code for that vendor who is extending the promotional offers for the items.
Vendor Name & Vendor Currency:  Enter the Vendor name and vendor supported currency.
Promo Code*:  Enter the Unique Promo Code for the promotion. This is a mandatory field.
Promo Name*:  Name of the Promotion extended by the vendor.
Promo Type*:  Mention the type of the discount. For example: whether it will be applicable on the Line item or it will be applicable on the total cart value etc. This is a mandatory field.
Start Date* & End Date*: Enter the Promotion start and end date.
Condition On*:  Mention the clauses or conditions on which the vendor Promo will applicable. For example: Applicable on SKU/Category/Brand/Subcategory.
Merch. Hierarchy: Select the category from here on which the vendor promotion will be applicable.
SKU Qty*: Enter the SKU Quantity valid for promotion.
Discount Type & Discount Value: User will choose from the discount type drop down that whether the discount will be an absolute value OR in Percentage or a Fixed value and then subsequently entre the discount value w.r.t. to the discount type chosen.
Free SKU & Free Qty: User will enter the name of Free SKU and free Qty.

2.5 Other Masters

2.5.1 Overview
Other masters section enables user to set up all the primary configuration’s which will be populating options on eRetail panel for the user and seller to choose from.

2.5.2 Utility 

  • User can subscribe or unsubscribe the HSN codes for GST from other masters section.
  • The inputs of various fields while SKU creation or Vendor creation are fed from other masters section.

Navigation
Masters –> Other Masters
Subscribe HSN Code:  From this section of the masters, user will be subscribing or unsubscribing the HSN codes for the GST calculations.
Brands-Materials-Size Group-Size-color: User will feed these fields from here which will subsequently be getting used while creating SKU’s, Vendors etc.
Reasons: User will enter the reasons of rejections or returns from here which will get populated in the drop down as options to choose from.
Payment Terms: User will define the payment terms for vendors from here will get populated at the time of vendor creation and other processes.
Excise Category:  User can create the excise category from here and can set its status as active or inactive.
SKU Pack Size : User can set the options here for the pack size of SKU packs. Which means options to choose the number of SKU’s in a SKU pack.

2.6 Currency

2.6.1 Overview
Currency section enables user to feed up all the currency which will be populating options on eRetail panel for the user and seller to choose from.

2.6.2 Utility 

  • User can add, manage activate or deactivate the currency options getting displayed on eRetail from here.
  • The User can add the ISO codes for each country’s currency as well.
  • There currency created here gets displayed as a drop down.

Navigation
Masters –> Currency

2.6.3   Adding Currency

  • The ‘add new’ button of the currency masters will enable the user to add new currency record in the system.User will fill in the Country’s ISO code, description, symbol and the status of the entered currency as active or inactive.**********************************************************************************************


2.7 Pricing Events
Pricing event section enables the user to create the pricing events based on customer type and location for regular and occasions basis.
The user can start and end the event based on the dates entered.
Lets understand it in more detail:

Navigation
Masters –> Miscellaneous –> Pricing Event

Pricing Events is the section where user decides the promotional offers and discounts to be given or extended on the SKU’s or product categories.

2.7.1 Utility

  • Enables user enquire and edit/update the promotional offers/discounts on the transactions which are provided or extended by the user itself.
  • These Promotional offers or discount can be on a particular SKU or any category or sub category or any brand.

Pricing Events is further elaborated in two parts:

–> Pricing Event Enquiry
–> Pricing Event Create/Edit

2.7.2 Pricing Event Enquiry
This section enables the user to enquire and search for the pricing events already created based on the filters like:

Pricing Scheme Code: System generated Unique identification code for each scheme getting created.
Pricing Scheme Name: Pricing scheme name to be entered by the user.
Location Code : Location code for which this particular pricing event will be applicable.
Customer : Enter the customer name in case this is created only for a specific customer.
Start Date: Pricing event start date refers to the date from which it will be applicable.
End Date: Pricing event end date refers to the date up till which it will be applicable.
Pricing Scheme: Here user can choose the type of pricing event, whether it will be temporary or regular.
Status: This section shows the status of the scheme, that which particular scheme has what status (Confirmed/cancelled/pending confirmation)

ACTION BUTTON

1.Search: Clicking on the search button without entering any filter criterion will populate the list of all the pricing events created in the system based on default filter setting. User can further narrow down the search by using filter options to get any specific information.
2. Reset: Reset button will refresh the filter fields to default settings, i.e. to an initial state to start fresh search.
3. Download: To download the filtered or searched result in CSV format which is displayed in the data grid.
4. Add New: To add a new pricing event to the database.
5Advance Search: Advance search further improves the search results of pricing event by providing more fields to filter from. Below fields get added for the advance search option of the pricing event.
Organisation Hierarchy
Vendor
Brand
Merch. Hierarchy
SKU Code
Scheme On
Operation
Discount Type

2.7.3 Add New
By clicking on add new button, we will be able to create the new pricing events.

Utility

  • Enables user to choose the location for which the promotional offers/discounts being set up. The pricing event will be applicable only for selected Location/warehouse’s SKU.
  • These Promotional offers or discount can be on a particular SKU or any category or sub category or any brand.
  • User can choose the Customer type and can also add specific customers to the pricing event.

This is majorly divided into 03 sections:
->Pricing Events
->Customer Details
->Location Details


Pricing Event
Pricing Event Code: System generated Unique identification code for each scheme getting created. 
Pricing Event Desc*: Pricing scheme name to be entered by the user.
Pricing Event Type: Here user can choose the type of pricing event, whether it will be temporary or regular.
Temporary:
In the temporary pricing event there will be the start and end date effective and during that period only this event will be applicable.
Regular: In the Regular pricing events created, there will not be any end date.
Status: This section shows the status of the scheme, that which particular scheme has what status (Confirmed/cancelled/pending confirmation)

*Customer Details
Customer Type: Enter the customer type in case this is created only for a specific customer customer like B2B, B2C and so on.

*Location Details
Location : Enter/choose the location or the warehouse location for which warehouse this will be applicable from the drop down.
Then click on NEXT button to proceed further to fill in the SKU details and UDF/s.

FOR SUPPORT
Feel free to contact us for all your queries at  +91-7838130820.

Vin eRetail : Procurement

Procurement Management

1. Procurement overview:

Procurement is the process of obtaining goods that the company needs to fulfill its business model. Vin eRetail system supports end-to-end procurement process through category buyers setup, PO/ASN Management, and vendor invoice.

Utility of Procurement Module:

  • It helps user to create PO for any location from a single screen
  • Enables implementing Just-In-Time functionality in the procurement process by creating PO from Back Orders.
  • Advanced Shipping Note (ASN) is a notification of pending deliveries. Users will be able to inbound against the ASN in their Warehouse.

Related links:

  • SKU Management
  • Vendor Management
  • Merchandise Hierarchy
  • Types of Inbound

2. Configuring Category Buyers:


2.1 Category buyers overview
Category buyers are speciality buyers who are authorized in eRetail to buy items belonging to one or multiple categories.

2.2 Category Buyers enquiry screen
Using this screen, one will be able to view existing category buyers and edit/update the same.

Utility

  • When the user creates a procurement PO, category buyer code is a mandatory field. If category buyer is not authorized to raise PO for any specific category (i.e category buyer not mapped to a particular category), then system will throw an error message.
  • The Category buyer enquiry screen displays all buyers created in past and the SKU categories they are mapped to. Use advance search option to further filter records as per user’s specific needs.

Navigation:

Procurement –> Category Buyers

Fields on the basis of which the buyers can be searched:

1. Buyer Name: User gives name to the buyer with which he is registering in the system.
Buyer Names can be identical and hence we require the buyer codes to differentiate.
2. Buyer Description: This is the description provided with respect to buyer during adding any new buyer.
3. Phone, Email: These two fields explain contact details of the buyer and by which user can find the details on required buyer.
4. Status: A category Buyer in ‘Active’ status can be added to any new PO, while an ‘Inactive’ buyer is not accepted by the system.
5. Edit Option: To modify details of any existing category buyer in system

Action buttons:

  1. Search: Clicking on the search button without entering any filter criterion will populate the list of all the vendors based on default filter setting. User can further narrow down the search by using filter options to get an specific information.
  2. Advanced Search: This button narrows the search results by adding more search criteria such as Alternate Phone and category.
  3. Reset: Reset button will refresh the filter fields to default settings, i.e. to an initial state to start a fresh search.
  4. Add New: To add a new buyer click on the add new button
  5. Audit (i): This button, gives detailed log of username who has created or modified the data and the timestamp

 2.3 Add new Category Buyers
Using this screen, a new category buyer can be added to the existing list.

Navigation
Procurement –> Category Buyers –> Add New

Fields on the basis of which a new Category buyer can be added

  1. Buyer Code: This is a system generated unique code which gets auto-generated when a new buyer is created.
  2. Buyer Name: Enter the name of person who is responsible for a particular category
  3. Buyer Description, Email, Phone, Alternate Phone: Enter as per user’s requirement
  4. Active: Select this checkbox to activate a buyer. By unchecking the check box, a buyer can be made inactive and hence can’t be added to any PO.
  5. Category: Select one or multiple categories from the dropdown to give rights to the category buyer to raise a PO against that category
  6. User Defined Fields for a category buyer can be added by clicking User Defined Fields

    Action Buttons:
  7. Save: Saves all details entered for a new category buyer created by user.
  8. Close: This option closes the existing window without saving any information.

3. PO Management

PO Management Overview
Purchase Order functionality in procurement module lets user to view existing procurement POs and create new procurement PO.

Utility

  • See all the existing procurement POs in enquiry screen
  • Create a new PO from a single location or using back orders
  • The PO would be needed while processing inbound w.r.t. PO
  • A PO can be raised against all the items linked to a particular vendor only

Related links:

  • SKU Management
  • Vendor Management
  • Merchandise Hierarchy
  • Types of Inbound
  • SKU vendor catalog
  • Category buyer
  • Receiving validation


3.1 PO Enquiry
Using this screen, one will be able to view existing POs and edit/update the same.

Utility

  • User can see all the POs and even narrow down results by putting values in search option as well as advance search options
  • User will be able to download results in a report format using Detail Export/ Download option
  • Lets user to create a new PO using Add New option

Navigation
Procurement –> PO Enquiry

Fields on the basis of which the POs can be searched:

PO Code: This is a system generated unique code which gets autogenerated when a new PO is created.
PO Date: User can see POs with respect to dates by filling this field.
Vendor: Helps to search all existing POs for that particular vendor.
PO type: If a user wants to see POs of a certain type, then he/she can use this field.
Status: User may narrow search using status of POs.
Delivery Location: User may filter POs based on delivery location.

Action Buttons:

  • Search: Clicking on the search button without entering any filter criterion will populate the list of all the POs based on default filter setting. User can further narrow down the search by using filter options to get a specific information.
  • Advanced Search: This button narrows the search results by adding more search criteria such as sku code, buyer code etc.
  • Reset: Reset button will refresh the filter fields to default settings, i.e. to an initial state to start a fresh search.
  • Download/ Detail Export: When user presses this button, user will be directed to Pending Report screen where user will be able to download report in the form of .csv file
  • Print: This button enables user to print PO copy either specific to vendor or internal to user’s firm
  • Add New: To create a new PO click on the add new button


3.2 PO Creation
PO creation lets user to create new procurement PO from single location or from back orders.
3.2.1- PO for a single location
Using this screen, user will be able to create PO for a single warehouse.
Navigation:
Procurement–> 
PO Create/ Edit –> Single Location

Below are the various tabs in Purchase Order screen, which may needs to be filled for creating a PO:

  1. Purchase Order
  2. User Defined Fields
  3. Terms and conditions
  4. Comment History
  5. PO Tags
  6. Import
  7. Purchase Order

Different fields in this tab are detailed below:

  • Vendor Code: User must fill the vendor code of the vendor against whom this PO is created. Beside this field there is a button which lets user to select vendor from a list of vendors
  • Delivery Location: User needs to select a particular delivery location where the items will be procured.
  • Buyer code: Here user needs to choose a buyer code who has access to create PO for a particular category.
  • Recv Valid Code: Using this option user can set quantity validation for receiving items in the location. System will allow you to inbound only a particular amount of quantity as per validation code.
  • External PO No: This may be a reference PO number which can be put in eRetail for reference.
  • Reference No: Any external number related to a PO can be populated in this field.
  • Notes: Any additional information which is relevant to a PO can be captured in this field.
  • Delivery Date: Here user may mention expected delivery date of the PO.
  • Status: This field shows the current status of PO throughout the processing cycle.
  • When a new PO is saved status of the PO becomes Pending Confirmation.
  • When the confirm button is clicked, PO status changes
  • Once PO becomes Confirmed, user will be able to change the status of PO to released by pressing Released button. Once the PO is in released status, you can modify the PO by choosing Reopen option. Upon doing this PO status changes to ReOpen.
  • Upon confirming the status of the reopened PO, the status of the PO changes to ReConfirmed.
  • User will be able to Close the PO upon pressing the option Close. After PO becomes, user will not able to modify any data related to the PO.
  • User may cancel the PO by pressing Cancel. This changes the status of PO to Cancelled. Cancelling PO is possible when the PO is in released status.
  • Add SKU: This button enables user to add SKUs which will be procured from the vendor mentioned in the PO. User needs to mention how many units he/she is going to order in UOM Qty field and press Add SKU.
  • Remove SKU: User can remove initially added SKUs in the PO by highlighting on the SKU to be removed and pressing Remove SKU
  • Import: Instead of entering SKUs one by one, user will be able to import SKUs using this option. Here user needs to specify data in the following format: SKU, Quantity, Cost (Optional). Here user needs to insert records each for a row and press OK. If there is any error in the data imported, Import Failed SKU List tab will appear where user can track errored records.

  1. User Defined Fields

User Defined Fields (UDFs) capture additional details of a PO which are not captured in other fields in the application. There are total five such fields user can use: UDF1, UDF2, UDF3, UDF4 and UDF5.
Action button in this tab:
Save UDF: Saves the UDFs entered by the user.

  1. Terms and conditions

Terms and conditions related to a vendor gets auto-populated here. However, user may modify Terms and conditions as per the requirement.

  1. Purchase Order Comments

Here there is a section where user can add detailed explanation of the PO and insert comments in the section “Add Purchase Order Comments”.

Action buttons in this tab are:

  • Submit Comments: After writing purchase order comments user needs to click on Submit Comments to save comments.
  1. PO Tags

This option is a supplement to PO status in the system where user will be able to track the entire life cycle of PO. Different information like delay reasons, timeframe in which a PO lifecycle is completed etc. can be captured using PO tags functionality.

If the user wants PO tags functionality in the system, user must pass a list of PO tags and request Vinculum team to update these tags from the backend.

  1. Import tab

If the user wants to import POs in bulk in the system using XSLX file, he may use import functionality. User will be able to import up to 2000 records at a time using this functionality.

Different action buttons in this screen are given below:

  • Download template: When the user clicks this action button he will be able to download a template of import file. Template file will be in .csv format and has following fields: Ext PO number, Vendor Code, Delivery Loaction, PO type, status, Reference no., Form C, Notes, SKU Code, PO Qty and Unit Base cost.
  • Upload template (Choose file): After data is entered in the template file, user needs to upload data in eRetail using this button. When user clicks the button, window will pop up prompting user to upload file from his computer. User needs to press OK after selecting the file in the system.
  • Import: After file is selected in the system, user needs to press Import button in order to upload data present in the file. In case of error, user may see the errors in the same screen for records under Remarks column.
  • Reset: Reset button will clear the log messages displayed in the system.

Various Action Buttons in the PO Create/ Edit screen are below:

  • Save: Once user enters all the details of a PO, he/she can save the PO draft by clicking this.
  • Confirm: Once user is ready to create the PO with respect to filled data, he/she can create the PO clicking this button.
  • Add New: To create a new PO click on the add new button

3.2.2-  PO from back order
Generating PO from back orders helps to implement Just-In-Time functionality in the system. The SKUs corresponding to sales orders for which there is no inventory and sales order status in Confirmed appear in this screen. This enables user to create PO against these SKUs.

&
Various fields appear in this screen are given below:

  • Order Date: During search user may narrow the search of back order sales PO date to Today, Yesterday, Last 7 days, Last 30 days, This Month, Last Month and also it can be set to custom range. If you set the custom date range, user needs to press Apply action button.
  • SKU Code: User may narrow the search to a particular SKU code against which back order PO can be generated in the system.
  • Brand: During the search, user may narrow the search using brands.
  • Vendor Code: User must fill the vendor code of the vendor against whom this PO is created. Beside this field there is a button which lets user to select vendor from a list of vendors
  • Order Type: User may narrow down the search results using different order types.
  • Ship by Date: During search user may narrow the search results by setting Ship By Date to Today, Yesterday, Last 7 days, Last 30 days, This Month, Last Month and also it can be set to custom range. If you set the custom date range, user needs to press Apply action button.

Various action buttons in the application screen:

  • Search: This button will display all the SKUs which are in back order depending on the fields inserted in the screen.
  • Reset: Reset button will refresh the filter fields to default settings, i.e. to an initial state to start a fresh search.
  • Advance Search: This button lets user to search records using some more criteria: merchandising category, order priority, Site Location, Order Tag, Reference no., on hold, channel type, back order check box and unconfirm PO check box.
  • Download: Using this option user will be able to download search results in an excel format. Upon clicking this button, the excel document containing all the search results gets downloaded.
  • Create PO: User will be able to raise POs against sales orders POs in confirmed status. User needs to select the rows/ SKUs against which back order POs needs to be created. Up on clicking Create PO, PO list window pops up with a list of POs corresponding to different vendors. Upon clicking these POs you will be directed to Purchase Order screen where you will process procurement PO

3.2.3 PO From Multi-Location
Purchase order from multi-location enables the user to create the Purchase order with multiple delivery locations in it. The Purchase order from Multiple location can be created with two types:
-Cross Dock
-Dropship

Cross Dock: With this PO type user can create the purchase order against each selected location, and inventory will be distributed as per defined ratio here.

Once the location for allocation has been chosen then the user will choose the pattern of the ratio in which the Purchase order Quantity will be divided. I.e.
->Even Distribution
&
-> Custom Ration

  • Vendor Code*: User must fill the vendor code of the vendor against whom this PO is created. Beside this field there is a button which lets user to select vendor from a list of vendors.
  • PO Method: For Cross Dock PO type user will have to choose the PO type as Cross Dock.
  • Delivery Location: Delivery Location here will be the Location chosen for parent PO and then while doing the allocation the PO at line levels will be created for various location.
  • Buyer code: Here user needs to choose a buyer code who has access to create PO for a particular category.
  • Recv Valid Code: Using this option user can set quantity validation for receiving items in the location. System will allow you to inbound only a particular amount of quantity as per validation code.
  • External PO No: This may be a reference PO number which can be put in eRetail for reference.
  • Reference No: Any external number related to a PO can be populated in this field.
  • Notes: Any additional information which is relevant to a PO can be captured in this field.
  • Delivery Date: Here user may mention expected delivery date of the PO.
  • Status: This field shows the current status of PO throughout the processing cycle.
    Multi-Location status flow
    ->Pending → Confirmed → Release In process → Released/Error in Releasing
    ->Partial Received, Received
    ->Short Closed, Closed, cancelled

ACTION BUTTON

  • Save: Once user enters all the details of a PO, he/she can save the PO draft by clicking this.
  • Confirm: Once user is ready to create the PO with respect to filled data, he/she can create the PO clicking this button.
  • Add New: To create a new PO click on the add new button
  • Manage Allocation: When option cross dock selected than only delivery location picker will get enable. In this selection user will only display warehouse type locations. The allocation action will come previous to adding of SKU and prior to allocation, system will not allow user to add SKU.
  • Add SKU: Adding the SKU for the Multiloction Purchase Order.
  • Remove SKU: Removing the Added SKU for Multilocation Purchase Order.

DROPSHIP 
In case of drop shipping the user can create purchase order where the system will create PO at each selected location.

4. ASN Management

4.1 ASN Management Overview

Advance Shipping Notice (ASN) is a notification document having all the important information about a future delivery. The main purpose of the ASN is to provide a prior notice to the customer regarding the delivery so that customer can get prepared to accept the delivery. It notifies the customer when shipping occurs and provides physical characteristics like weight, dimension of the box etc. about the shipment.


Utility of ASN:

  • It helps buyer to plan for storage and transportation of the purchased items.
  • If ASN is available, then buyer can track goods throughout the supply chain.

Related links:

  • SKU Management
  • Vendor Management
  • Customer Management


4.2 ASN Enquiry
Using this screen, user will be able to view existing ASNs and edit/update the same.

Navigation:
Procurement –> 
Manage ASN

Different fields in this screen are given below:

  • ASN No.: This is a system generated unique code which gets auto-generated when a new ASN is created.
  • ASN. No.: This is a unique code given by user while creating the ASNs.
  • ASN Date: User can see ASNs with respect to dates by filling this field.
  • Status: User may narrow search using status of ASNs. An ASN can be available in one of the below statuses:
  • Pending Confirmation – If an ASN is created and saved, then it goes into ‘Pending confirmation’ status.
  • Confirmed – If an ASN is created and clicked ‘Confirm’, then the ASN got created and status changes to ‘Confirmed’.
  • Part Received – If ASN is not fulfilled completely i.e. some items were received not all, then ASN status will be ‘Part received’.
  • Closed – If all the items in an ASN is received completely, then ASN status becomes ‘Closed’.
  • Cancelled – If user cancels the ASN in any stage of the process, then ASN status moves to ‘Cancelled’.
  • Vendor: While creating PO, vendor name is necessary. So, a user can view ASNs with respect to a vendor by filling this field.
  • Customer: While creating PO, Customer name is necessary. So, a user can view ASNs with respect to a Customer by filling this field.
  • Delivery Location: User may filter records using delivery location.

ACTION BUTTON

  • Search: Clicking on the search button without entering any filter criterion will populate the list of all the ASNs based on default filter setting. User can further narrow down the search by using filter options to get a specific information.
  • Advanced Search: This button narrows the search results by adding more search criteria such as SKU, Reference No. etc.
  • Reset: Reset button will refresh the filter fields to default settings, i.e. to an initial state to start a fresh search.
  • Export: Upon clicking this button, pending reports will open where you will be able to download search results in .csv format.
  • Add new: To add a new ASN click on the add new button.


4.3 ASN Creation
User can create new ASN in this screen.

Navigation:
Procurement –>Manage ASN–>ASN create/edit.

Below are the 3 tabs in ASN Create/ Edit:
1.Create ASN
2.User Defined Fields
3. Import

Create ASN
Different fields in this tab are given below:

  • ASN Type: ASN types can be vendor based, customer based or other type. This needs to be selected at the time of ASN creation in the system.
  • Vendor Code/ customer code: User needs to select the vendor code or customer code at the time of ASN creation if the ASN type is vendor or customer respectively.
  • Delivery location: User has to mention the location for which the ASN is created.
  • ASN No.: This may be a reference ASN number which can be put in eRetail for reference.
  • Status: This field shows the current status of ASN throughout the processing cycle.
  • Remark: In this field user remarks about ASN can be put.
  • Gross Weight: This specifies gross weight of the consignment related to ASN.
  • Delivery date, Challan No., Mat. Rcvd date: These fields can be input at the time of ASN creation.

Action buttons

  • Add SKU: This button enables user to add SKUs which will be delivered from the vendor mentioned in the ASN. User may filter SKUs which will be added. User needs to mention how many units he/she is going to order in UOM Qty field and press Add SKU.
  • Save: Saves all details entered for the ASN
  • Confirm: Upon clicking this button, it changes the status of ASN to confirm.

2. User Defined Fields

User Defined Fields (UDFs) capture additional details of the ASN which are not captured in other fields in the application. There are total five such fields user can use: UDF1, UDF2, UDF3, UDF4 and UDF5.

3.  Import tab

If the user wants to import ASNs in bulk in the system using csv file, he may use import functionality. User will be able to import up to 2000 records at a time using this functionality.

Different action buttons in this screen are given below:

  • Download template: When the user clicks this action button he will be able to download a template of import file. Fields marked in yellow colour are mandatory fields which user needs to enter for import of a record to be successful.
  • Upload template (Choose file): After data is entered in the template file, user needs to upload data in eRetail using this button. When user clicks the button, window will pop up prompting user to upload file from his computer. User needs to press OK after selecting the file in the system.
  • Import: After file is selected in the system, user needs to press Import button to upload data present in the file. During this process logs can be captured in the section below import button. If user uploads wrong data, then system shows an error message.
  • Reset: Reset button will refresh the filter fields to default settings, i.e. to an initial state to start a fresh search.
  • Export: User can download list of ASNs by clicking this field.

5. VENDOR INVOICE
This section enables the user to eniquire, create and manage the Vendor invoices and manage the Open to Buy scenarios. For situations where there is a change in Invoice that was raised while creating the PO, so against that a new invoice can be created from this Invoice section.

5.1 Vendor Invoice Enquiry
This section enables the users to enquire about the Vendor Invoices created from this section based below filter available.

Invoice Number :
User can search the Vendor Invoices from here based on the Vendor Invoice Number. It is a unique number given to the Invoice number by the user.
Vendor Code:
User is required to choose the vendor from the list to create the Invoice against that vendor. Beside this field there is a button which lets user to select vendor from a list of vendors
Invoice Date:
Invoice Date is the date on which the invoice is raised.
Posting Date:
User will enter the date on which the Invoice is posted.
Vendor Name:
User will be entering the vendor name of the selected vendor.
Status:
There are two status for Vendor Invoice: Pending & Confirmed.
When the user created the Invoice and saves it, it remains in Pending status untill the confirmation button is clicked.

NAVIGATION
Procurement –> Vendor Invoice —> Vendor Invoice Enquiry

ACTION BUTTONS

  • Search: Clicking on the search button without entering any filter criterion will populate the list of all the Vendor Invoices based on default filter setting. User can further narrow down the search by using filter options to get a specific information.
  • Advanced Search: This button narrows the search results by adding two more search criteria : GRN number and PO number.
  • Reset: Reset button will refresh the filter fields to default settings, i.e. to an initial state to start a fresh search.
  • Export: Upon clicking this button, pending reports will open where you will be able to download search results in .csv format.
  • Add new: To add a new Vendor Invoice click on the add new button.


5.2 Manage Vendor Invoice
Manage Vendor Invoice Section enables the User to create the Invoices. This section is divided into two tabs, one for creating the Invoice and other for creating the Invoices in BULK.

Navigation
Procurement –> Vendor Invoice —> Manage Vendor Invoice

Lets Understand each field in detail:
Vendor Code*:  User is required to choose the vendor from the list to create the Invoice against that vendor. Beside this field there is a button which lets user to select vendor from a list of vendors
Vendor Name: User will be entering the vendor name of the selected vendor.
Doc Invoice No.: Doc Invoice is the system generated serial number given to the Invoice.
Vendor Invoice No*: User can search the Vendor Invoices from here based on the Vendor Invoice Number. It is a unique number given to the Invoice number by the user.
Invoice Date*: Invoice Date is the date on which the invoice is raised.
Invoice Amount*: Invoice amount for which the vendor Invoice is being raised.
Status: There are two status for Vendor Invoice: Pending & Confirmed.
When the user created the Invoice and saves it, it remains in Pending status untill the confirmation button is clicked.
Posting Date: User will enter the date on which the Invoice is posted.
Currency: Choose the currency for Invoice.


ACTION BUTTON
SAVE:
To save the Invoice.
CONFIRM:
To Confirm the Created Invoice.
DISCARD:
To Discard the Invoice Created
ADD NEW:
To add the new vendor Invoice
ADD & Remove GRN:
While creating the Vendor Invoice, the GRN needs to be added in the invoice for which the Invoice is getting raised.


5.3 OTB Enquiry
OTB (Open to Buy) enquiry is the section which displays all the Budgets created by the User. OTB is the process where the user specifies the budget for a particular category in a specified period of time, within which only the stated amount of PO can be raised.

NAVIGATION
Procurement –> Vendor Invoice —> OTB Enquiry

Lets Understand this in detail:
The enquiry screen will have right based access.

OTB ID: OTB ID is the system generated ID for the open to buy budget created.
Description: This is the description of the OTB budget entered by the user while creating it.
Location: User can specify the Location for which the OTB will be applicable.
Start Date: This is the date from which the OTB period will initiate.
End Date: This is the date upto which the OTB period will be applicable.
Status: Status cycle of the OTB is stated as follows.
Pending –> Confirmed –> Released –> Cancelled/Expired.
Total Budget: Total Budget assigned for any particular category during the specified period
Consumed: Consumed amount from the Total budget.
OpenToBuy: This section contains the Open to Buy amount.

ACTION BUTTON
Search: Clicking on the search button without entering any filter criterion will populate the list of all the OTB created based on default filter setting. User can further narrow down the search by using filter options to get a specific information.
Reset: Reset button will refresh the filter fields to default settings, i.e. to an initial state to start a fresh search.
Download: Upon clicking this button, search results will be get downloaded  in .csv format.
Add New: Add new button will enable the user to add new OTB.


5.4 View/Edit OTB
This section enables the user to create the new OTB from here.OTB is the process where the user specifies the budget for a particular category in a specified period of time, within which only the stated amount of PO can be raised.

OTB Id: OTB ID is the system generated ID for the open to buy budget created.
Start Date:This is the date from which the OTB period will initiate.
Total Budget: Total Budget assigned for any particular category during the specified period.
Description: This is the description of the OTB budget entered by the user while creating it.
End Date:This is the date upto which the OTB period will be applicable.
Consumed: Consumed amount from the Total budget.
Location: User can specify the Location for which the OTB will be applicable.
Status: Status cycle of the OTB is stated as follows.
Pending –> Confirmed –> Released –> Cancelled/Expired.
Open To Buy: This section contains the Open to Buy amount.
Vendor Code: User will be entering the vendor name of the selected vendor.
Operand Type: Operand type is the basis on which this OTB will apply. The OTB can be applied on any one components specified in the Operand type for one OTB on which the budget is getting created.
Operand: Based on the operand type chosen, the operand category will be selected from here to create the OTB transaction.


6. ARS (Auto Replenishment Schedule)
ARS is Auto Replenishment System is used for automatic purchase order creation and auto-delivery of products directly. Our ARS module is primarily divided into three sections.

ARS SKU-Location Link
ARS Rules
ARS Execution Log

To understand this in detail, Click here.

************************************************************************************************************

SUPPORT
Feel free to contact us for all your queries at  +91-7838130820.

eRetail | Sales Section

SALES

  1. SALES Section Overview

Use the Sales Section to configure your Sales Channels, managing & adding the new sales channels with respect to the already integrated marketplaces and order enquiry, order creation, payment reconciliation management based on user will monitor and manage the orders and COD payments.

UTILITY

  • Sales section enables user to target business on various sales channels.
  • Enables user to configure, pull, manage orders and much more after creating the sales channel.
  1. Listing and Description
  • Manage Channels
  • SKU Channel Link
  • Order Enquiry
  • Order Create/Edit
  • Global Order Search


2.1 Manage Channels
2.1.1 Overview
Manage channel enables the user to view listing of all the channels created (active or inactive) and add any new sales channel.
It also enables the user to search the existing sales channels on the basis of the channel code and channel name.

2.1.2 Utility

  • Enables user to search the existing sales channels on the basis of the channel code and channel name.
  • It also enables user to add and verify existing integration touchpoints like API credentials, sync date time for inventories, orders etc.
  • User can add a new sales channel for his business and reconcile the existing ones.
  • These created sales channels will enable the user to pull and sync the orders and further initiate other order processing information on eRetail.

NAVIGATION
SALES –> MANAGE SALES

RELATED LINKS
Order Enquiry
SKU Channel link
return

Fields on the basis of which the sales channel can be searched:

  • Channel Code
  • Channel Name

Channel Code: Channel code is the auto generated unique code by the system for each channel.
Channel Name:  Channel name is the name given by the user to the channel while creating the channel.

ACTION BUTTON:

1. Search: Clicking on the search button without entering any filter criterion will populate the list of all the sales channel whether active or inactive. User can further narrow down the search by using filter options: Channel code and channel name.

2. Reset:
Reset button will refresh the filter fields to default settings, i.e. to an initial state to start fresh search.

4. Add New: To add a new channel to the database. User will see the list of already added/integrated channels, selecting any one of those will enable user to add a new channel.

Further the Add channel is divided into 4 major sections.

*Channel Detail
*Order
*Channel SKU
*Inventory


Lets Understand these in detail.

Channel Detail
Channel Code: Channel code is the system generate unique ID given to the channel to differentiate these channels from one another.
Channel Name*: User will enter the name of the channel getting created.
Status: User will specify the channel’s state as active or inactive by selecting from the dropdown.
If channel’s status is inactive then the order sync, order processing & the inventory syncof that particular channel will be stopped.
Order Fulfillment WH*:
User will choose order fulfillment warehouse from the list of warehouses given.This will be the default WH on which the order will get routed when pulling from the MP.
Auto Range SKU: Auto range SKU enables the user to configure that with a particular channel location whether the SKU’s will be getting Automatically mapped/synced or not. Based on the requirement the user can select yes or no from the option.
Configure Interface:
User can configure the API credentials from here by entering the details.
Channel SLA(in hrs)*: This is the service level agreement between the channel and the user. Here various aspects of the service – quality, availability, responsibilities – are agreed between the service provider and the service user.

Orders Enquiry
Order Sync*:
User can choose to sync the order from the channel to eRetail by managing this option. If this is disabled, the  Order pull will not happen also the shipping label/Invoice and manifest will not get generated.
Order Sync From Date*: Order Sync action can be performed by the user by choosing the from date and from that till present’s period order will get sync.
Order Sync From Order No*: Order Sync action can be performed by the user by choosing the order number and from that order number till present’s period order numbers will get sync.
Shipping By: User can configure from here that the shipping will be done by the marketplace or by the seller.
Bill To Party & Its Master*: User gets the option to choose the billing party in case of multiple parties. These bill to party options can be created or managed from the
Masters — > Other Master — >Channel Configuration –> Bill to Party Tab.
Invoice No By: User will choose that the Invoice no will get generated by the user or by the channel.
PrePack Enabled: User can enable prepack for the order from here.
**Using this feature user can generate the label at the time of generating the picklist & when scannign the products/SKU user will get the labels in less than 05 seconds.
Mark ReadyToShip At: User can choose to mark the status of ready to ship at any of the two events :
-at Manifest
or
-at Pack
Each Qty Per Line: User can enable to sync the each quantity per line order.
International Invoice & Domestic Invoice: user can choose which format of invoice suits his requirement from here.

Channel Sku
Channel SKU Suffix & Prefix:
User can put the different suffix and prefix on SKUs of different channels to differentiate them from one another.
SKU Sync: SKU Sync between Channel and eRetail can be done via PULL & PUSH.
User can choose Pull to Pull the SKU’s from the channel to eRetail panel.
And User  can choose Push to send the SKU data or changes from eRetail to the channel.
-In SKU pull the user is given with two options:
Create
&

Moderate
CREATE: In create SKU pull, all the SKU will be pulled and created on the eRetail panel in order to get mapped.
&
MODERATE: In moderate SKU pull only the Product Id’s of other platform will get pulled and then mapped with the eRetail’s SKU Id’s.

Inventory
Inventory Sync:User will have to choose the option of Yes or No, in case he wants to enable or disable the inventory sync respectively.
Safety Stock: Safety stock is the stock kept by user to describe a level of buffer stock that is maintained to mitigate risk of stockouts (shortfall in raw material or packaging) caused by uncertainties in supply and demand.
Sync Method: In Sync method, users can choose that whether they want to sync the inventories from all the Locations, or they want to sync from different selected or custom locations.
Channel Inventory percentage: User can define the safety stock in percentage of the total stock.
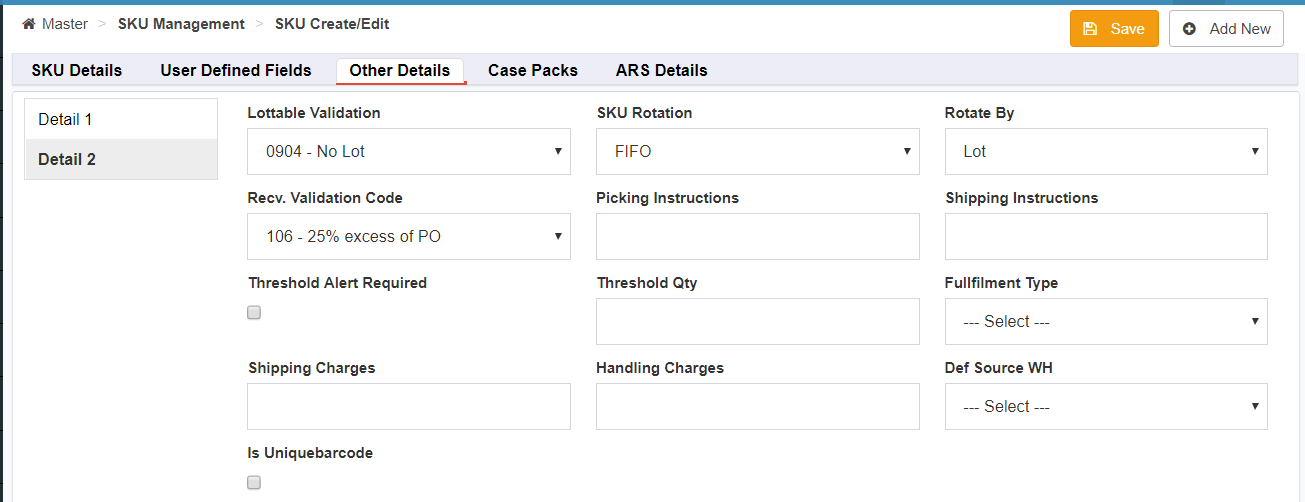


2.2
SKU CHANNEL LINK
2.2.1 Overview
SKU Channel link section enables the user to link the SKU’s on the sales channel with the SKU’s on eRetail. If any of the product does not have channel ID or Channel SKU then it will not be mapped to that respective channel leading to order/inventory sync failure.

Refer to the clip below for better understanding.

2.2.2 Utility

  • Enables user to create new SKU channel link or mark an record as in-active to discontinue it for that respective channel
  • Also lets user to save the changes done by updating the record.
  • With the SKU channel linking the order is pulled and inventory is pushed in the system.

NAVIGATION
SALES –> SKU CHANNEL LISTING

RELATED LINKS
Order Enquiry
Order Pull
Inventory Push
Channel Product ID & Channel SKU

SKU Channel Link can be divided into three tabs:

  • SKU/Link Search Channel
  • SKU Channel Link Import
  • Unmapped SKU’s

SKU/Link Search Channel

This section will display search results of the SKU mapping on different marketplaces. Here user can select the sales channel for which user is interested to view SKU–channel mapping details like Channel SKU, Product ID etc. and can update the same as per requirement.

Here are the below fields on the basis of which you can narrow down your search results.

  • Channel
  • eRetail SKU
  • SKU Description
  • Channel SKU
  • Channel Product ID

ACTION BUTTON:

1. Search: Clicking on the search button without entering any filter criterion will populate the list of all the sales channel whether active or inactive. User can further narrow down the search by using filter options: Channel code
and
Channel name.
2. Reset:
Reset button will refresh the filter fields to default settings, i.e. to an initial state to start fresh search.
3. Export: To download and export the displayed search results in the form of CSV.
4. Add New: User will use this to add the new SKU channel Link. User will have to fill in the below fields in order to add new record.

  • Channel Name:
  • eRetail SKU
  • SKU Description
  • Channel SKU
  • Channel Product Id
  • Back order Quantity
  • Channel Price
  • Status

SKU/Link Channel Link Import

User can also add the SKU channel link record in bulk from this section by importing the CSV.
User can download the CSV template and do not change the pattern of the same.
Also note that: Max 5000 rows can be imported in an attempt of Import.

Unmapped SKU
All the SKU’s which by chance have not got linked or mapped on sales channel will be getting displayed here and the user can map them from this section.

SKU link in eRetail can be done via PULL & PUSH.
User can choose Pull to Pull the SKU’s from the channel to eRetail panel. And User  can choose Push to send the SKU data or changes from eRetail to the channel.
-In SKU pull the user is given with two options:
Create
&
Moderate

CREATE: In create SKU pull, all the SKU will be pulled and created on the eRetail panel in order to get mapped.
MODERATE: In moderate SKU pull only the Product Id’s of other platform will get pulled and then mapped with the eRetail’s SKU Id’s.

So after this mapping those SKU whose product Id’s have not got mapped to the Id’s of SKUs on eRetail those SKUs come in unmapped section.
From the filter options given, user will choose the channel to view details accordingly.


2.3 ORDER ENQUIRY

2.3.1 Overview
Orders across all the channels are visible here on a common screen. User can enquire for all the order related information from here on the basis of various filters available to narrow down the search result.
All the orders from various vendors and channels will get displayed here, and the order can be confirmed, saved, allocated, shipped, put away from here.
User can quick ship the orders from here.

2.3.2 Utility

  • Enables user to enquire for all the orders, check their status, export reports, view fulfillment and order processing details.
  • Also lets user to save the changes done for any order.

NAVIGATION
SALES –> ORDER ENQUIRY

The order enquiry section consists of four sections:
-All orders
-Failed Orders
-Cancel orders post Shipping
-Pending MP Label Shipment

  1. ALL ORDERS
    User will select the ‘to’ & ‘from’ dates and all the orders of that date selection will appear. User can also narrow down the search of orders by using various filters available like Order number, External Order Number, channel, order type, status, order amount & much more.From the order listing user can choose the order and manage it completely by clicking on the order number.
    Selecting any Order user can manage its
    allocation,
    can quick ship,
    save & confirm the order,
    can part pick the order,
    can update Warehouse,
    Can hold the Order,
    can unallocated the order,
    can cancel the order and much more.

ACTION BUTTON:

1. Search: Clicking on the search button without entering any filter criterion will populate the list of all the Orders. User can further narrow down the search by using various filter options like Order number, External Order Number, channel, order type, status, order amount etc.

2. Reset:
Reset button will refresh the filter fields to default settings, i.e. to an initial state to start fresh search.

3. Export: To download and export the displayed search results in the form of CSV.

4. Advance Search: Advance search further improves the search results of Orders by providing more fields to filter from. Below fields get added for the advance search option of the order enquiry.

  • External Order No
  • Fulfilled By
  • SKU Code
  • Priority
  • Discount Code
  • Replacement
  • Customer Email
  • Customer Phone
  • Delivery No/AWB NO
  • Reference No
  • Channel Type
  1. Add New: User will use this to add/create the new Order. User will have to fill in all the mandatory forms of each tab given to create the order.
    Order creation consists of 08 tabs with separate forms in them.
    List of tabs are:
    a) Order Details
    b) Address
    c) UDF
    d) Outbound Delivery
    e) Activity & Remarks
    f) Payment Detail
    g) Order Tags
    h) Gift Wrap

2 . FAILED ORDERS

User will select the ‘to’ & ‘from’ dates and all the orders that have not been synced or pulled of that date selection will appear. User can also narrow down the search of orders by using various filters available like Order number, External Order Number, channel, order type, status, order amount & much more.
From this section the failed orders can be pulled from FORCED PULL button.

3 . CANCEL ORDER POST PICKING

User will select the ‘to’ & ‘from’ dates for order and all the orders which are cancelled for that date selection will appear. User can also narrow down the search of orders by using various filters available like Order number, External Order Number, channel, order type, status, order amount & much more.
From this section the PUTAWAY for cancelled orders can be processed.


2.4 Order Create/Edit

2.4.1 Overview
User will use this to add/create the new Order. User will have to fill in all the forms of each tab given to create the order.Order creation consists of 08 tabs with separate forms in them.

List of tabs are:

a) Order Details
b) Address
c) UDF
d) Outbound Delivery
e) Activity & Remarks
f) Payment Detail
g) Order Tags
h) Gift Wrap

2.4.2 Utility

  • Enables user to allocate and unallocated the orders.
  • Let’s user to save & confirm the order, can part pick the order and update Warehouse and can hold the Order
  • User can cancel the orders and can do the PUTAWAY for cancelled orders.
  • User can run the Forced Pull for failed orders.

NAVIGATION
SALES –> ORDER CREATE/EDIT

RELATED LINKS:
-Force Pull
-manage picking
-Manage picklist
-Inventory view

ORDER DETAILS

a) External Order No: External Order number is the number given in by the user OR order No provided by the sales channel/platform from where orders are pulled into eRetail.
b) Channel: User will select the warehouse/ sales channel/ Marketplace for the order to be created under.
c) Remarks: User can enter the remarks related to significant orders.
d) Order Type: Order type here in drop down will be the type of order categories created in the database by the user.
For example: COD/Cheque/Prepaid/consignment/others.
e) Customer Type: Customer Type here in drop down will be the type of customer categories created in the database by the user. For example: Marketplace type, B2B type, B2C type etc.
f) Customer Code *: User selects the customer code w.r.t order. Customer Code is the unique code provided by the system to each customer and helps differentiating 2 or more records.
g) On Hold Status: Checking this box will enable the user to put the order status on hold instead of confirmed while creating the order.
h) Send Notification: User can check this box to receive order related updates.

ADD SKU
After filling in the order detail form user will enter the SKU details w.r.t. to the order created.

SKU Code:
Enter SKU Code. Any unique code which a user gives to the SKU while creating it. This SKU code is a mandatory field and once created and saved cannot be changed and must be a unique number.
SKU Description: Enter SKU description if any.
UOM: Enter UOM which is the Unit of Measurement in which the SKU will be measured or weighed which is used in advanced Shipment Notice, Invoice, Purchase Order documents etc.
Source WH: Specify Source Warehouse for the order.
Unit Price & Order Qty & Discount Amount: Enter the Unit Price & Order Qty & Discount Amount.

b) ADDRESS
Address tab consists the full detailed Shipping and billing address of the customer with respect to the order.

c) UDF (User Defined Fields)
These are the custom fields which can be created by the User for customers in case of any extra information required.

d) OUTBOUND DELIVERY NUMBEROutbound delivery number shows the details of order like from which Warehouse it has been shipped, the Shipping detail or ASN number.The transporter can be changed for the order from this section.

e) ACTIVITY & REMARK
User can enter the order related remarks or any important piece of advice/instruction.

f) PAYMENT DETAIL
This section will contain all the details of payment made for the order. User will primarily have to define the mode of payment which is the mandatory field to be entered by the user.

g) ORDER TAGS & GIFT WRAP
User can enter the order tags and enable the gift wrap from this section.

3. OMS RULES
OMS 
rules are the set of rules created for the order routing and order management, which routes the order based on the rules set here and over writes the actual order flow.

These OMS rules can be set for below types:
Order Validation Rules
Order Routing/Split Rules
Seller Panel Order Rules
Shipping Rules
Notification Rules
Allocation Rules

3.1 Order Validation Rules

Order Validation rule enables the user to create the validation rules for the orders based on various criterion.
The Order validation rule screen shows the already created the rules along with their active/inactive status, preference and option to remove the rule as well.

Action Button
Add New Rules: This will enable the user to create the new Order Validation from here. Clicking on this button the user will get redirected to the below screen for rule creation.

Rule Name* : Rule name is a mandatory field. This is unique name that is given by the user while creating the rule. Also from the drop down the user can choose to mark this rule as active or inactive.
Channel Type : From here the channel type will be defined from the given drop down : Self/ Third Party/ Select All.
Location: Choose the location/s for which this rule will be applicable.
Events *: Events are mandatory to enter while creating the validation rule. Here User will have to specify that whether it is for : Create or Allocate .
All Condition: 
Set the Conditions of Rule here where this condition will apply only when all the condition specified in this section will be true.
Any Condition: Set the Conditions of Rule here where this condition will apply when any of the condition will be true.
Action: Here the User defines the action to be performed for the conditions stated above.

2. Order Routing/Split Rule
Order Routing rule enables the user to route the order based on the rules created here per say various criterion. The rule screen shows the already created the rules along with their active/inactive status, preference and option to remove the rule as well.

Rule Name* : Rule name is a mandatory field. This is unique name that is given by the user while creating the rule. Also from the drop down the user can choose to mark this rule as active or inactive.
Channel Type : From here the channel type will be defined from the given drop down : Self/ Third Party/ Select All.

All Condition: Set the Conditions of Rule here where this condition will apply only when all the condition specified in this section will be true.
Any Condition: Set the Conditions of Rule here where this condition will apply when any of the condition will be true.
Action: Here the User defines the action to be performed for the conditions stated above.

Likewise all the other OMS rules will be set here.

********************************************************

Feel free to contact us for all your queries at  +91-7838130820