

Procurement Management
1. Procurement overview:
Procurement is the process of obtaining goods that the company needs to fulfill its business model. Vin eRetail system supports end-to-end procurement process through category buyers setup, PO/ASN Management, and vendor invoice.
Utility of Procurement Module:
- It helps user to create PO for any location from a single screen
- Enables implementing Just-In-Time functionality in the procurement process by creating PO from Back Orders.
- Advanced Shipping Note (ASN) is a notification of pending deliveries. Users will be able to inbound against the ASN in their Warehouse.
Related links:
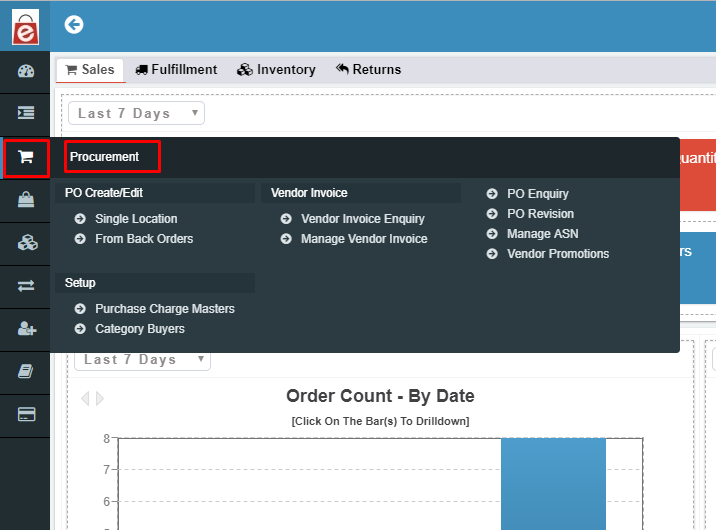
2. Configuring Category Buyers:
2.1 Category buyers overview
Category buyers are speciality buyers who are authorized in eRetail to buy items belonging to one or multiple categories.
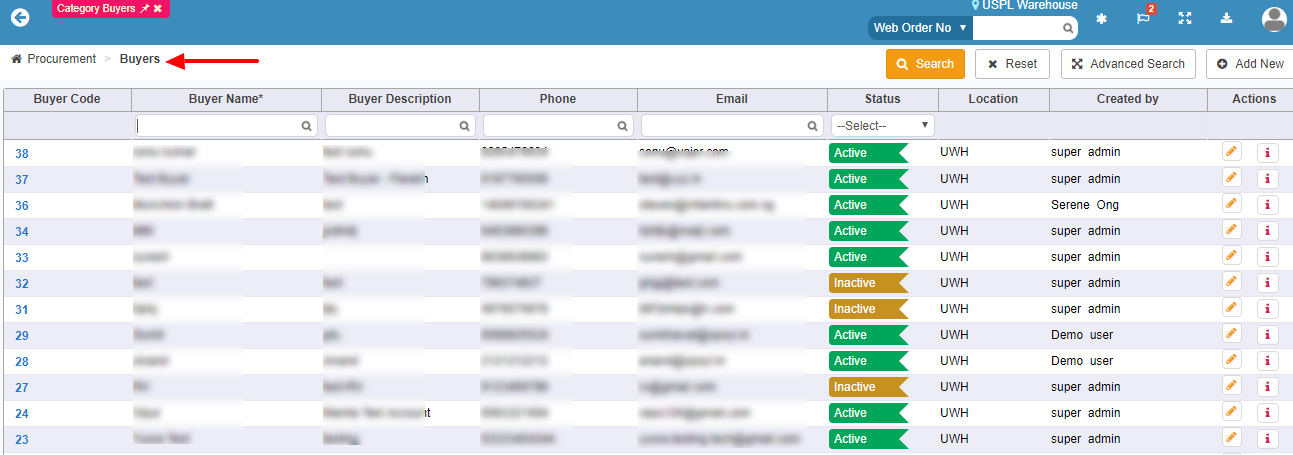
2.2 Category Buyers enquiry screen
Using this screen, one will be able to view existing category buyers and edit/update the same.
Utility
- When the user creates a procurement PO, category buyer code is a mandatory field. If category buyer is not authorized to raise PO for any specific category (i.e category buyer not mapped to a particular category), then system will throw an error message.
- The Category buyer enquiry screen displays all buyers created in past and the SKU categories they are mapped to. Use advance search option to further filter records as per user’s specific needs.
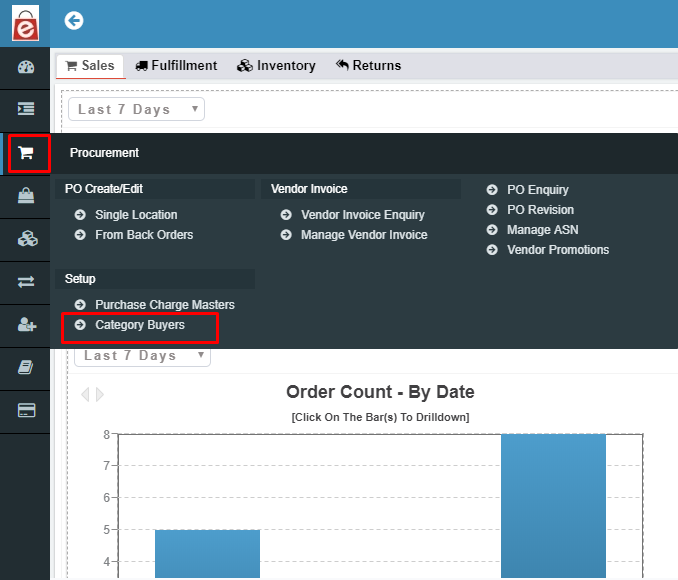
Navigation:
Procurement –> Category Buyers
Fields on the basis of which the buyers can be searched:
1. Buyer Name: User gives name to the buyer with which he is registering in the system.
Buyer Names can be identical and hence we require the buyer codes to differentiate.
2. Buyer Description: This is the description provided with respect to buyer during adding any new buyer.
3. Phone, Email: These two fields explain contact details of the buyer and by which user can find the details on required buyer.
4. Status: A category Buyer in ‘Active’ status can be added to any new PO, while an ‘Inactive’ buyer is not accepted by the system.
5. Edit Option: To modify details of any existing category buyer in system
Action buttons:
- Search: Clicking on the search button without entering any filter criterion will populate the list of all the vendors based on default filter setting. User can further narrow down the search by using filter options to get an specific information.
- Advanced Search: This button narrows the search results by adding more search criteria such as Alternate Phone and category.
- Reset: Reset button will refresh the filter fields to default settings, i.e. to an initial state to start a fresh search.
- Add New: To add a new buyer click on the add new button
- Audit (i): This button, gives detailed log of username who has created or modified the data and the timestamp
2.3 Add new Category Buyers
Using this screen, a new category buyer can be added to the existing list.
Navigation
Procurement –> Category Buyers –> Add New
Fields on the basis of which a new Category buyer can be added
- Buyer Code: This is a system generated unique code which gets auto-generated when a new buyer is created.
- Buyer Name: Enter the name of person who is responsible for a particular category
- Buyer Description, Email, Phone, Alternate Phone: Enter as per user’s requirement
- Active: Select this checkbox to activate a buyer. By unchecking the check box, a buyer can be made inactive and hence can’t be added to any PO.
- Category: Select one or multiple categories from the dropdown to give rights to the category buyer to raise a PO against that category
- User Defined Fields for a category buyer can be added by clicking User Defined Fields
Action Buttons: - Save: Saves all details entered for a new category buyer created by user.
- Close: This option closes the existing window without saving any information.
3. PO Management
PO Management Overview
Purchase Order functionality in procurement module lets user to view existing procurement POs and create new procurement PO.
Utility
- See all the existing procurement POs in enquiry screen
- Create a new PO from a single location or using back orders
- The PO would be needed while processing inbound w.r.t. PO
- A PO can be raised against all the items linked to a particular vendor only
Related links:
- SKU Management
- Vendor Management
- Merchandise Hierarchy
- Types of Inbound
- SKU vendor catalog
- Category buyer
- Receiving validation
3.1 PO Enquiry
Using this screen, one will be able to view existing POs and edit/update the same.
Utility
- User can see all the POs and even narrow down results by putting values in search option as well as advance search options
- User will be able to download results in a report format using Detail Export/ Download option
- Lets user to create a new PO using Add New option
Navigation
Procurement –> PO Enquiry
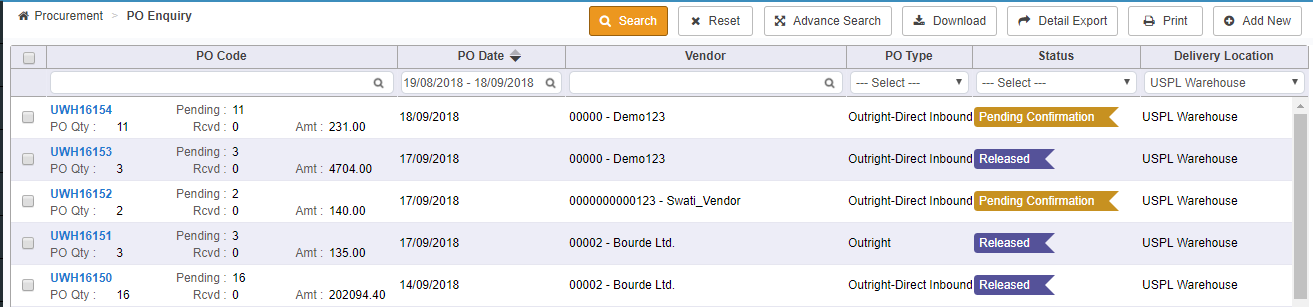
Fields on the basis of which the POs can be searched:
PO Code: This is a system generated unique code which gets autogenerated when a new PO is created.
PO Date: User can see POs with respect to dates by filling this field.
Vendor: Helps to search all existing POs for that particular vendor.
PO type: If a user wants to see POs of a certain type, then he/she can use this field.
Status: User may narrow search using status of POs.
Delivery Location: User may filter POs based on delivery location.
Action Buttons:
- Search: Clicking on the search button without entering any filter criterion will populate the list of all the POs based on default filter setting. User can further narrow down the search by using filter options to get a specific information.
- Advanced Search: This button narrows the search results by adding more search criteria such as sku code, buyer code etc.
- Reset: Reset button will refresh the filter fields to default settings, i.e. to an initial state to start a fresh search.
- Download/ Detail Export: When user presses this button, user will be directed to Pending Report screen where user will be able to download report in the form of .csv file
- Print: This button enables user to print PO copy either specific to vendor or internal to user’s firm
- Add New: To create a new PO click on the add new button
3.2 PO Creation
PO creation lets user to create new procurement PO from single location or from back orders.
3.2.1- PO for a single location
Using this screen, user will be able to create PO for a single warehouse.
Navigation:
Procurement–> PO Create/ Edit –> Single Location
Below are the various tabs in Purchase Order screen, which may needs to be filled for creating a PO:
- Purchase Order
- User Defined Fields
- Terms and conditions
- Comment History
- PO Tags
- Import
- Purchase Order
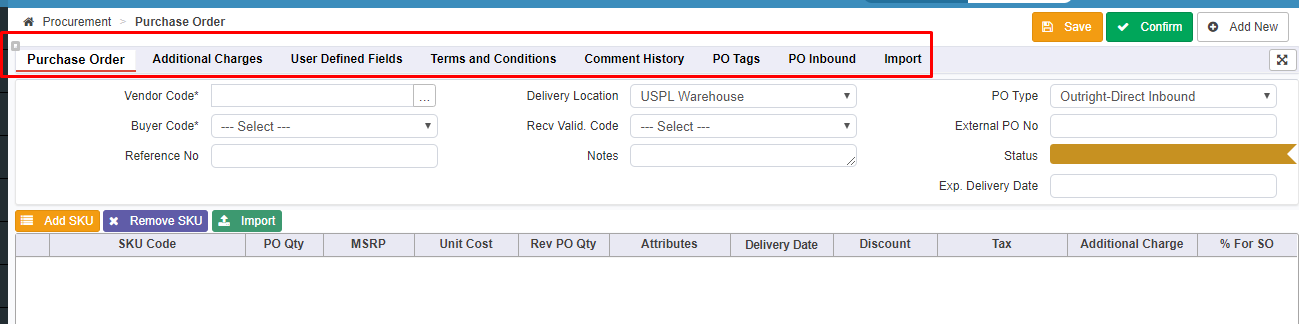
Different fields in this tab are detailed below:
- Vendor Code: User must fill the vendor code of the vendor against whom this PO is created. Beside this field there is a button which lets user to select vendor from a list of vendors
- Delivery Location: User needs to select a particular delivery location where the items will be procured.
- Buyer code: Here user needs to choose a buyer code who has access to create PO for a particular category.
- Recv Valid Code: Using this option user can set quantity validation for receiving items in the location. System will allow you to inbound only a particular amount of quantity as per validation code.
- External PO No: This may be a reference PO number which can be put in eRetail for reference.
- Reference No: Any external number related to a PO can be populated in this field.
- Notes: Any additional information which is relevant to a PO can be captured in this field.
- Delivery Date: Here user may mention expected delivery date of the PO.
- Status: This field shows the current status of PO throughout the processing cycle.
- When a new PO is saved status of the PO becomes Pending Confirmation.
- When the confirm button is clicked, PO status changes
- Once PO becomes Confirmed, user will be able to change the status of PO to released by pressing Released button. Once the PO is in released status, you can modify the PO by choosing Reopen option. Upon doing this PO status changes to ReOpen.
- Upon confirming the status of the reopened PO, the status of the PO changes to ReConfirmed.
- User will be able to Close the PO upon pressing the option Close. After PO becomes, user will not able to modify any data related to the PO.
- User may cancel the PO by pressing Cancel. This changes the status of PO to Cancelled. Cancelling PO is possible when the PO is in released status.
- Add SKU: This button enables user to add SKUs which will be procured from the vendor mentioned in the PO. User needs to mention how many units he/she is going to order in UOM Qty field and press Add SKU.
- Remove SKU: User can remove initially added SKUs in the PO by highlighting on the SKU to be removed and pressing Remove SKU
- Import: Instead of entering SKUs one by one, user will be able to import SKUs using this option. Here user needs to specify data in the following format: SKU, Quantity, Cost (Optional). Here user needs to insert records each for a row and press OK. If there is any error in the data imported, Import Failed SKU List tab will appear where user can track errored records.

- User Defined Fields
User Defined Fields (UDFs) capture additional details of a PO which are not captured in other fields in the application. There are total five such fields user can use: UDF1, UDF2, UDF3, UDF4 and UDF5.
Action button in this tab:
Save UDF: Saves the UDFs entered by the user.

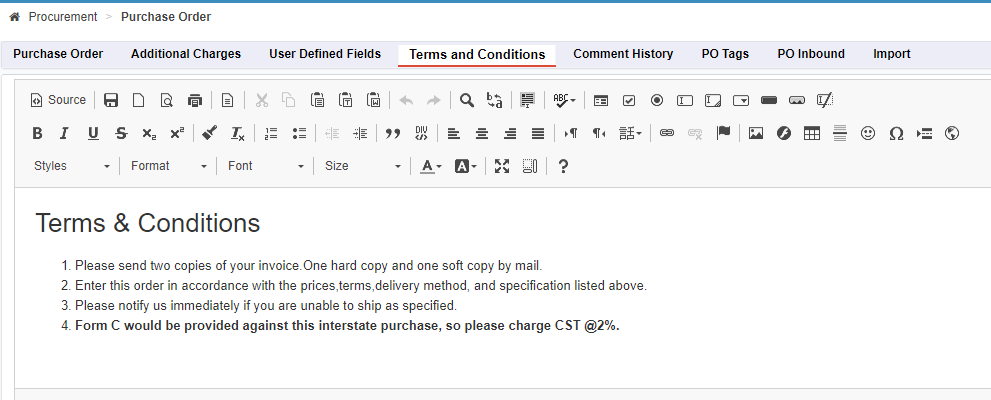
- Terms and conditions
Terms and conditions related to a vendor gets auto-populated here. However, user may modify Terms and conditions as per the requirement.
- Purchase Order Comments
Here there is a section where user can add detailed explanation of the PO and insert comments in the section “Add Purchase Order Comments”.
Action buttons in this tab are:
- Submit Comments: After writing purchase order comments user needs to click on Submit Comments to save comments.
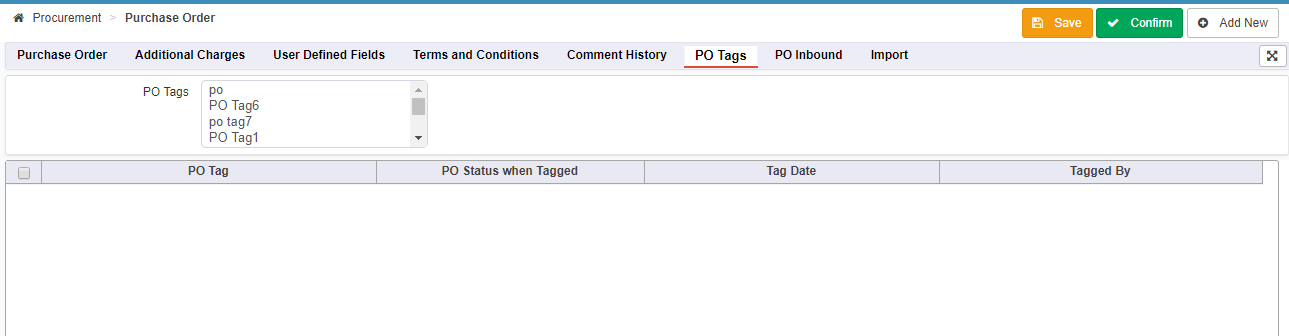
- PO Tags
This option is a supplement to PO status in the system where user will be able to track the entire life cycle of PO. Different information like delay reasons, timeframe in which a PO lifecycle is completed etc. can be captured using PO tags functionality.
If the user wants PO tags functionality in the system, user must pass a list of PO tags and request Vinculum team to update these tags from the backend.
- Import tab
If the user wants to import POs in bulk in the system using XSLX file, he may use import functionality. User will be able to import up to 2000 records at a time using this functionality.

Different action buttons in this screen are given below:
- Download template: When the user clicks this action button he will be able to download a template of import file. Template file will be in .csv format and has following fields: Ext PO number, Vendor Code, Delivery Loaction, PO type, status, Reference no., Form C, Notes, SKU Code, PO Qty and Unit Base cost.
- Upload template (Choose file): After data is entered in the template file, user needs to upload data in eRetail using this button. When user clicks the button, window will pop up prompting user to upload file from his computer. User needs to press OK after selecting the file in the system.
- Import: After file is selected in the system, user needs to press Import button in order to upload data present in the file. In case of error, user may see the errors in the same screen for records under Remarks column.
- Reset: Reset button will clear the log messages displayed in the system.
Various Action Buttons in the PO Create/ Edit screen are below:
- Save: Once user enters all the details of a PO, he/she can save the PO draft by clicking this.
- Confirm: Once user is ready to create the PO with respect to filled data, he/she can create the PO clicking this button.
- Add New: To create a new PO click on the add new button
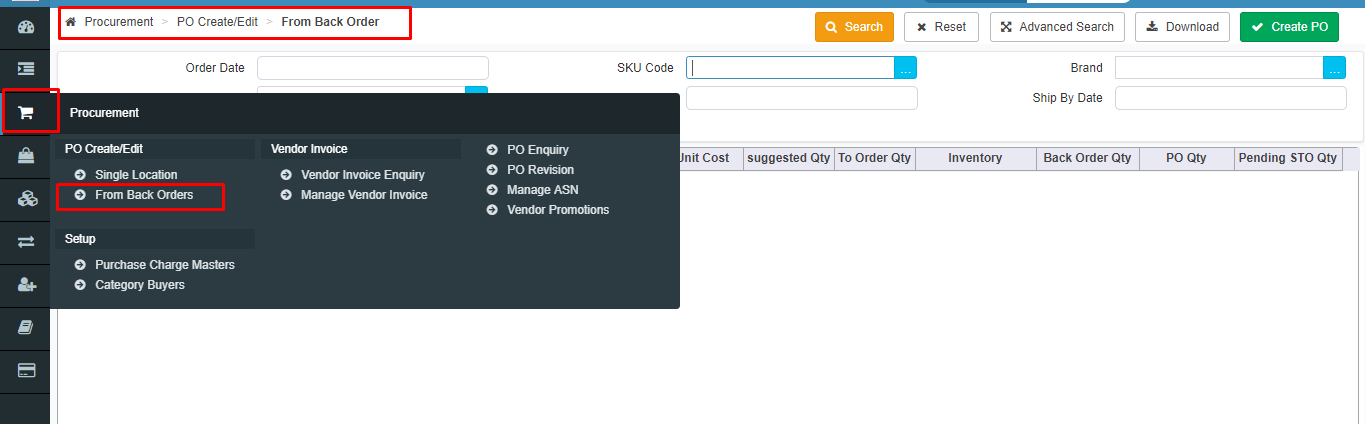
3.2.2- PO from back order
Generating PO from back orders helps to implement Just-In-Time functionality in the system. The SKUs corresponding to sales orders for which there is no inventory and sales order status in Confirmed appear in this screen. This enables user to create PO against these SKUs.
&
 Various fields appear in this screen are given below:
- Order Date: During search user may narrow the search of back order sales PO date to Today, Yesterday, Last 7 days, Last 30 days, This Month, Last Month and also it can be set to custom range. If you set the custom date range, user needs to press Apply action button.
- SKU Code: User may narrow the search to a particular SKU code against which back order PO can be generated in the system.
- Brand: During the search, user may narrow the search using brands.
- Vendor Code: User must fill the vendor code of the vendor against whom this PO is created. Beside this field there is a button which lets user to select vendor from a list of vendors
- Order Type: User may narrow down the search results using different order types.
- Ship by Date: During search user may narrow the search results by setting Ship By Date to Today, Yesterday, Last 7 days, Last 30 days, This Month, Last Month and also it can be set to custom range. If you set the custom date range, user needs to press Apply action button.
Various action buttons in the application screen:
- Search: This button will display all the SKUs which are in back order depending on the fields inserted in the screen.
- Reset: Reset button will refresh the filter fields to default settings, i.e. to an initial state to start a fresh search.
- Advance Search: This button lets user to search records using some more criteria: merchandising category, order priority, Site Location, Order Tag, Reference no., on hold, channel type, back order check box and unconfirm PO check box.
- Download: Using this option user will be able to download search results in an excel format. Upon clicking this button, the excel document containing all the search results gets downloaded.
- Create PO: User will be able to raise POs against sales orders POs in confirmed status. User needs to select the rows/ SKUs against which back order POs needs to be created. Up on clicking Create PO, PO list window pops up with a list of POs corresponding to different vendors. Upon clicking these POs you will be directed to Purchase Order screen where you will process procurement PO
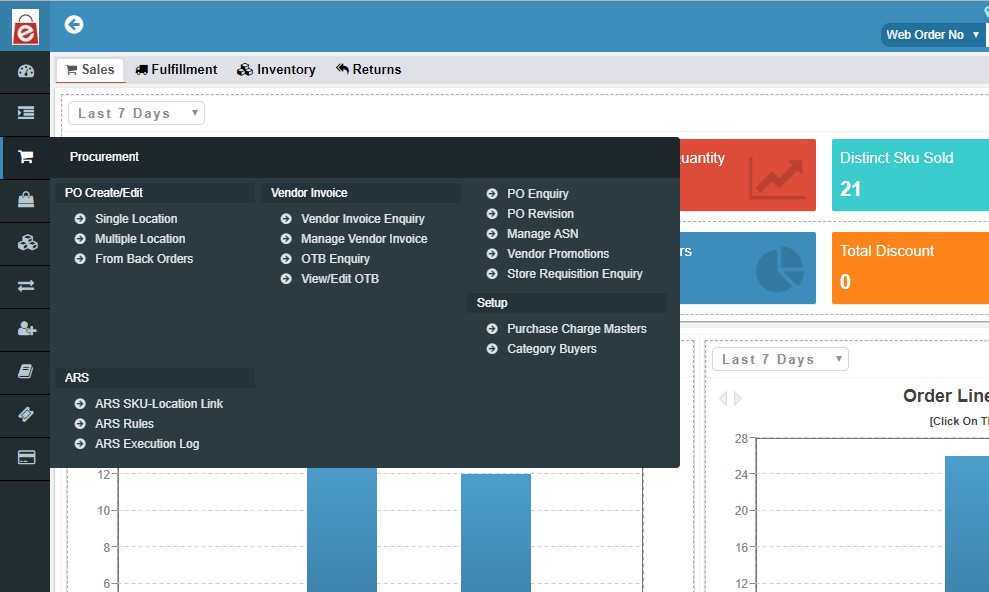
3.2.3 PO From Multi-Location
Purchase order from multi-location enables the user to create the Purchase order with multiple delivery locations in it. The Purchase order from Multiple location can be created with two types:
-Cross Dock
-Dropship
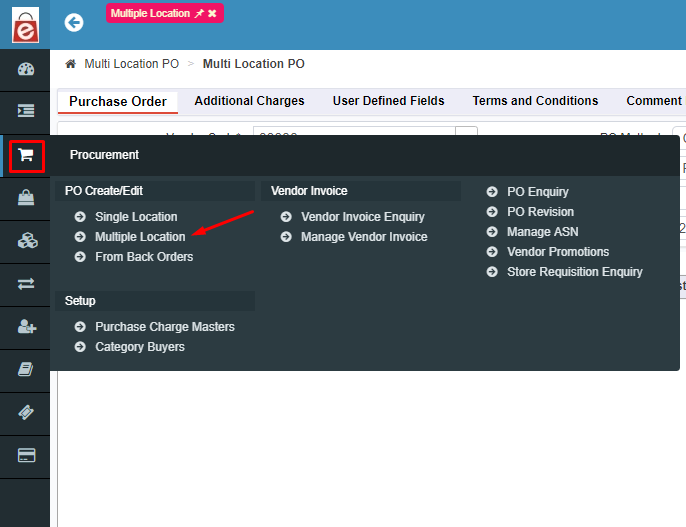
Cross Dock: With this PO type user can create the purchase order against each selected location, and inventory will be distributed as per defined ratio here.
Once the location for allocation has been chosen then the user will choose the pattern of the ratio in which the Purchase order Quantity will be divided. I.e.
->Even Distribution
&
-> Custom Ration
- Vendor Code*: User must fill the vendor code of the vendor against whom this PO is created. Beside this field there is a button which lets user to select vendor from a list of vendors.
- PO Method: For Cross Dock PO type user will have to choose the PO type as Cross Dock.
- Delivery Location: Delivery Location here will be the Location chosen for parent PO and then while doing the allocation the PO at line levels will be created for various location.
- Buyer code: Here user needs to choose a buyer code who has access to create PO for a particular category.
- Recv Valid Code: Using this option user can set quantity validation for receiving items in the location. System will allow you to inbound only a particular amount of quantity as per validation code.
- External PO No: This may be a reference PO number which can be put in eRetail for reference.
- Reference No: Any external number related to a PO can be populated in this field.
- Notes: Any additional information which is relevant to a PO can be captured in this field.
- Delivery Date: Here user may mention expected delivery date of the PO.
- Status: This field shows the current status of PO throughout the processing cycle.
Multi-Location status flow
->Pending → Confirmed → Release In process → Released/Error in Releasing
->Partial Received, Received
->Short Closed, Closed, cancelled
ACTION BUTTON
- Save: Once user enters all the details of a PO, he/she can save the PO draft by clicking this.
- Confirm: Once user is ready to create the PO with respect to filled data, he/she can create the PO clicking this button.
- Add New: To create a new PO click on the add new button
- Manage Allocation: When option cross dock selected than only delivery location picker will get enable. In this selection user will only display warehouse type locations. The allocation action will come previous to adding of SKU and prior to allocation, system will not allow user to add SKU.
- Add SKU: Adding the SKU for the Multiloction Purchase Order.
- Remove SKU: Removing the Added SKU for Multilocation Purchase Order.
DROPSHIP
In case of drop shipping the user can create purchase order where the system will create PO at each selected location.
Advance Shipping Notice (ASN) is a notification document having all the important information about a future delivery. The main purpose of the ASN is to provide a prior notice to the customer regarding the delivery so that customer can get prepared to accept the delivery. It notifies the customer when shipping occurs and provides physical characteristics like weight, dimension of the box etc. about the shipment.
Utility of ASN:
- It helps buyer to plan for storage and transportation of the purchased items.
- If ASN is available, then buyer can track goods throughout the supply chain.
Related links:
- SKU Management
- Vendor Management
- Customer Management
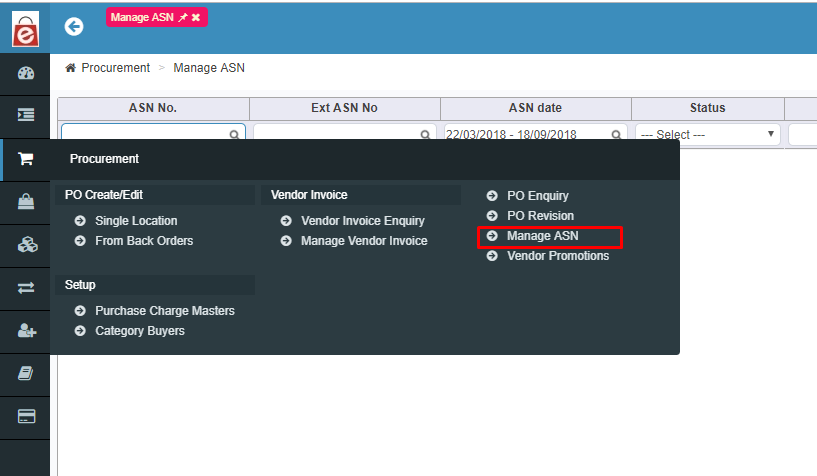
4.2 ASN Enquiry
Using this screen, user will be able to view existing ASNs and edit/update the same.
Navigation:
Procurement –> Manage ASN
Different fields in this screen are given below:
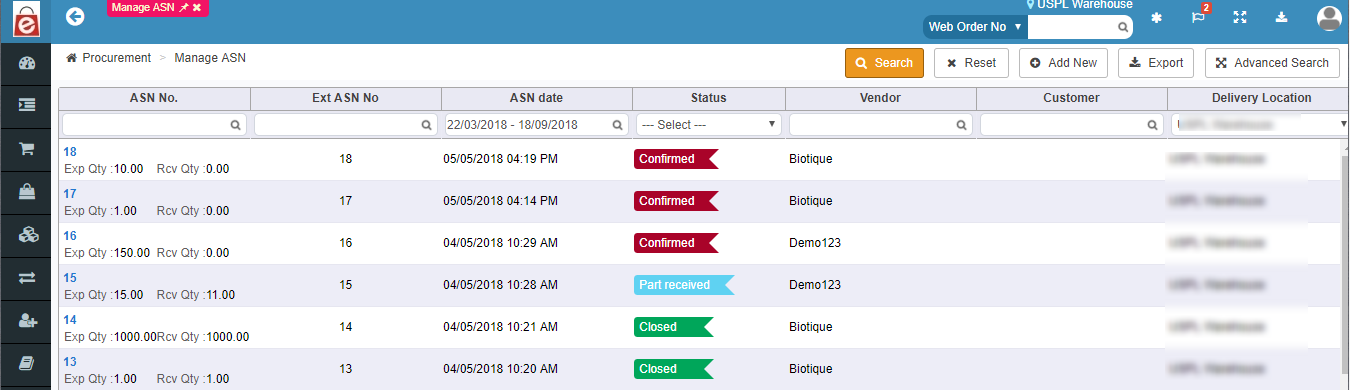
- ASN No.: This is a system generated unique code which gets auto-generated when a new ASN is created.
- ASN. No.: This is a unique code given by user while creating the ASNs.
- ASN Date: User can see ASNs with respect to dates by filling this field.
- Status: User may narrow search using status of ASNs. An ASN can be available in one of the below statuses:
- Pending Confirmation – If an ASN is created and saved, then it goes into ‘Pending confirmation’ status.
- Confirmed – If an ASN is created and clicked ‘Confirm’, then the ASN got created and status changes to ‘Confirmed’.
- Part Received – If ASN is not fulfilled completely i.e. some items were received not all, then ASN status will be ‘Part received’.
- Closed – If all the items in an ASN is received completely, then ASN status becomes ‘Closed’.
- Cancelled – If user cancels the ASN in any stage of the process, then ASN status moves to ‘Cancelled’.
- Vendor: While creating PO, vendor name is necessary. So, a user can view ASNs with respect to a vendor by filling this field.
- Customer: While creating PO, Customer name is necessary. So, a user can view ASNs with respect to a Customer by filling this field.
- Delivery Location: User may filter records using delivery location.
ACTION BUTTON
- Search: Clicking on the search button without entering any filter criterion will populate the list of all the ASNs based on default filter setting. User can further narrow down the search by using filter options to get a specific information.
- Advanced Search: This button narrows the search results by adding more search criteria such as SKU, Reference No. etc.
- Reset: Reset button will refresh the filter fields to default settings, i.e. to an initial state to start a fresh search.
- Export: Upon clicking this button, pending reports will open where you will be able to download search results in .csv format.
- Add new: To add a new ASN click on the add new button.
4.3 ASN Creation
User can create new ASN in this screen.
Navigation:
Procurement –>Manage ASN–>ASN create/edit.
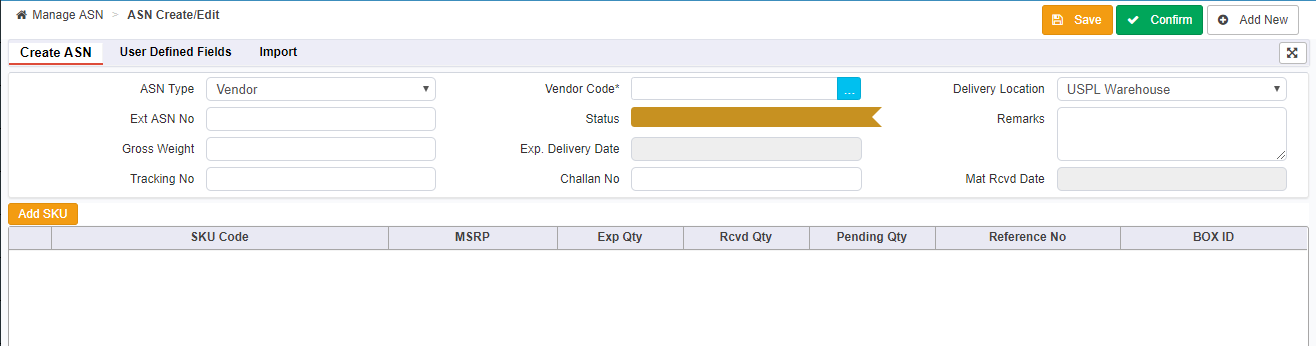
Below are the 3 tabs in ASN Create/ Edit:
1.Create ASN
2.User Defined Fields
3. Import
Create ASN
Different fields in this tab are given below:
- ASN Type: ASN types can be vendor based, customer based or other type. This needs to be selected at the time of ASN creation in the system.
- Vendor Code/ customer code: User needs to select the vendor code or customer code at the time of ASN creation if the ASN type is vendor or customer respectively.
- Delivery location: User has to mention the location for which the ASN is created.
- ASN No.: This may be a reference ASN number which can be put in eRetail for reference.
- Status: This field shows the current status of ASN throughout the processing cycle.
- Remark: In this field user remarks about ASN can be put.
- Gross Weight: This specifies gross weight of the consignment related to ASN.
- Delivery date, Challan No., Mat. Rcvd date: These fields can be input at the time of ASN creation.
Action buttons
- Add SKU: This button enables user to add SKUs which will be delivered from the vendor mentioned in the ASN. User may filter SKUs which will be added. User needs to mention how many units he/she is going to order in UOM Qty field and press Add SKU.
- Save: Saves all details entered for the ASN
- Confirm: Upon clicking this button, it changes the status of ASN to confirm.
2. User Defined Fields
User Defined Fields (UDFs) capture additional details of the ASN which are not captured in other fields in the application. There are total five such fields user can use: UDF1, UDF2, UDF3, UDF4 and UDF5.

3. Import tab
If the user wants to import ASNs in bulk in the system using csv file, he may use import functionality. User will be able to import up to 2000 records at a time using this functionality.
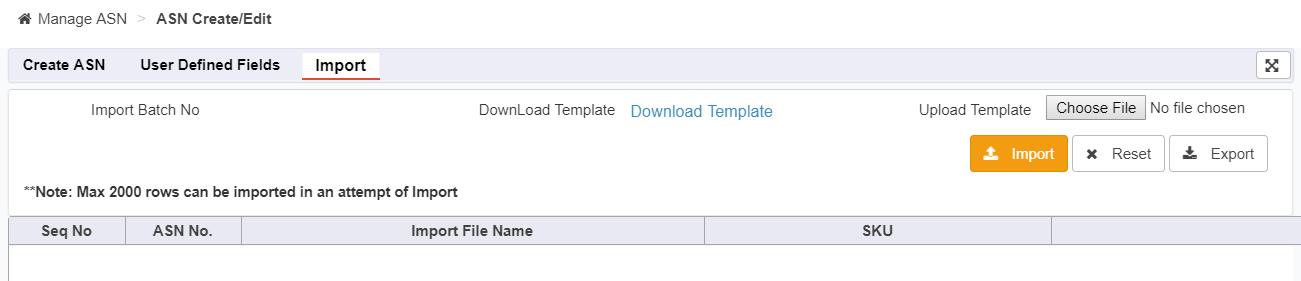
Different action buttons in this screen are given below:
- Download template: When the user clicks this action button he will be able to download a template of import file. Fields marked in yellow colour are mandatory fields which user needs to enter for import of a record to be successful.
- Upload template (Choose file): After data is entered in the template file, user needs to upload data in eRetail using this button. When user clicks the button, window will pop up prompting user to upload file from his computer. User needs to press OK after selecting the file in the system.
- Import: After file is selected in the system, user needs to press Import button to upload data present in the file. During this process logs can be captured in the section below import button. If user uploads wrong data, then system shows an error message.
- Reset: Reset button will refresh the filter fields to default settings, i.e. to an initial state to start a fresh search.
- Export: User can download list of ASNs by clicking this field.
5. VENDOR INVOICE
This section enables the user to eniquire, create and manage the Vendor invoices and manage the Open to Buy scenarios. For situations where there is a change in Invoice that was raised while creating the PO, so against that a new invoice can be created from this Invoice section.
5.1 Vendor Invoice Enquiry
This section enables the users to enquire about the Vendor Invoices created from this section based below filter available.
Invoice Number : User can search the Vendor Invoices from here based on the Vendor Invoice Number. It is a unique number given to the Invoice number by the user.
Vendor Code: User is required to choose the vendor from the list to create the Invoice against that vendor. Beside this field there is a button which lets user to select vendor from a list of vendors
Invoice Date: Invoice Date is the date on which the invoice is raised.
Posting Date: User will enter the date on which the Invoice is posted.
Vendor Name: User will be entering the vendor name of the selected vendor.
Status: There are two status for Vendor Invoice: Pending & Confirmed.
When the user created the Invoice and saves it, it remains in Pending status untill the confirmation button is clicked.
NAVIGATION
Procurement –> Vendor Invoice —> Vendor Invoice Enquiry
ACTION BUTTONS
- Search: Clicking on the search button without entering any filter criterion will populate the list of all the Vendor Invoices based on default filter setting. User can further narrow down the search by using filter options to get a specific information.
- Advanced Search: This button narrows the search results by adding two more search criteria : GRN number and PO number.
- Reset: Reset button will refresh the filter fields to default settings, i.e. to an initial state to start a fresh search.
- Export: Upon clicking this button, pending reports will open where you will be able to download search results in .csv format.
- Add new: To add a new Vendor Invoice click on the add new button.
5.2 Manage Vendor Invoice
Manage Vendor Invoice Section enables the User to create the Invoices. This section is divided into two tabs, one for creating the Invoice and other for creating the Invoices in BULK.
Navigation
Procurement –> Vendor Invoice —> Manage Vendor Invoice
Lets Understand each field in detail:
Vendor Code*: User is required to choose the vendor from the list to create the Invoice against that vendor. Beside this field there is a button which lets user to select vendor from a list of vendors
Vendor Name: User will be entering the vendor name of the selected vendor.
Doc Invoice No.: Doc Invoice is the system generated serial number given to the Invoice.
Vendor Invoice No*: User can search the Vendor Invoices from here based on the Vendor Invoice Number. It is a unique number given to the Invoice number by the user.
Invoice Date*: Invoice Date is the date on which the invoice is raised.
Invoice Amount*: Invoice amount for which the vendor Invoice is being raised.
Status: There are two status for Vendor Invoice: Pending & Confirmed.
When the user created the Invoice and saves it, it remains in Pending status untill the confirmation button is clicked.
Posting Date: User will enter the date on which the Invoice is posted.
Currency: Choose the currency for Invoice.
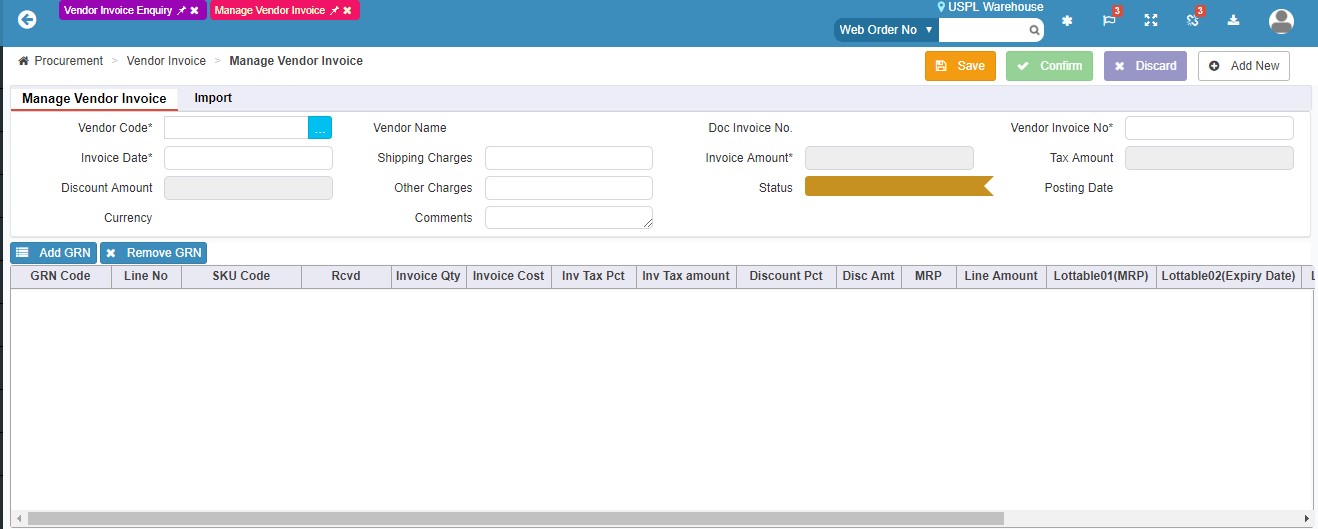
ACTION BUTTON
SAVE: To save the Invoice.
CONFIRM: To Confirm the Created Invoice.
DISCARD: To Discard the Invoice Created
ADD NEW: To add the new vendor Invoice
ADD & Remove GRN: While creating the Vendor Invoice, the GRN needs to be added in the invoice for which the Invoice is getting raised.
5.3 OTB Enquiry
OTB (Open to Buy) enquiry is the section which displays all the Budgets created by the User. OTB is the process where the user specifies the budget for a particular category in a specified period of time, within which only the stated amount of PO can be raised.
NAVIGATION
Procurement –> Vendor Invoice —> OTB Enquiry
Lets Understand this in detail:
The enquiry screen will have right based access.
OTB ID: OTB ID is the system generated ID for the open to buy budget created.
Description: This is the description of the OTB budget entered by the user while creating it.
Location: User can specify the Location for which the OTB will be applicable.
Start Date: This is the date from which the OTB period will initiate.
End Date: This is the date upto which the OTB period will be applicable.
Status: Status cycle of the OTB is stated as follows.
Pending –> Confirmed –> Released –> Cancelled/Expired.
Total Budget: Total Budget assigned for any particular category during the specified period
Consumed: Consumed amount from the Total budget.
OpenToBuy: This section contains the Open to Buy amount.
ACTION BUTTON
Search: Clicking on the search button without entering any filter criterion will populate the list of all the OTB created based on default filter setting. User can further narrow down the search by using filter options to get a specific information.
Reset: Reset button will refresh the filter fields to default settings, i.e. to an initial state to start a fresh search.
Download: Upon clicking this button, search results will be get downloaded in .csv format.
Add New: Add new button will enable the user to add new OTB.
5.4 View/Edit OTB
This section enables the user to create the new OTB from here.OTB is the process where the user specifies the budget for a particular category in a specified period of time, within which only the stated amount of PO can be raised.
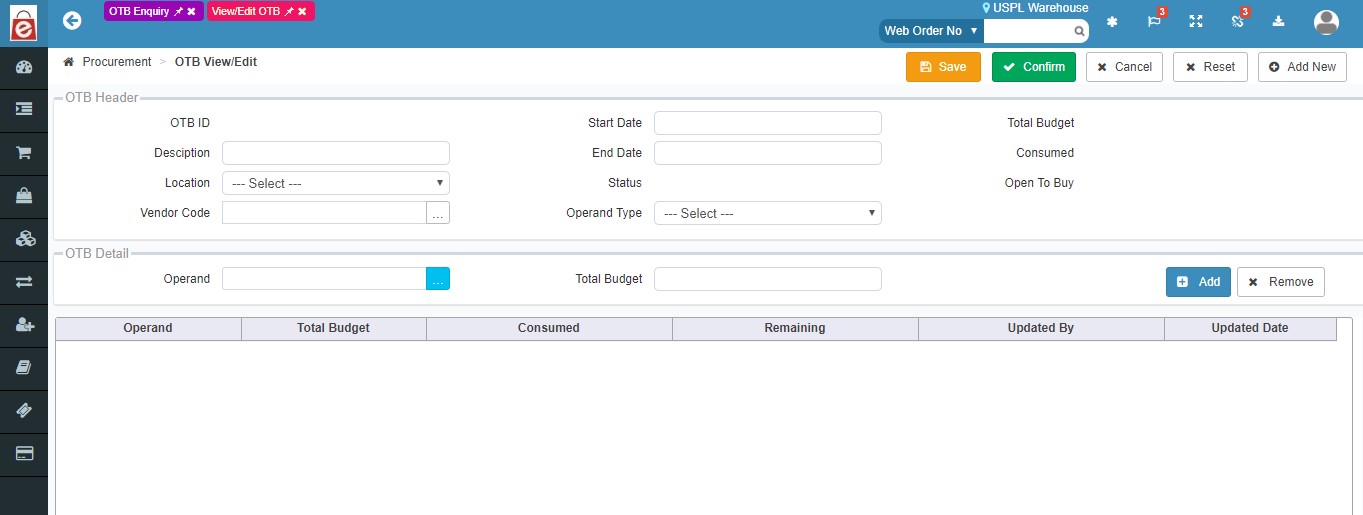
OTB Id: OTB ID is the system generated ID for the open to buy budget created.
Start Date:This is the date from which the OTB period will initiate.
Total Budget: Total Budget assigned for any particular category during the specified period.
Description: This is the description of the OTB budget entered by the user while creating it.
End Date:This is the date upto which the OTB period will be applicable.
Consumed: Consumed amount from the Total budget.
Location: User can specify the Location for which the OTB will be applicable.
Status: Status cycle of the OTB is stated as follows.
Pending –> Confirmed –> Released –> Cancelled/Expired.
Open To Buy: This section contains the Open to Buy amount.
Vendor Code: User will be entering the vendor name of the selected vendor.
Operand Type: Operand type is the basis on which this OTB will apply. The OTB can be applied on any one components specified in the Operand type for one OTB on which the budget is getting created.
Operand: Based on the operand type chosen, the operand category will be selected from here to create the OTB transaction.
6. ARS (Auto Replenishment Schedule)
ARS is Auto Replenishment System is used for automatic purchase order creation and auto-delivery of products directly. Our ARS module is primarily divided into three sections.
ARS SKU-Location Link
ARS Rules
ARS Execution Log
To understand this in detail, Click here.
************************************************************************************************************
SUPPORT
Feel free to contact us for all your queries at +91-7838130820.