
eRetail POS
Vin eRetail POS
Overview
POS (Point of Sale) is the place where the actual transaction is taking place on a particular time. Vin eRetail’s POS is a cloud based app enabling sellers to manage selling operations at a physical store location.
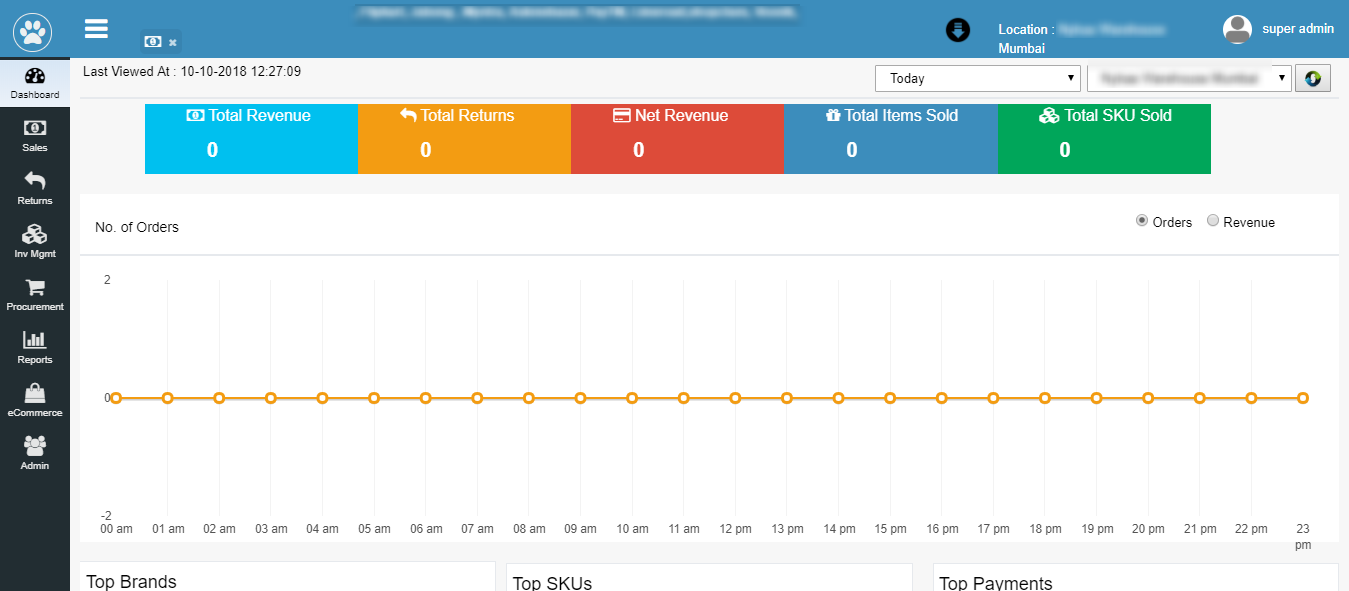
Dashboard shown in the above screenshot gives the gist of all the transaction’s data in a consolidated format along with the order and revenue graph.
It also consists of the filter for the user to choose the period for which he/she wish to view the data representation.
Lets move further section by section to understand POS.
It is divided into different sections:
-> Sales
-> Return
-> Inventory Management
-> Procurement
-> Reports
-> eCommerce
-> Admin
1. SALES
Sales section here in POS provides all the information about sales enquiry, bills generation and refund related transactions.
This section is further divided into:
->Sales Enquiry
->Generate Bill
->Refund
1.1 Sales Enquiry
Sales enquiry section enables the user search and filter the sales enquiry based on various filter available.
Bill No: Bill number is the system generated unique number given to every bill as a identifier.
Order No: Order number is the order number given to an order in the eRetail.
Bill Amount: Bill amount is the total amount of transaction being carried out per order per bill number. User can search any sales entry on the basis of bill amount as well.
Bill Date: User can search and enquire for sales entries on the basis of their billing date. In the POS system their are pre defined fields of periods based on which the enquiry can be searched.
Customer Name: User can search the sales transaction on the basis of name of the customer.
Reprint Receipt: User can reprint the receipt from here.
Email Receipt: User can email the receipt from here.
Location: User can filter on the basis of location of the warehouse.
Action buttons:
1. Search ![]() : Clicking on the search button without entering any filter criterion will populate the list of all the sales transaction on default filter setting. User can further narrow down the search by using filter options to get any specific information.
: Clicking on the search button without entering any filter criterion will populate the list of all the sales transaction on default filter setting. User can further narrow down the search by using filter options to get any specific information.
2. Clear Search ![]() : Clear search button will refresh the filter fields to default settings, i.e. to an initial state to start fresh search.
: Clear search button will refresh the filter fields to default settings, i.e. to an initial state to start fresh search.
3. Download  : To download the filtered or searched result in CSV format which is displayed in the data grid.
4. Advance Search: Advance search further improves the search results of sales enquiry by providing more fields to filter from. Below fields get added for the advance search option of the Sales Enquiry:
->Customer Phone
->Customer Email
1.2 Generate Bill
Generate bills section enables the user to generate the bill from here and proceed with the payment of any transaction. It also enables the user to park the sale of a customer in case customer wishes to recheck the products, and in the meantime user can start the fresh sale transaction and can later retrieve the parked sale.
1.2.1 SKU Search
1.2.2 Add New Customer
1.2.3 Park Sale
1.2.4 Discard Sale
1.2.1 SKU Search
In any POS, to commence a transaction for payment, the first step performed is to search the SKU customer is ordering and then add it for further process.
User can type or scan SKUs bought by the customer. Pressing ‘Enter’ will open “SKU List” pop up.
Below are fields based on which the SKU can be searched for scanning in POS.
SKU Code: Any unique code which a user gives to the SKU while creating it. This SKU code is a mandatory field and once created and saved cannot be changed and must be a unique number.
Description: Details provided to each SKU which explains the feature of products.
Size & MRP: User can search & filter the SKU on the basis of size an d MRP(Maximum Retail Price) as well.
Sale Price: User can filter the SKU on the basis of sale price of the product.
Available Quantity: The SKU’s can be filtered on the basis of available quantity to be further selected by the user for POS transaction.
Action Button
1. Search: Clicking on the search button without entering any filter criterion will populate the list of all theSKUs on default filter setting. User can further narrow down the search by using filter options to get any specific information.
2. Clear Search: Clear search button will refresh the filter fields to default settings, i.e. to an initial state to start fresh search.
1.2.2 Add New Customer
Add new customer section is has a great significance as from this section of the POS the user creates new customer or searches for the existing customer to commence the POS transaction.
To create Customer user will have to fill in the below basic details:
Customer Name
Customer Phone
Customer Email
To search for an already existing customer in the system for the transaction, the user can user the below filter/search field:
Customer Name
Customer Phone
Customer Email
Customer Create Date
Customer Code
Extra Info
Action Button
1. Search ![]() :Clicking on the search button without entering any filter criterion will populate the list of all the SKUs on default filter setting. User can further narrow down the search by using filter options to get any specific information.
:Clicking on the search button without entering any filter criterion will populate the list of all the SKUs on default filter setting. User can further narrow down the search by using filter options to get any specific information.
2. Clear Search ![]() :Clear search button will refresh the filter fields to default settings, i.e. to an initial state to start fresh search.
:Clear search button will refresh the filter fields to default settings, i.e. to an initial state to start fresh search.
1.2.3 Park Sale
Park sale is an awesome concept of parking the sale for sometime in case of customer wants to add or reduce some products in the current listing, so here user can park this customer in background for the time being and take up the next customer in queue for the transaction and then can retrieve the previous customer on hold.
1.2.4 Discard Sale
Discard sale is the process of removing the sale transaction created before proceeding for the billing. On the events where at the last moment buyer changes the mind about the product or user may have entered the wrong SKU and wants to remove the same, then in such cases discard sale feature can be useful.
2. RETURN
Return section here in POS provides all the information about return enquiry and return request creation.
This section is further divided into:
-> Return Enquiry
-> Create Return
2.1 Create Return
User can create the return of product purchased by the customer.
Below are fields which the user needs to fill in order to raise the return.
Bill Number: User will search and enter the bill number of the order /SKUs which needs to be returned. Entering the bill number will fetch the details of the products ordered in that bill. User will then select the products to be returned as per customer’s requirement proceed.
Return Category: Category of return needs to be defined by the user as per customer’s requirement. Below are the three types of return out of which one can be processed.
-> Credit Coupon: it is a receipt given by a the user/POS to a customer who has returned goods, which can be used by the customer against future purchases (may be valid upto a certain period)
-> Refund: User/POS returning the amount paid by the customer against the SKU returned.
-> Replacement: Customer replacing the SKU he wants to return with some other SKU that he wish to purchase by adjusting the previous amount paid here.
Reason: POS user will be entering the reason of return by asking the same from the customer.
Enter Return Quantity: Once the bill number is fetched for the return, and SKU is selected from that order then the user will be entering the quantity to be returned by the customer and click on Confirm Return.
ACTION BUTTON
New: To raise a new return request.
Confirm Return: After filling in all the details, user uses confirm button to confirm the return request.
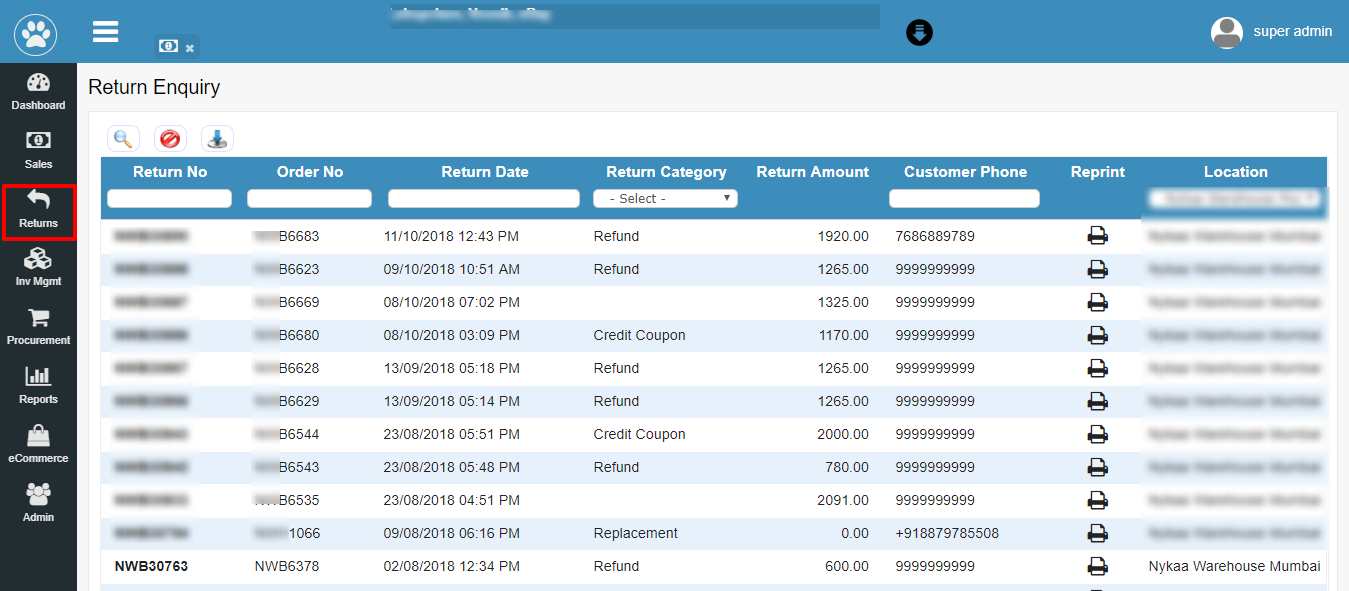
2.2 Return Enquiry
Return Enquiry section enables the user to search for the existing returns already raised by POS user. This section will be helpful in data analysis of all the returns created in the POS system.
Below are the fields based on which the returns requests can be searched, filetered & viewed.
Order No: User can enquire or filter the return enquiry by order number as well.
Return Date: By entering the date or date slot the user can search for the return request created during that period.
Return Category: Category of return needs to be defined by the user as per customer’s requirement. Below are the three types of return out of which one can be processed.
-> Credit Coupon: it is a receipt given by a the user/POS to a customer who has returned goods, which can be used by the customer against future purchases (may be valid upto a certain period)
-> Refund: User/POS returning the amount paid by the customer against the SKU returned.
-> Replacement: Customer replacing the SKU he wants to return with some other SKU that he wish to purchase by adjusting the previous amount paid here.
Return Amount: Search the return enquiry by return amount i.e. price of the product returned.
Customer Phone: Search the return enquiry by Customer phone number.
Reprint: to print the return invoice.
Location: Filter by the warehouse location.
ACTION BUTTON
a) Search ![]() : Clicking on the search button without entering any filter criterion will populate the list of all the return transactions on default filter setting. User can further narrow down the search by using filter options to get any specific information.
: Clicking on the search button without entering any filter criterion will populate the list of all the return transactions on default filter setting. User can further narrow down the search by using filter options to get any specific information.
b) Clear Search ![]() : Clear search button will refresh the filter fields to default settings, i.e. to an initial state to start fresh search.
: Clear search button will refresh the filter fields to default settings, i.e. to an initial state to start fresh search.
c) Download : To download the filtered or searched result in CSV format which is displayed in the data grid.
3.1 Inventory View & Adjustment
Inventory view section enables the user to view real time status of inventory present in the warehouse. It shows item wise inventory for each of the products like total stock in hand, Free stock or available quantity. In inventory view section the inventory can be viewed or searched by SKU Code & by SKU IMEI.
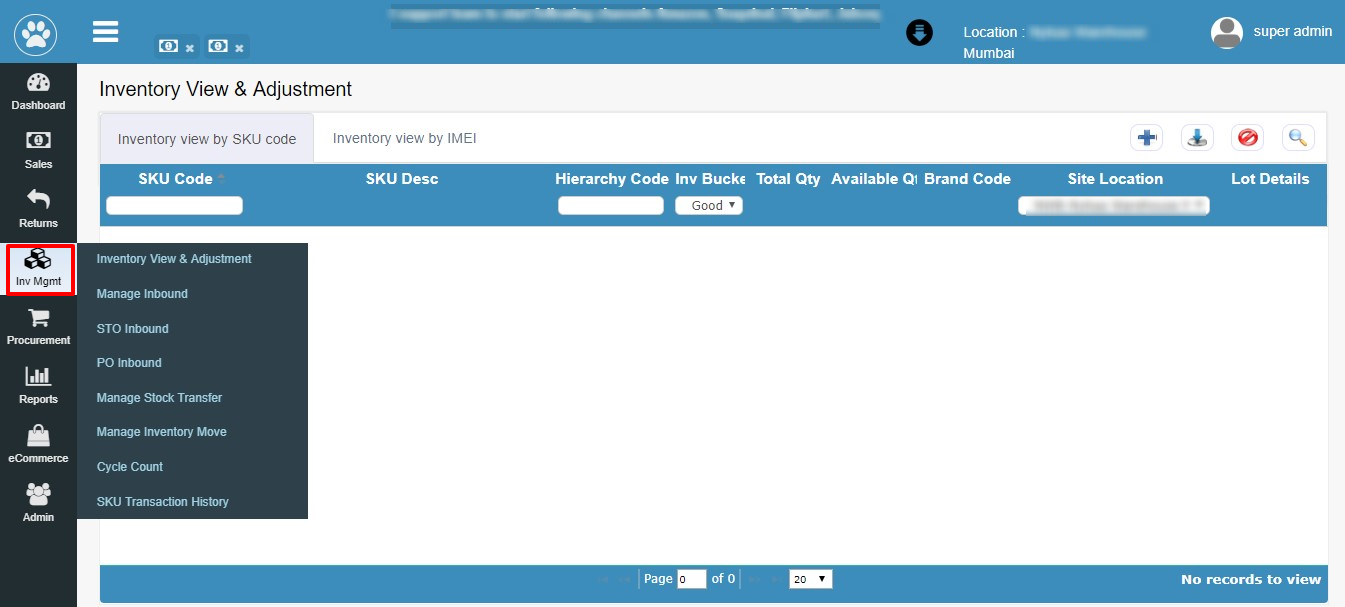
3.1.1 Inventory view by SKU
In inventory view by scan user can search or filter SKU’s on basis of few fields, lets understand them in detail.
SKU Code: Any unique code which a user gives to the SKU while creating it. This SKU code is a mandatory field and once created and saved cannot be changed and must be a unique number.
SKU Description: User can filter and search the SKU on the basis of description given to it.
Hierarchy Code: Hierarchy code helps user to configure merchandising hierarchy for SKU from the list as they could be the sub category or sub-sub category of the SKU.
Inv Bucket: Inv bucket shows the status of the products in inbound and accordingly to be assigned the bucket. User will have to select the most suitable one out the given options.
Total Quantity:Total quantity of the SKU
Available Quantity: Actual available quantity of the SKU.
Brand Code:User can filter and search the brand code on the basis of brand code given to it .
Site Location: User’s selected warehouse location for the Inventory view will be getting displayed here. This field is automatically fed once the user logs in.
ACTION BUTTON
a) Search ![]() : Clicking on the search button without entering any filter criterion will populate the list of all the SKU code on default filter setting. User can further narrow down the search by using filter options to get any specific information.
: Clicking on the search button without entering any filter criterion will populate the list of all the SKU code on default filter setting. User can further narrow down the search by using filter options to get any specific information.
b) Clear Search ![]() : Clear search button will refresh the filter fields to default settings, i.e. to an initial state to start fresh search.
: Clear search button will refresh the filter fields to default settings, i.e. to an initial state to start fresh search.
c) Download : To download the filtered or searched result in CSV format which is displayed in the data grid.
d) Add Stock  : By this action button user can add the stock to any particular SKU. Once this is clicked the user gets a form to fill in order to increase the stock.
SKU* : Enter the SKU name here in order to increase its inventory.
SKU Desc : Enter the SKU description.
Adjustment Qty*: Enter the Increased or adjusted quantity.
Reason*: Enter the reason for adjustment. For example: Order Shipment, Stock Take etc.

3.1.2 Inventory view by IMEI
In inventory view by IMEI user can search or filter SKU’s on basis of IMEI as well. Rest everything will be same as inventory view by SKU code but here the inventory can be viewed by IMEI as well.
3.2 Manage Inbound
Overview
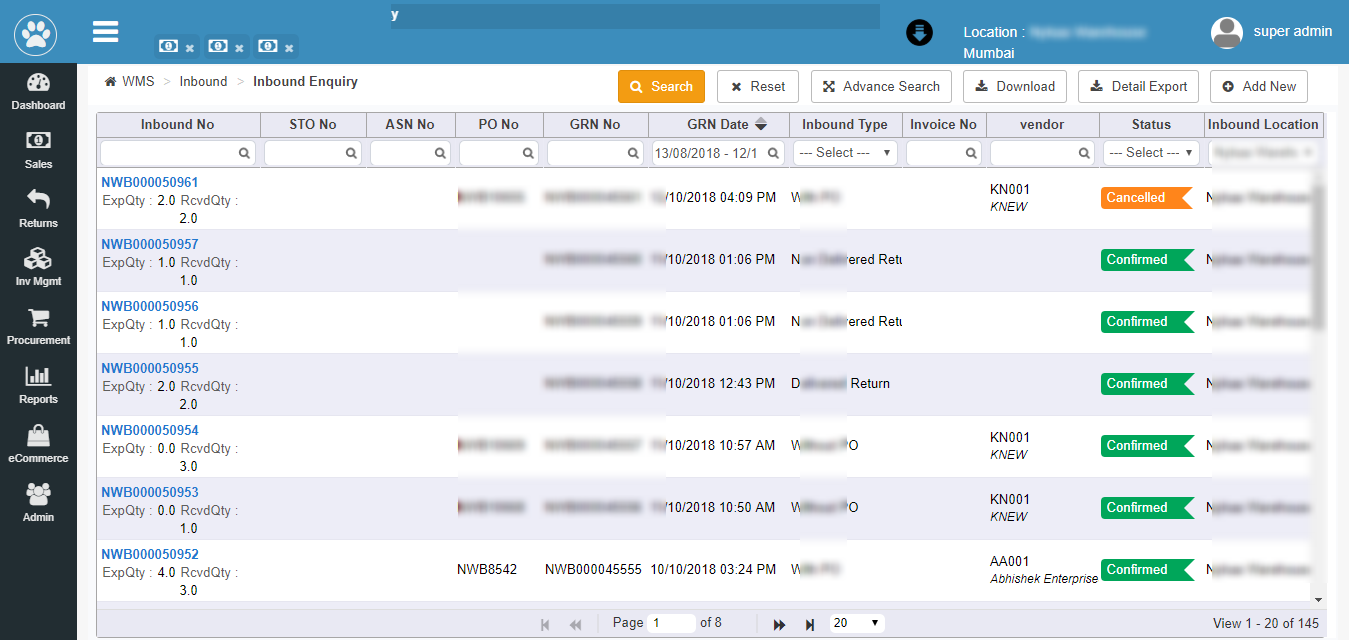
The inbound process starts when items arrives in the warehouse location, either received from external sources or from another company location. An order becomes an inbound shipment when a purchase order release is packed and it is physically ready to be shipped.
Inbound enquiry can be carried out by filtering the below data:
Inbound no: Inbound number is the unique identification system generated number given to every inbound created in the system.
STO no: User can search the inbound enquiry and can narrow down the search results by using STO no. as a filter.
ASN no: User can search the inbound enquiry and can narrow down the search results by using ASN no. as a filter.
PO no: Inbound can be searched with respect to the PO number generated for the same.
GRN no & Date: Inbound enquiry can be carried out by using the Goods Received Note and date.
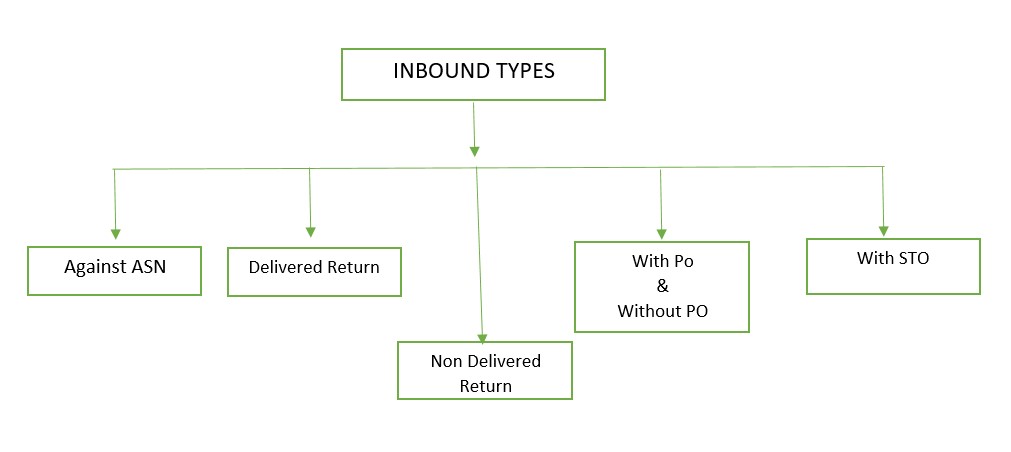
Inbound Type: User can filter the inbound numbers based on their types and categories.
Invoice no: The inbound can be filtered on the basis of invoice number as well.
Vendor: User can filter the inbound enquiry by the vendor name as well.
Status: The inbound can also be searched with the status of the inbound entered in the system.
The Status based on which these inbound can be filtered are:
-> Cancelled
-> Confirmed
-> GRN in Process
-> GRN in QC
-> Pending Confirmation
->QC Done
Inbound Location: User can search and filter the result on the basis of inbound location.
- This section will enable the POS user to enquire and search an already existing STO’s and STO details. User can refine the search further by using filters as per requirement/s. Fields on the basis of which the Stock Transfer Orders can be searched:
- STO number- Date- Type
STO number is the system generated unique ID given to the STO & from the filter option the STO’s can be searched using STO as well.
STO Date is the date on which the STO is created.
STO type filter consists of two type STO, one is NORMAL STO which is created in case of normal transfer from one location to another & other type of STO is RETURN where the sales transfer order is created in case of order returns. STO can be filtered /searched on these bases as well.
Ship & Delivered Date
Ship Date & delivered date are the dates on which the STO was shipped and delivered respectively. The user can narrow down the search results by entering the ship date or delivered date.
Origin & Destination Site
User can also search the STO by entering the origin and destination site for the STO. And all the STO’s corresponding to that origin will be displayed as search result.
Status
STOs status changes at every stage with respect to the user’s action and STOs processing cycle.
The status through which an STO goes through is:
-Created: When the STO is created.
-confirmed: When the STO is Saved and confirmed.
-Allocated: When the STO is allocated for the WH location.
-Part Allocated: When not all the SKU’s of the STO but few are allocated for the WH location.
-Part Picked: When from an confirmed STO few SKU’s are picked and not the whole STO, then this is the part picked status of an STO.
-Pick Complete: When an STO is completely picked.
-Part Shipped: When from an STO few SKU’s are Shipped and not the whole STO, then this is the part Shipped status of an STO.
-Shipped Complete: When an STO is completely picked.
-Delivered: When the STO is delivered to destination then the status changes to delivered.
-On Hold: User can put the STO on hold if he wants, and in the search criterion the same can be treated as a parameter to narrow down the STO search results.
Action buttons
1. Search: Clicking on the search button without entering any filter criterion will populate the list of all the STO based on default filter setting. User can further narrow down the search by using filter options to get any specific information.
2. Reset: Reset button will refresh the filter fields to default settings, i.e. to an initial state to start fresh search.
3. Export/Download: To download the filtered or searched result in CSV format which is displayed in the data grid.
4. Advance Search: Advance search further improves the search results of STO by providing more fields to filter from. Below fields get added for the advance search option of the STOs.
5. Add New: To add a new STO to the database.
below tabs are present to capture all STO related information while creating it.
-> STO Order Detail
-> UDF
-> Outbound Delivery
-> Comment History
-> STO Order Tag
STO Order Detail:
From STO order detail section the user will enter all the details for creating an STO and adds the SKU for STO from here.
Ext. STO No:
External STO number is the number given by the user OR order No provided by the sales channel/platform from where STOs are pulled into eRetail
STO Type:
There can be two type of STO, one is NORMAL STO which is created in case of normal transfer from one location to another & other type of STO is RETURN where the sales transfer order is created in case of order returns.
From Site:
The ‘from site’ is the warehouse location from where the SKU will be picked up.
To Site
The ‘to site’ is the warehouse location to where the SKU will be inward.
Reason
User will have to mention the reason for Stock transfer being done from one location to another.
Priority
User can set the priority while creating the STO as low priority or high priority based on the priority options.
On Hold Status:
User can put the STO on hold if he wants, and in the search criterion the same can be treated as a parameter to narrow down the STO search results.
Remarks:
User can mention the remarks for the STO being sent for the receiving warehouse to know about the same.
Status:
STOs status changes at every stage with respect to the user’s action and STOs processing cycle.
The status through which an STO goes through is:
-Created: When the STO is created.
-confirmed: When the STO is Saved and confirmed.
-Allocated: When the STO is allocated for the WH location.
-Part Allocated: When not all the SKU’s of the STO but few are allocated for the WH location.
-Part Picked: When from an confirmed STO few SKU’s are picked and not the whole STO, then this is the part picked status of an STO.
-Pick Complete: When an STO is completely picked.
-Part Shipped: When from an STO few SKU’s are Shipped and not the whole STO, then this is the part Shipped status of an STO.
-Shipped Complete: When an STO is completely picked.
-Delivered: When the STO is delivered to destination then the status changes to delivered.
UDF (User Defined Fields)
These are the custom fields which can be created by the User for customers in case of any extra information required.
Outbound Delivery
Outbound delivery number shows the details of order like from which Warehouse it has been shipped, the Shipping detail or ASN number.
The transporter can be changed for the order from this section.
STO Order Tag
User can enter the order tags which are nothing but important information about the STO order which also acts as the searchable keywords for those STOs.
Action buttons
1. Add New: To add a new STO to the database.
2. Save: Save the created the STO.
3. Confirm: To confirm the created STO.