
SELLER PANEL
Vinculum’s eRetail Seller Panel enables a seller of the marketplace to efficiently manage the Orders in OMS and also to help collaborate and synergize in WMS, OMS, returns, Shipping labels, Invoices and also enables the seller to support multiple fulfilment modes.
UTILITY
Vin eRetail Seller Panel is designed for Marketplaces to help collaborate and synergize with their partner network through –
- Quick seller on-boarding and catalogue management
- Dashboards to view records and Business KPIs on a single platform
- Manage Orders, Shipping labels invoice, SKUs, & Inventory
- Update Order status to marketplaces
- Support multiple fulfilment modes
- Manage RTOs and delivered returns
- Track and rate seller performance
- Seller Support tickets, notifications, reports & message broadcast
- MANAGE ORDERS
Manage order section enables the user to manage the orders which are confirmed, shipped or ready to be shipped. From here user can generate the invoices, reject the orders and can change the mode to view different stages of orders. Manage Order section is primarily divided into :1.1 Active Orders
&
1.2 Archived Order List
1.1 Active Order
Active order section gives the details of all the confirmed order and all those order which are pending for seller’s action.
Navigation
Manage Orders –> Active Orders
In active order section there are four modes under which different orders are placed and processed.
They are:
1.1.1 Dropship
1.1.2 Fulfilled By 3PL (one ship)
1.1.3 Ship via FC
1.1.4 Vendor Self Delivery
1.1.1 Drop Ship
In all the modes of orders there are 03 tabs of order processing.
*Confirmed: Confirmed tab here shows the orders which are confirmed to be drop shipped, seller can generate invoices from here and can also reject one or more orders from the listing displayed.
Once a user selects a line to print the invoice, the following screen will appear which will ask for confirmation if the invoice status is correct. The information that is typically generated once the print invoice is pressed is Invoice No., Identification of the transporter and the generation of AWB Number.
*Ready to be Shipped: All the ready to be shipped orders of drop shipping mode gets listed here. From here the seller can schedule pickup, mark the orders as shipped, print invoices and shipping label as well.
*Shipped: The Shipped tab will display all the Shipped orders along with their order number and shipping related details.
1.1.2 Fulfilled by 3PL
Fulfilled by 3PL refers to fulfillment of the order by a 3rd party Logistics. Here the inventory lies with any third party logistics company’s warehouse and the order is fulfilled by the 3PL here.
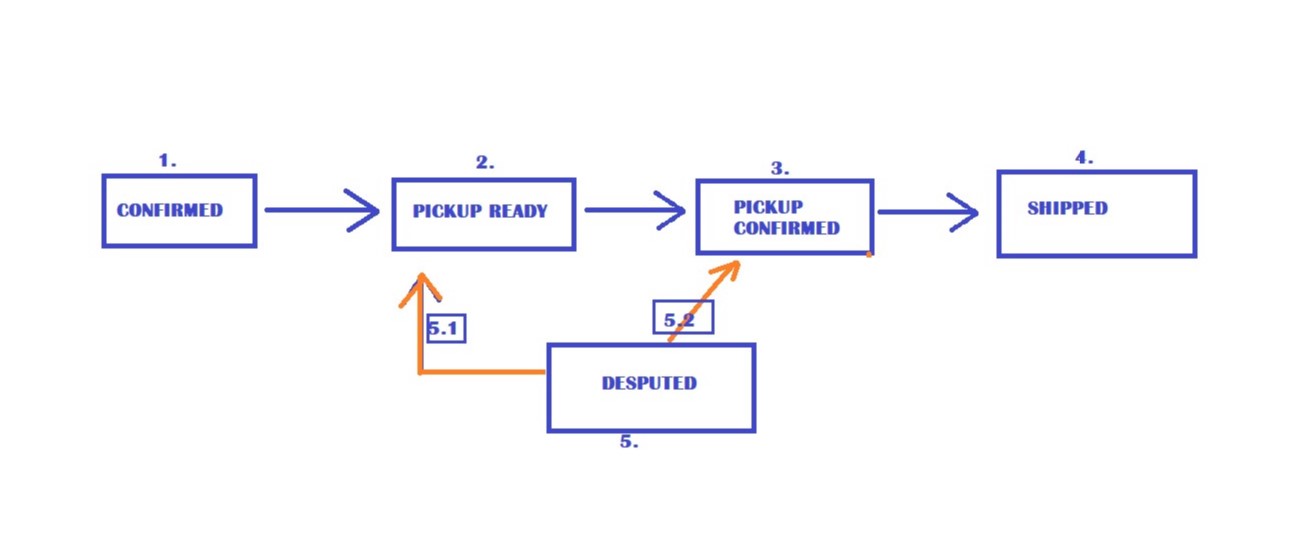
The order gets displayed in 05 different tabs here:
-Confirmed
-Pickup Ready
-Pickup Confirmed
-Shipped
-Disputed
A Regional Distributer (RD) plays an important role in case of One Ship.The below figure shows the work flow in the “One Ship” Mode.
1.1.3 Ship Via FC
Here is the shipment via Fulfillment Carrier option where the order gets sent via FC. This mode displays the list of order fulfilled by FC along with the order image, order number, customer details, Sku Code, Status and much more.
Vendor Self Delivery mode is similar to a Drop Ship model with the exception that in this mode the transporter is decided by the seller itself and there is no intervention from the Marketplace player w.r.t. selection of transporter.
The seller has to track and update the status of the orders all by himself as the trading API’s does not work in this mode. The following will be the status of different orders:
-In-Transit
-Delivered
-RTO
-RTO Delivered
On selecting an order and clicking on the “generate invoice” button, the following screen will appear which will help select a transporter from the drop down list and the system will prompt to enter the AWB number.
1.2 Archived Order List
The Archived Order list contains the list of all the delivered and returned orders.
2. SKU
2.1 Sku Listing
The SKU List gives the list of all the SKU’s linked to a particular seller. There are various filters available like SKU Name, UPC Code, Brands, SKU Code etc. which helps in fetching data quickly from the database. This screen captures all the SKUs linked to the particular vendor.
Seller can also update inventory and view total inventory available in warehouse.
2.2 Update Price/Inventory
From this section the User can help the seller in updating the selling price and quantity of the SKU in bulk i.e. for multiple SKU’s at a time.
The template files are Marketplace defined and can be uploaded to the marketplace after filling all the information. These template files are visible to the seller and can be downloaded to each sub-category. Once the category, sub-category and leaf category is entered, the download template will become active and the template can be downloaded. Once, all the details have been entered it can be uploaded using the upload data file. Seller can also view the status of all the files uploaded by him.
2.3 SKU Import
SKU Import section enables the user to import SKUs & to download them based on their attribute set via CSV.
ASN stands for Advanced Shipping Note. In the case of consignment based purchase, the Seller (Vendor) creates an ASN for the goods which are to be sent to marketplace. All such ASNs are visible in the ASN Enquiry screen in Seller Panel.
Once the ASN is confirmed by Marketplace, the seller can view and print barcodes. Accordingly, the seller pack, stick barcodes and ship the goods to the Marketplace.
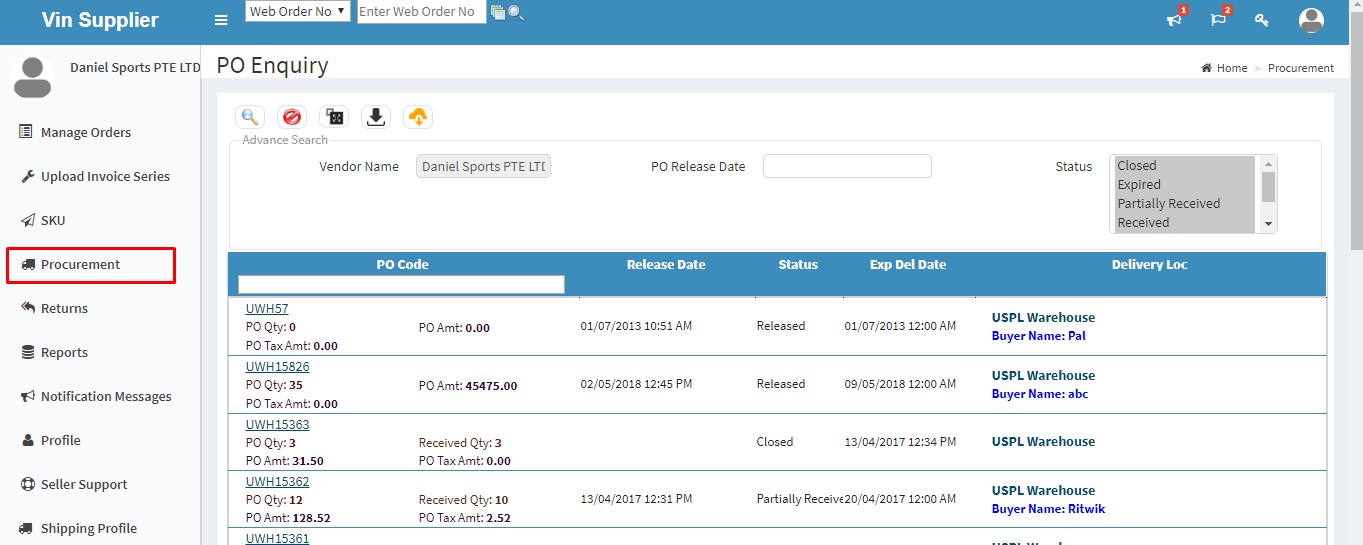
3. PROCUREMENT
Procurement section will able to view existing POs and their PO code, status, Location, expected delivery date and more. User can see all the POs and even narrow down results by putting values in search option of PO code field.
User will be able to download results in a report format using Detail Export/ Download option.
Action Button
- Search: Clicking on the search button without entering any filter criterion will populate the list of all the POs based on default filter setting. User can further narrow down the search by using PO Code filter options to get a specific information.
- Advanced Search: This button narrows the search results by adding more search criteria such as Vendor Name,PO Release Date, Status.
- Reset: Reset button will refresh the filter fields to default settings, i.e. to an initial state to start a fresh search.
- Download/ Detail Export: When user presses this button, user will be directed to Pending Report screen where user will be able to download report in the form of .csv file
4. RETURNS
Return section is divided primarily into 02 sections.
4.1 Manage Returns
4.2 Vendor Returns
4.1 Manage Returns: Manage returns section displays all the returns in three different tabs:
-> Returned Initiated: When a return is initiated by the customer online (delivered returns), a Return No is generated. Seller Panel returns screen shows all such returns number with Web Order No, SKU details etc. The below screen depicts the returns initiated by customer.
-> Return To Origin: In case of Un-delivered returns or RTO (Return to Origin), the below screen appears. The data grid shows all the RTO records along with the Return No, Web Order Number, SKU details, any additional remarks etc.
-> Disputed: In case of a dispute between the Seller and the 3PL company, the User can select ‘Mark Disputed’ and give reason for the same. Once the dispute is resolved, the User can confirm the same on ‘Disputed’ tab.
Action Button
- Search: Clicking on the search button without entering any filter criterion will populate the list of all the Returns based on default filter setting.
- Advanced Search: This button narrows the search results by adding more search criteria such as Seller, Return Date,Customer Name,Customer Email & Return Type.
- Reset: Reset button will refresh the filter fields to default settings, i.e. to an initial state to start a fresh search.
- Download/ Detail Export: When user presses this button, user will be directed to Pending Report screen where user will be able to download report in the form of .csv file.
- Mark Resolved: 4.2 Vendor ReturnUser will be able to see all the RTV requests in a single screen. The search results can be narrowed using different search fields available in the screen and user may further narrow down the search results using the Advance Search option. User may print the search results using the option Export/ Detail Export.
Report section enables the seller to generate the manifest sheet and manifest soft data transporter wise based on order type, date wise and other fields.