

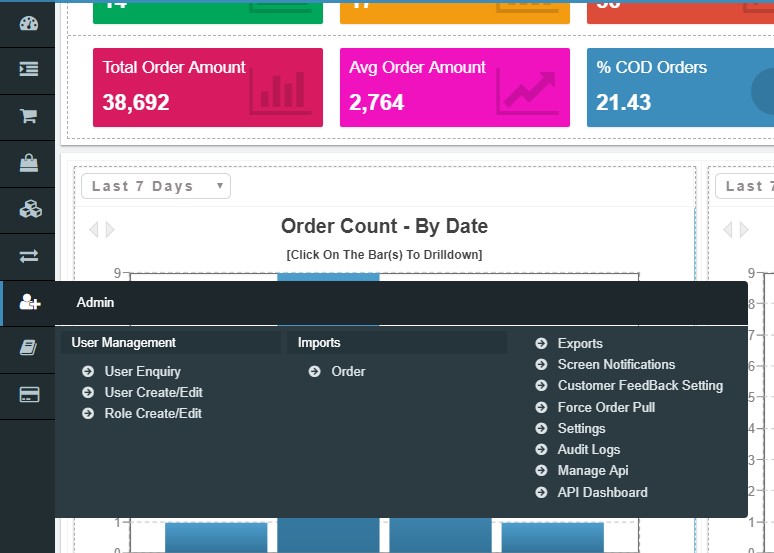
ADMIN
Admin section enables the admin to create and manage the users and limit their access rights, manage the audit logs, manage APIs and much more.
UTILITY
- Create and manage users and provide them different access rights based on the work areas.
- The audit logs can be viewed & details can be exported from Admin section.
- API can be activated and the access rights as well as the location can be entered.
- USER MANAGEMENT
- AUDIT LOG
- MANAGE API
- ORDER IMPORT
- This section will enable admin to enquire and search the already existing Users and User details with whom he has shared the access rights based on utility/work genre. Admin can refine the search further by using filters as per requirement/s.
- Admin can also create as many users and give them all different set of access right issues to enable the users to perform different action.
Navigation
Admin —> User Management
Utility
- Enables the Admin to maintain the records of users created and refer the rights provided whenever required.
- Admin can also create and edit the existing roles for the user.
This section will enable admin to inquire and search the already existing Users and User details with whom he has shared the access rights based on utility/work genre.
Navigation
Admin —> User Management —> User Enquiry
Fields on the basis of which the Users can be searched:
USER NAME: User name is the name given by the admin for any user while creating the user. This is unique identifier user differentiates one user from another & no two different user can have the same user name.
FIRST NAME & LAST NAME: In the User enquiry section the users can be searched by entering the first and the last name as well.
STATUS: The user can be searched from status.
EMAIL: The user can be searched from their email address.
USER TYPE: Admin while creating the users can define the user type. These can be types based on which they are characterized and differentiated, for example: admin, distributor, seller, seller admin etc.
ACTION BUTTON
Advance Search: Advance search further improves the search results of User Management by providing more fields to filter from. Below fields get added for the advance search option of the users.
->Role
->Company
->Location
Search: Clicking on the search button without entering any filter criterion will populate the list of all the user based on default filter setting. User can further narrow down the search by using filter options to get any specific information.
Reset: Reset button will refresh the filter fields to default settings, i.e. to an initial state to start fresh search.
Export: To download the filtered or searched result in CSV format which is displayed in the data grid.
2.1.2 USER CREATE/ EDIT
This section will enable admin to create new users and edit or update the already existing Users.
NAVIGATION
Admin —> User Management —> User create/edit
The user create / edit section is primarily divided into three sections.
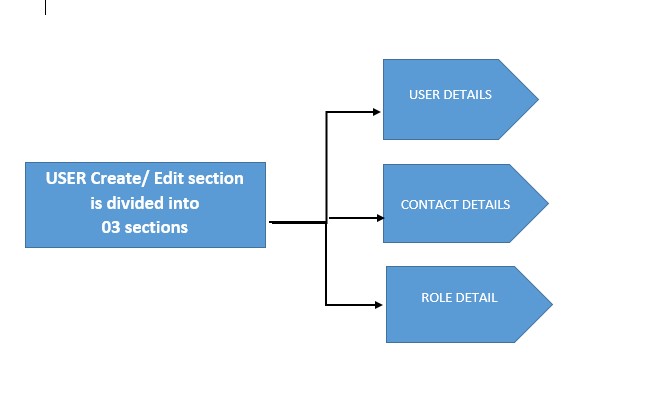
USER DETAILS

USER NAME: User name is the name given by the admin for any user while creating the user. This is unique identifier user differentiates one user from another & no two different user can have the same user name.
FIRST NAME & LAST NAME:In the User enquiry section the users can be searched by entering the first and the last name as well.
TITLE:
DATE OF BIRTH:
STATUS: The user can be searched from status.
USER TYPE: Admin while creating the users can define the user type. These can be types based on which they are characterized and differentiated, for example: admin, distributor, seller, seller admin etc.
PURCHASE ORDER LIMIT:
CONTACT DETAILS
Below are the fields to be filled while entering the contact details of the user which consists of Full address and details of contact number and email Id.

Address 1 *
Address 2
Address 3
Country *
State *
City *
PinCode
Phone *
Alternate Phone
Email *
Alternate Email
With Audit Log section user can search the maintained record of all the changes made Vendor Maintenance & SKU Maintenance process groups. From here user can get the clear idea of all the time when the process of Vendor management had happened, the action associated with it whether insert or update or delete and much more.
NAVIGATION
ADMIN —> AUDIT LOGS
Below filter fields can help in narrow down the search results.
Date: Choose the date range from the drop down to narrow the search results and specify the period of which you want to analyze the record. User can choose the date as today, tomorrow, last 07 days, last month, and user can define the custom range where the specific period of 90 days can be described.
Process group: This field is used to select the process group for which the user intends to check the logs.
This is primarily divided into tow sections:
Vendor Maintenance.
&
SKU Maintenance.
Action: User can search the audit logs on the basis of action associated with it. The actions are categorized in three parts:
-Insert
-Update
-Delete
Attribute: User can select the attributes/fields for which the audit logs are required.
User: This field is used to enter the user name in case the audit logs are required in reference to some particular user ID.
ACTION BUTTON
Search: Clicking on the search button without entering any filter criterion will populate the list of all the Audit Logs based on default filter setting. User can further narrow down the search by using filter options to get any specific information.
Reset: Reset button will refresh the filter fields to default settings, i.e. to an initial state to start fresh search.
Export: To download the filtered or searched result in CSV format which is displayed in the data grid.
Manage API section enables the user to manage the integrated APIs in the system and also enables the users to add new APIs. Users can manage & do the settings based upon the requirement of their business.
UTILITY
– User can Activate or deactivate any integrated API from here.
-Users can add new API from here.
– The API key along with the API owner name, addition date and expiry is mentioned on the landing page of this section.
-User can manage the setting of any API by choosing and enabling the access rights for that API along with choosing the locations for the same.
NAVIGATION
Admin — > API — > Manage API
Let’s Understand all the fields in detail:
ADD NEW: Clicking on ‘Add’ button the users will get the list of APIs available with eRetail. They can choose the API they want to integrate — > then check the check box of access rights in case the user wants to enable the access right on the API — > and then setup the location.
In Location section there will be all the unmapped locations getting displayed w.r.t. to that API, user will choose the unmapped API and then map them.
API Key: On the Manage API section’s landing page user will see all the integrated API’s along with their API keys. An API key is the code passed to call the API and to identify the calling program or website.
API Owner: Name of the API owner will be displayed here.
Created Date & Expiry Date: API creation and expiry date.
Status: User can see the status of API from here, whether the API is active or not.
Settings: With settings, user can edit or change the access rights and can manager and change the mapped and unmapped locations. In Location section there will be all the unmapped locations getting displayed w.r.t. to that API, user will choose the unmapped API and then map them.
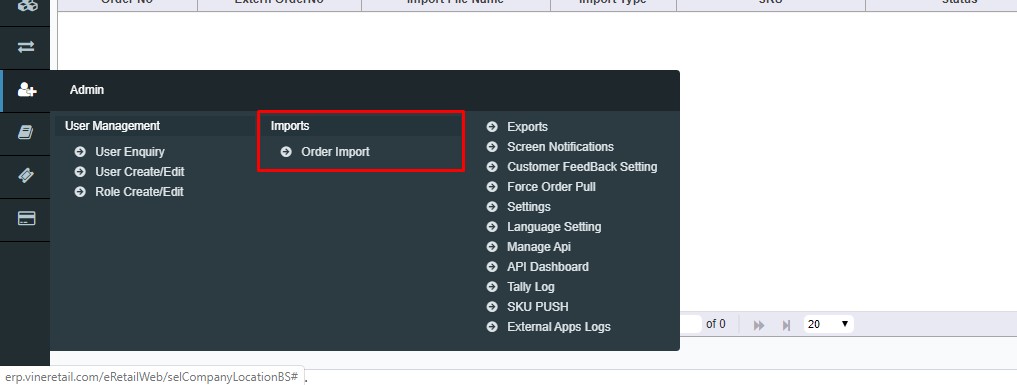
2.4 ORDER IMPORTS
Order Imports enable the user to import the data in bulk for Order cretion, order updation, POS orders and much more.
User will simply have to download the template, fill in the details and then upload the file.
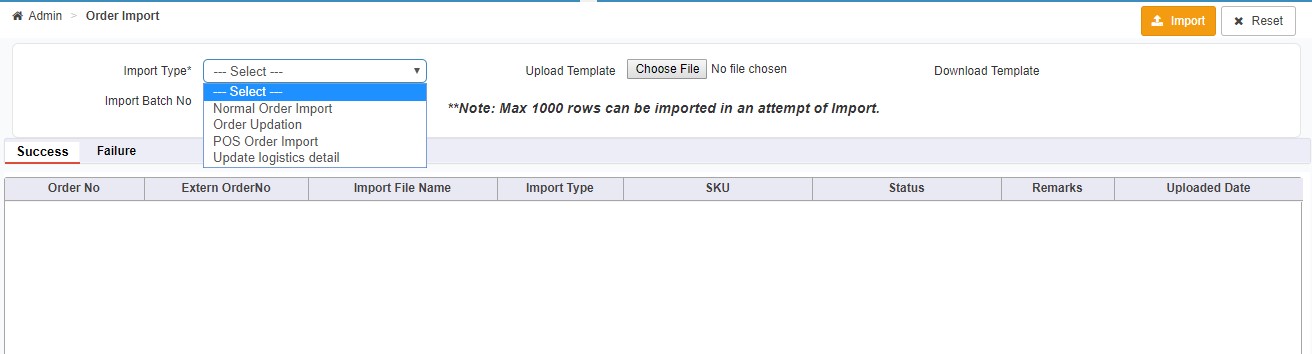
This Screen also displays the success and Failure of the records imported.