

SALES
Use the Sales Section to configure your Sales Channels, managing & adding the new sales channels with respect to the already integrated marketplaces and order enquiry, order creation, payment reconciliation management based on user will monitor and manage the orders and COD payments.

UTILITY
- Sales section enables user to target business on various sales channels.
- Enables user to configure, pull, manage orders and much more after creating the sales channel.
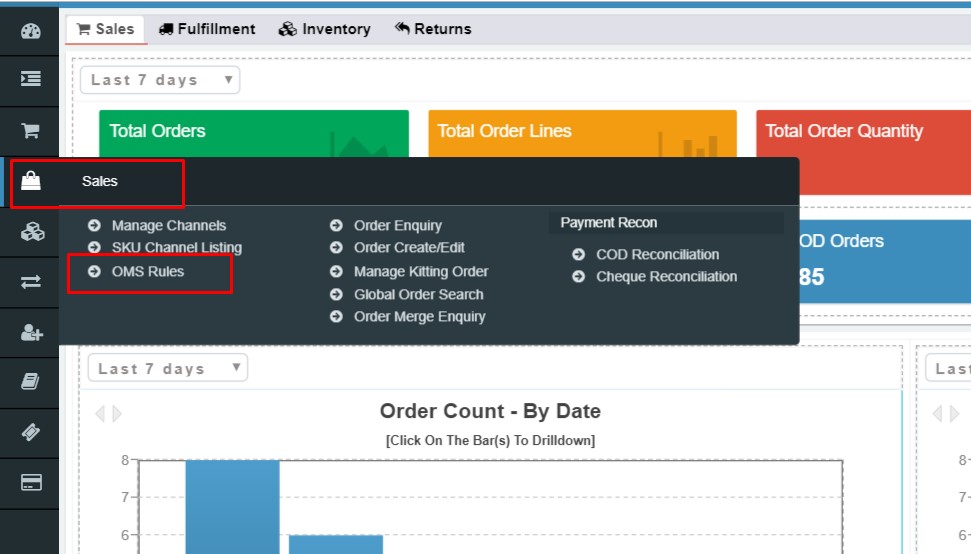
- Manage Channels
- SKU Channel Link
- Order Enquiry
- Order Create/Edit
- Global Order Search
2.1 Manage Channels
2.1.1 Overview
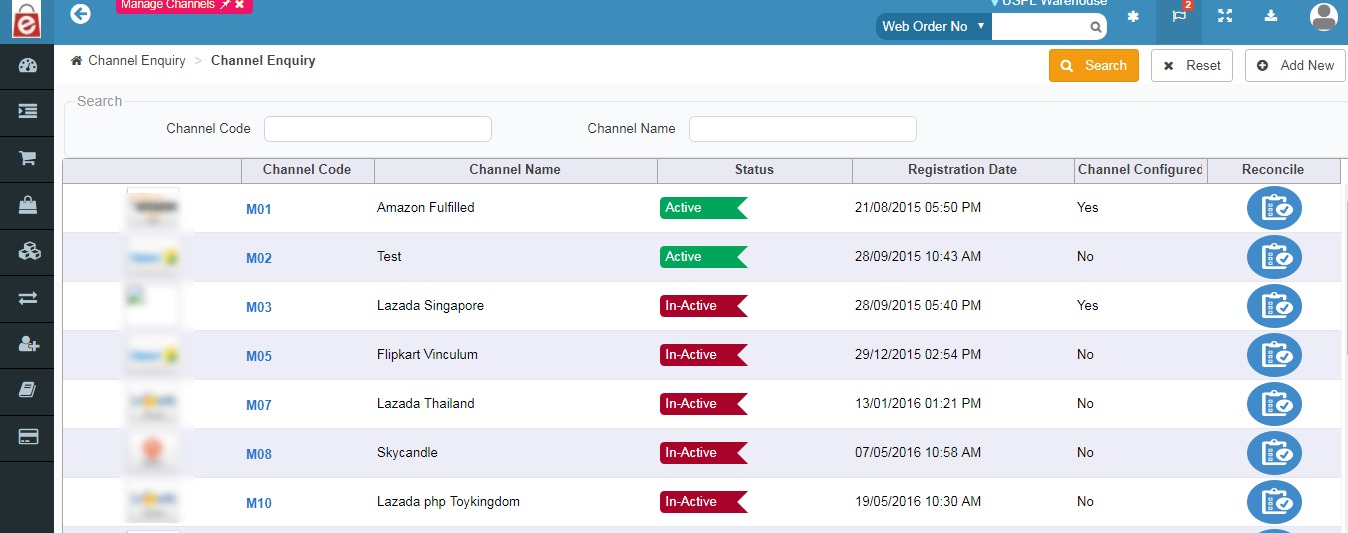
Manage channel enables the user to view listing of all the channels created (active or inactive) and add any new sales channel.
It also enables the user to search the existing sales channels on the basis of the channel code and channel name.
2.1.2 Utility
- Enables user to search the existing sales channels on the basis of the channel code and channel name.
- It also enables user to add and verify existing integration touchpoints like API credentials, sync date time for inventories, orders etc.
- User can add a new sales channel for his business and reconcile the existing ones.
- These created sales channels will enable the user to pull and sync the orders and further initiate other order processing information on eRetail.
NAVIGATION
SALES –> MANAGE SALES
RELATED LINKS
Order Enquiry
SKU Channel link
return
Fields on the basis of which the sales channel can be searched:
- Channel Code
- Channel Name
Channel Code: Channel code is the auto generated unique code by the system for each channel.
Channel Name: Channel name is the name given by the user to the channel while creating the channel.
ACTION BUTTON:
1. Search: Clicking on the search button without entering any filter criterion will populate the list of all the sales channel whether active or inactive. User can further narrow down the search by using filter options: Channel code and channel name.
2. Reset: Reset button will refresh the filter fields to default settings, i.e. to an initial state to start fresh search.
4. Add New: To add a new channel to the database. User will see the list of already added/integrated channels, selecting any one of those will enable user to add a new channel.
Further the Add channel is divided into 4 major sections.
*Channel Detail
*Order
*Channel SKU
*Inventory
Lets Understand these in detail.
Channel Detail
Channel Code: Channel code is the system generate unique ID given to the channel to differentiate these channels from one another.
Channel Name*: User will enter the name of the channel getting created.
Status: User will specify the channel’s state as active or inactive by selecting from the dropdown.
If channel’s status is inactive then the order sync, order processing & the inventory syncof that particular channel will be stopped.
Order Fulfillment WH*: User will choose order fulfillment warehouse from the list of warehouses given.This will be the default WH on which the order will get routed when pulling from the MP.
Auto Range SKU: Auto range SKU enables the user to configure that with a particular channel location whether the SKU’s will be getting Automatically mapped/synced or not. Based on the requirement the user can select yes or no from the option.
Configure Interface: User can configure the API credentials from here by entering the details.
Channel SLA(in hrs)*: This is the service level agreement between the channel and the user. Here various aspects of the service – quality, availability, responsibilities – are agreed between the service provider and the service user.
Orders Enquiry
Order Sync*:User can choose to sync the order from the channel to eRetail by managing this option. If this is disabled, the Order pull will not happen also the shipping label/Invoice and manifest will not get generated.
Order Sync From Date*: Order Sync action can be performed by the user by choosing the from date and from that till present’s period order will get sync.
Order Sync From Order No*: Order Sync action can be performed by the user by choosing the order number and from that order number till present’s period order numbers will get sync.
Shipping By: User can configure from here that the shipping will be done by the marketplace or by the seller.
Bill To Party & Its Master*: User gets the option to choose the billing party in case of multiple parties. These bill to party options can be created or managed from the
Masters — > Other Master — >Channel Configuration –> Bill to Party Tab.
Invoice No By: User will choose that the Invoice no will get generated by the user or by the channel.
PrePack Enabled: User can enable prepack for the order from here.
**Using this feature user can generate the label at the time of generating the picklist & when scannign the products/SKU user will get the labels in less than 05 seconds.
Mark ReadyToShip At: User can choose to mark the status of ready to ship at any of the two events :
-at Manifest
or
-at Pack
Each Qty Per Line: User can enable to sync the each quantity per line order.
International Invoice & Domestic Invoice: user can choose which format of invoice suits his requirement from here.
Channel Sku
Channel SKU Suffix & Prefix: User can put the different suffix and prefix on SKUs of different channels to differentiate them from one another.
SKU Sync: SKU Sync between Channel and eRetail can be done via PULL & PUSH.
User can choose Pull to Pull the SKU’s from the channel to eRetail panel.
And User can choose Push to send the SKU data or changes from eRetail to the channel.
-In SKU pull the user is given with two options:
Create
&
Moderate
CREATE: In create SKU pull, all the SKU will be pulled and created on the eRetail panel in order to get mapped.
&
MODERATE: In moderate SKU pull only the Product Id’s of other platform will get pulled and then mapped with the eRetail’s SKU Id’s.
Inventory
Inventory Sync:User will have to choose the option of Yes or No, in case he wants to enable or disable the inventory sync respectively.
Safety Stock: Safety stock is the stock kept by user to describe a level of buffer stock that is maintained to mitigate risk of stockouts (shortfall in raw material or packaging) caused by uncertainties in supply and demand.
Sync Method: In Sync method, users can choose that whether they want to sync the inventories from all the Locations, or they want to sync from different selected or custom locations.
Channel Inventory percentage: User can define the safety stock in percentage of the total stock.
2.2 SKU CHANNEL LINK
2.2.1 Overview
SKU Channel link section enables the user to link the SKU’s on the sales channel with the SKU’s on eRetail. If any of the product does not have channel ID or Channel SKU then it will not be mapped to that respective channel leading to order/inventory sync failure.
 Refer to the clip below for better understanding.
2.2.2 Utility
- Enables user to create new SKU channel link or mark an record as in-active to discontinue it for that respective channel
- Also lets user to save the changes done by updating the record.
- With the SKU channel linking the order is pulled and inventory is pushed in the system.
NAVIGATION
SALES –> SKU CHANNEL LISTING
RELATED LINKS
Order Enquiry
Order Pull
Inventory Push
Channel Product ID & Channel SKU
SKU Channel Link can be divided into three tabs:
- SKU/Link Search Channel
- SKU Channel Link Import
- Unmapped SKU’s
SKU/Link Search Channel
This section will display search results of the SKU mapping on different marketplaces. Here user can select the sales channel for which user is interested to view SKU–channel mapping details like Channel SKU, Product ID etc. and can update the same as per requirement.
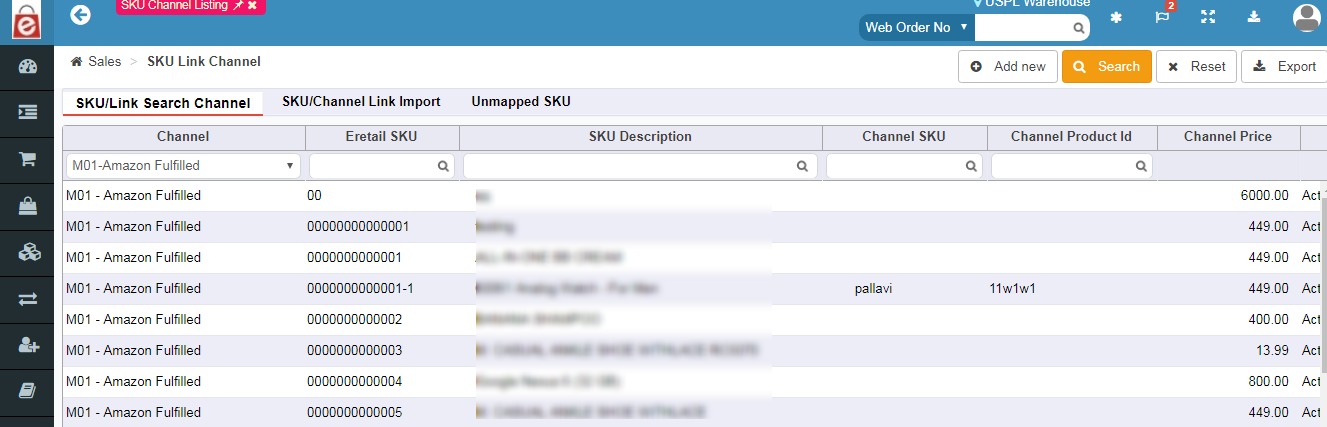
Here are the below fields on the basis of which you can narrow down your search results.
- Channel
- eRetail SKU
- SKU Description
- Channel SKU
- Channel Product ID
ACTION BUTTON:
1. Search: Clicking on the search button without entering any filter criterion will populate the list of all the sales channel whether active or inactive. User can further narrow down the search by using filter options: Channel code
and
Channel name.
2. Reset: Reset button will refresh the filter fields to default settings, i.e. to an initial state to start fresh search.
3. Export: To download and export the displayed search results in the form of CSV.
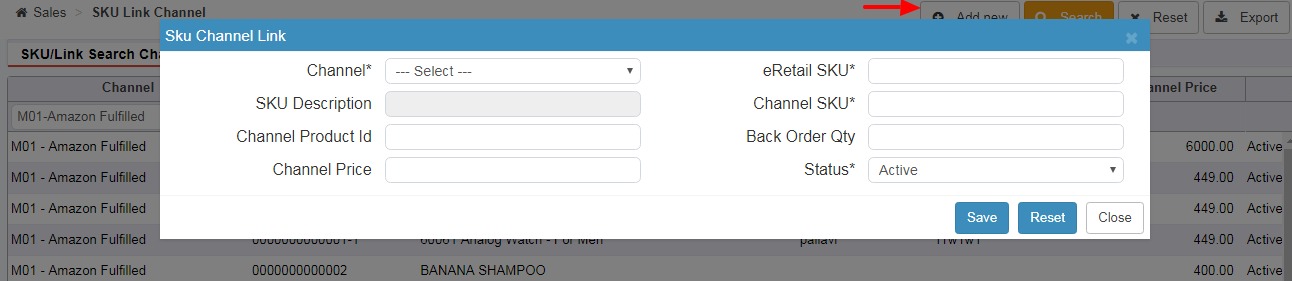
4. Add New: User will use this to add the new SKU channel Link. User will have to fill in the below fields in order to add new record.
- Channel Name:
- eRetail SKU
- SKU Description
- Channel SKU
- Channel Product Id
- Back order Quantity
- Channel Price
- Status
SKU/Link Channel Link Import
User can also add the SKU channel link record in bulk from this section by importing the CSV.
User can download the CSV template and do not change the pattern of the same.
Also note that: Max 5000 rows can be imported in an attempt of Import.
Unmapped SKU
All the SKU’s which by chance have not got linked or mapped on sales channel will be getting displayed here and the user can map them from this section.
SKU link in eRetail can be done via PULL & PUSH.
User can choose Pull to Pull the SKU’s from the channel to eRetail panel. And User can choose Push to send the SKU data or changes from eRetail to the channel.
-In SKU pull the user is given with two options:
Create
&
Moderate
CREATE: In create SKU pull, all the SKU will be pulled and created on the eRetail panel in order to get mapped.
MODERATE: In moderate SKU pull only the Product Id’s of other platform will get pulled and then mapped with the eRetail’s SKU Id’s.
So after this mapping those SKU whose product Id’s have not got mapped to the Id’s of SKUs on eRetail those SKUs come in unmapped section.
From the filter options given, user will choose the channel to view details accordingly.
2.3.1 Overview
Orders across all the channels are visible here on a common screen. User can enquire for all the order related information from here on the basis of various filters available to narrow down the search result.
All the orders from various vendors and channels will get displayed here, and the order can be confirmed, saved, allocated, shipped, put away from here.
User can quick ship the orders from here.
2.3.2 Utility
- Enables user to enquire for all the orders, check their status, export reports, view fulfillment and order processing details.
- Also lets user to save the changes done for any order.
NAVIGATION
SALES –> ORDER ENQUIRY
The order enquiry section consists of four sections:
-All orders
-Failed Orders
-Cancel orders post Shipping
-Pending MP Label Shipment

- ALL ORDERS
User will select the ‘to’ & ‘from’ dates and all the orders of that date selection will appear. User can also narrow down the search of orders by using various filters available like Order number, External Order Number, channel, order type, status, order amount & much more.From the order listing user can choose the order and manage it completely by clicking on the order number.
Selecting any Order user can manage its
allocation,
can quick ship,
save & confirm the order,
can part pick the order,
can update Warehouse,
Can hold the Order,
can unallocated the order,
can cancel the order and much more.
ACTION BUTTON:
1. Search: Clicking on the search button without entering any filter criterion will populate the list of all the Orders. User can further narrow down the search by using various filter options like Order number, External Order Number, channel, order type, status, order amount etc.
2. Reset: Reset button will refresh the filter fields to default settings, i.e. to an initial state to start fresh search.
3. Export: To download and export the displayed search results in the form of CSV.
4. Advance Search: Advance search further improves the search results of Orders by providing more fields to filter from. Below fields get added for the advance search option of the order enquiry.
- External Order No
- Fulfilled By
- SKU Code
- Priority
- Discount Code
- Replacement
- Customer Email
- Customer Phone
- Delivery No/AWB NO
- Reference No
- Channel Type
- Add New: User will use this to add/create the new Order. User will have to fill in all the mandatory forms of each tab given to create the order.
Order creation consists of 08 tabs with separate forms in them.
List of tabs are:
a) Order Details
b) Address
c) UDF
d) Outbound Delivery
e) Activity & Remarks
f) Payment Detail
g) Order Tags
h) Gift Wrap
2 . FAILED ORDERS
User will select the ‘to’ & ‘from’ dates and all the orders that have not been synced or pulled of that date selection will appear. User can also narrow down the search of orders by using various filters available like Order number, External Order Number, channel, order type, status, order amount & much more.
From this section the failed orders can be pulled from FORCED PULL button.
3 . CANCEL ORDER POST PICKING
User will select the ‘to’ & ‘from’ dates for order and all the orders which are cancelled for that date selection will appear. User can also narrow down the search of orders by using various filters available like Order number, External Order Number, channel, order type, status, order amount & much more.
From this section the PUTAWAY for cancelled orders can be processed.
2.4.1 Overview
User will use this to add/create the new Order. User will have to fill in all the forms of each tab given to create the order.Order creation consists of 08 tabs with separate forms in them.
List of tabs are:
a) Order Details
b) Address
c) UDF
d) Outbound Delivery
e) Activity & Remarks
f) Payment Detail
g) Order Tags
h) Gift Wrap
2.4.2 Utility
- Enables user to allocate and unallocated the orders.
- Let’s user to save & confirm the order, can part pick the order and update Warehouse and can hold the Order
- User can cancel the orders and can do the PUTAWAY for cancelled orders.
- User can run the Forced Pull for failed orders.
NAVIGATION
SALES –> ORDER CREATE/EDIT
RELATED LINKS:
-Force Pull
-manage picking
-Manage picklist
-Inventory view
ORDER DETAILS
a) External Order No: External Order number is the number given in by the user OR order No provided by the sales channel/platform from where orders are pulled into eRetail.
b) Channel: User will select the warehouse/ sales channel/ Marketplace for the order to be created under.
c) Remarks: User can enter the remarks related to significant orders.
d) Order Type: Order type here in drop down will be the type of order categories created in the database by the user.
For example: COD/Cheque/Prepaid/consignment/others.
e) Customer Type: Customer Type here in drop down will be the type of customer categories created in the database by the user. For example: Marketplace type, B2B type, B2C type etc.
f) Customer Code *: User selects the customer code w.r.t order. Customer Code is the unique code provided by the system to each customer and helps differentiating 2 or more records.
g) On Hold Status: Checking this box will enable the user to put the order status on hold instead of confirmed while creating the order.
h) Send Notification: User can check this box to receive order related updates.
ADD SKU
After filling in the order detail form user will enter the SKU details w.r.t. to the order created.
SKU Code: Enter SKU Code. Any unique code which a user gives to the SKU while creating it. This SKU code is a mandatory field and once created and saved cannot be changed and must be a unique number.
SKU Description: Enter SKU description if any.
UOM: Enter UOM which is the Unit of Measurement in which the SKU will be measured or weighed which is used in advanced Shipment Notice, Invoice, Purchase Order documents etc.
Source WH: Specify Source Warehouse for the order.
Unit Price & Order Qty & Discount Amount: Enter the Unit Price & Order Qty & Discount Amount.
b) ADDRESS
Address tab consists the full detailed Shipping and billing address of the customer with respect to the order.
c) UDF (User Defined Fields)
These are the custom fields which can be created by the User for customers in case of any extra information required.
d) OUTBOUND DELIVERY NUMBEROutbound delivery number shows the details of order like from which Warehouse it has been shipped, the Shipping detail or ASN number.The transporter can be changed for the order from this section.
e) ACTIVITY & REMARK
User can enter the order related remarks or any important piece of advice/instruction.
f) PAYMENT DETAIL
This section will contain all the details of payment made for the order. User will primarily have to define the mode of payment which is the mandatory field to be entered by the user.
g) ORDER TAGS & GIFT WRAP
User can enter the order tags and enable the gift wrap from this section.
3. OMS RULES
OMS rules are the set of rules created for the order routing and order management, which routes the order based on the rules set here and over writes the actual order flow.
These OMS rules can be set for below types:
Order Validation Rules
Order Routing/Split Rules
Seller Panel Order Rules
Shipping Rules
Notification Rules
Allocation Rules
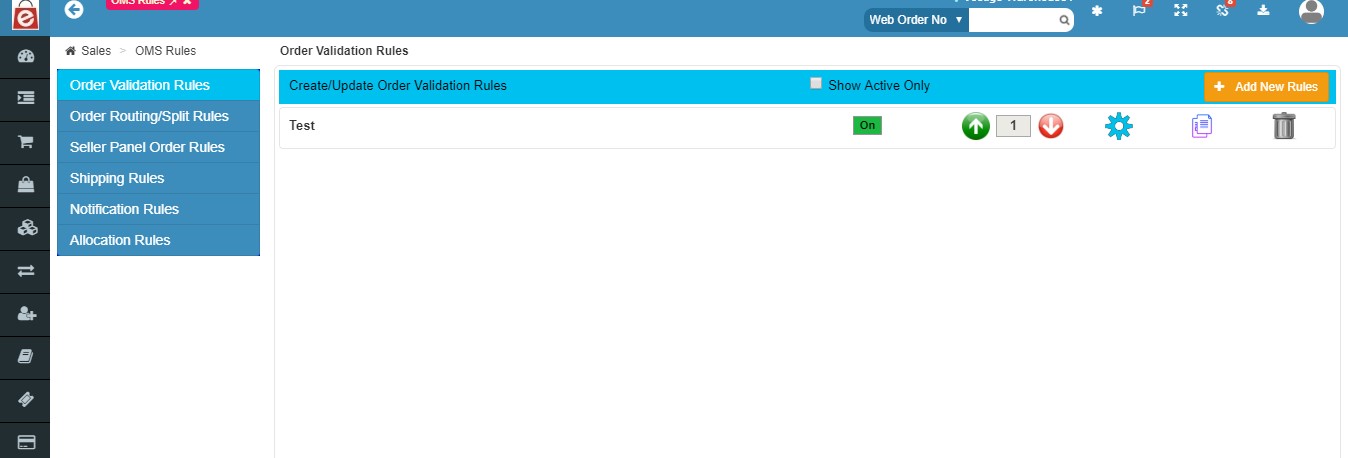
3.1 Order Validation Rules
Order Validation rule enables the user to create the validation rules for the orders based on various criterion.
The Order validation rule screen shows the already created the rules along with their active/inactive status, preference and option to remove the rule as well.

Action Button
Add New Rules: This will enable the user to create the new Order Validation from here. Clicking on this button the user will get redirected to the below screen for rule creation.
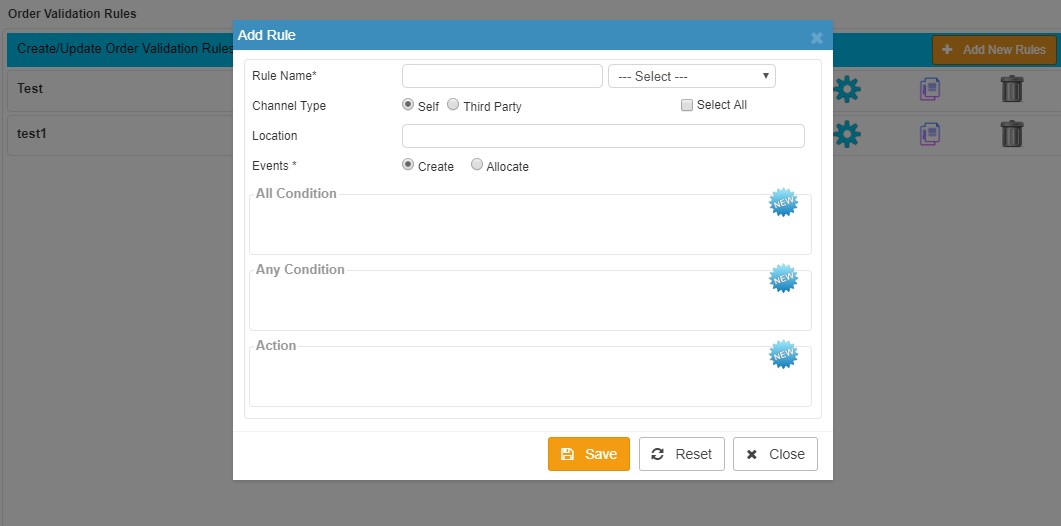
Rule Name* : Rule name is a mandatory field. This is unique name that is given by the user while creating the rule. Also from the drop down the user can choose to mark this rule as active or inactive.
Channel Type : From here the channel type will be defined from the given drop down : Self/ Third Party/ Select All.
Location: Choose the location/s for which this rule will be applicable.
Events *: Events are mandatory to enter while creating the validation rule. Here User will have to specify that whether it is for : Create or Allocate .
All Condition: Set the Conditions of Rule here where this condition will apply only when all the condition specified in this section will be true.
Any Condition: Set the Conditions of Rule here where this condition will apply when any of the condition will be true.
Action: Here the User defines the action to be performed for the conditions stated above.
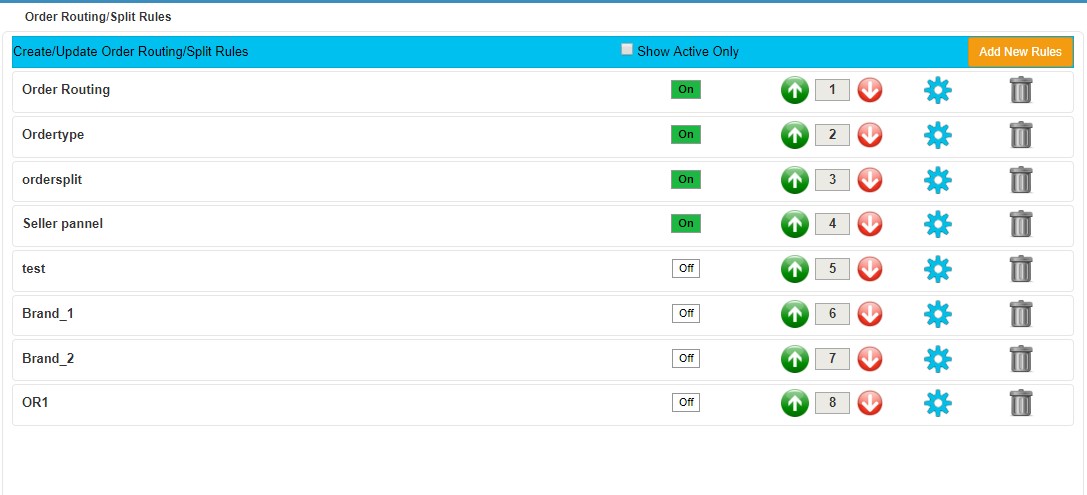
2. Order Routing/Split Rule
Order Routing rule enables the user to route the order based on the rules created here per say various criterion. The rule screen shows the already created the rules along with their active/inactive status, preference and option to remove the rule as well.
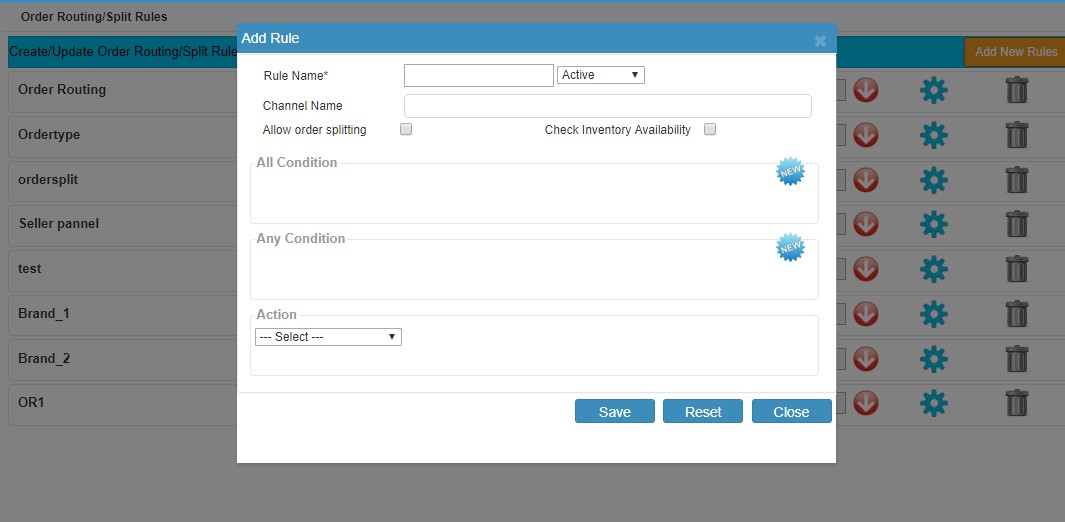
Channel Type : From here the channel type will be defined from the given drop down : Self/ Third Party/ Select All.
All Condition: Set the Conditions of Rule here where this condition will apply only when all the condition specified in this section will be true.
Any Condition: Set the Conditions of Rule here where this condition will apply when any of the condition will be true.
Action: Here the User defines the action to be performed for the conditions stated above.
Likewise all the other OMS rules will be set here.
********************************************************
Feel free to contact us for all your queries at +91-7838130820