

WAREHOUSE MANAGEMENT SYSTEM
Use the WMS to configure your WMS Setup, Order Processing, Inventory, Logistics, Inbound, miscellaneous and configuring the zones, bins, lottables based on which the further transactions will run.
UTILITY:
- In WMS, the WMS setup is the initial configuration process where all the warehouse management setup steps are performed on the basis of which the transactions will take place.
- User can create and configure bins, zones, lottables which will be helping in business reporting and Interfaces.
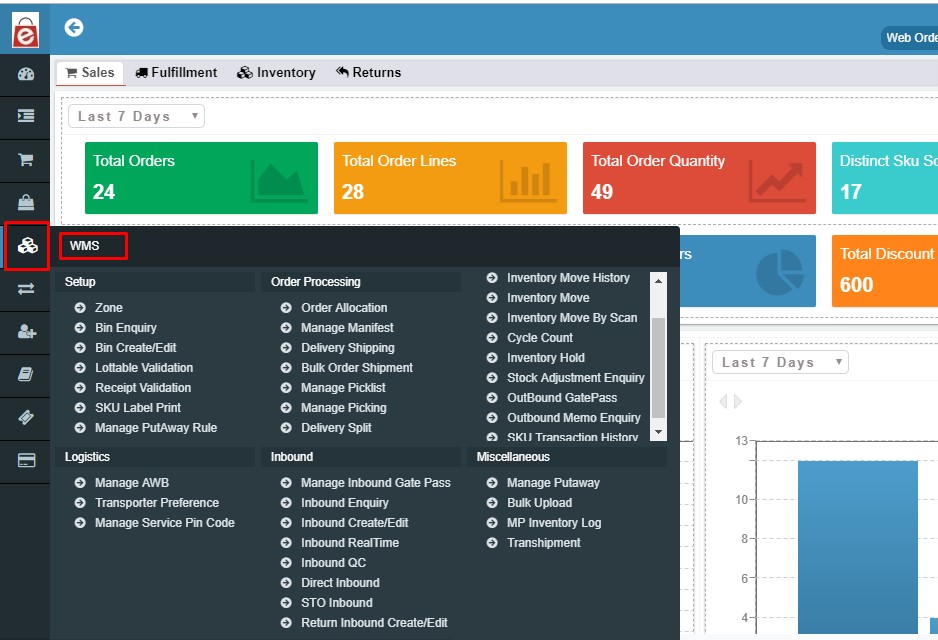
WMS consist of the below sections:
->Setup
->Order Processing
->Inventory
->Logistics
->Inbound
->Miscellaneous
2.1 SETUP
Overview
This section will enable user to search and create Zones, Bins, Lottables and check the lottable validations which we would be requiring further for Warehouse Management System.
UTILITY
- This section will enable user to search and create Zones, Bins, Lottables and check the lottable validations.
- User can perform the SKU print label and receipt validation.
2.2.1 ZONES
Zones are the divisions in which any warehouse is divided for the Stock keeping based on various attributes for one or multiple locations.
-> Zone enables defining the constraints for put away and picking of SKUs in the warehouse.
->Inventory Move, Stock Adjustment, Stock Take, Inbound and Returns take place with respect to the Zone.
NAVIGATION
WMS >> Setup >> Zones
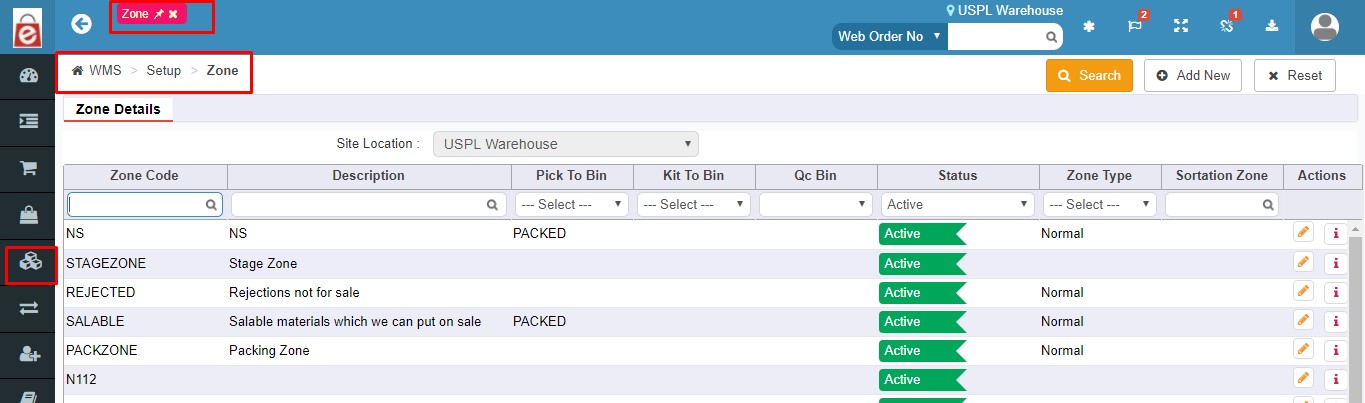
In ZONE DETAIL section, below are the fields based on which the ZONES can be searched:
Zone Code: Zone code is the User defined name/code given to the zone. This is a mandatory field while creating a zone.
Description: User can describe the zone by providing the description here.
Pick to Bin: User will choose the bin from here in which the product will get picked and allotted for the Zone.
QC Bin: QC bin refers to the quality check bin which will be chosen from here by the user for the zone.
Status: User can mark the Zone while creation as Active or Inactive. Inactive Zones cannot be used for the inbounds and further process.
Zone Type: User will have to choose the zone type from the drop down whether the zone user is creating is a normal zone or a sortation zone.
Sortation Zone: A sortation zone is the zone where all the zones SKU’s are staged and then sorted from there to be shifted from their respective assigned zones.
Actions: User can choose to Edit and Audit the Zones from the Action section.
ACTION BUTTONS
1. Search: Clicking on the search button without entering any filter criterion will populate the list of all the ZONES based on default filter setting. User can further narrow down the search by using filter options to get any specific information.
2. Reset: Reset button will refresh the filter fields to default settings, i.e. to an initial state to start fresh search.
3. Add New: To add a new Zone to the database.
2.2.2 BIN ENQUIRY
This section will enable user to enquire and search an already existing Bin and related details. User can refine the search further by using filters as per requirement/s.
->User can take a download/export of all the data present on Enquiry screen at any point of time.
UTILITY
-> The BIN describes the position in the warehouse where the goods are or can be stored in the smallest available unit of space.
-> The Bins are the storage units under zones created to actualize the status of inbound SKUs.
NAVIGATION:
WMS >> Setup >> Bin Enquiry
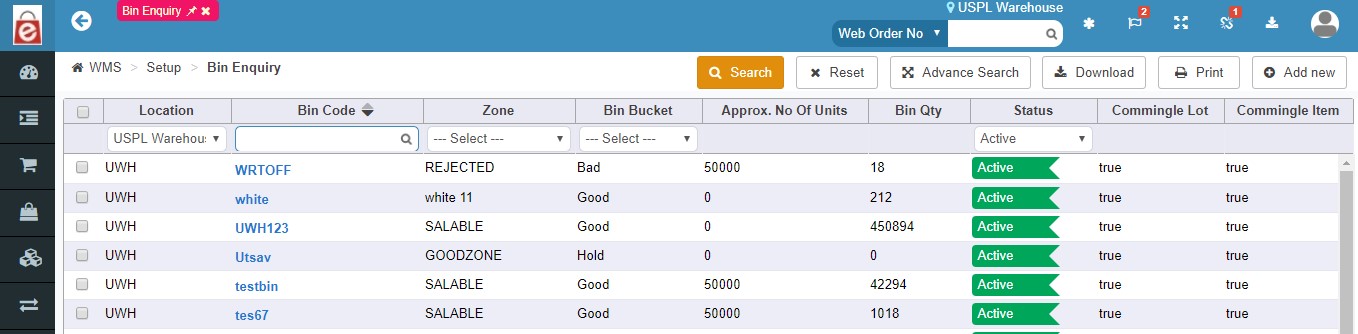
User can search the bin or enquire about the bin using the below filters to narrow down the search:
Location: User will have to mention the location as the warehouse/physical location for the Bin while creation.
Bin Code: Bin code is the unique code given by the user to the bin while creating the Bin. This is the mandatory field.
Zone: User will be choosing the zone from the drop list showing the already created zones for the Bin.
Bin Bucket: Bin bucket is the field which shows the status and feature of the bin created. For example, the bucket can be with the name based on conditions like Good/Bad/Damaged etc.
Approx no. of Units: This field describes the number of units any bin can hold/store.
Commingle Lot: If user wants to put two or more different type of items in one lot, then this commingle lot requires to checked.
Commingle Item: If user wants to put different items in a single bin then the check box of commingle item required to be checked.
ACTION BUTTON
1. Search: Clicking on the search button without entering any filter criterion will populate the list of all the Bins Created on default filter setting. User can further narrow down the search by using filter options to get any specific information.
2. Reset: Reset button will refresh the filter fields to default settings, i.e. to an initial state to start fresh search.
3. Download: To download the filtered or searched result in CSV format which is displayed in the data grid.
4. Add New: To add a new Bin to the system.
5. Advance Search: Advance search further improves the search results of Bin enquiry by providing more fields to filter from. Below fields get added for the advance search option of the Bin.
- BIN Type*
- Quantity
- Checkbox for: Default Bin for Inbound
- Checkbox for: Default Bin for Inbound
- Aisle

2.2.3 BIN CREATE/EDIT
Given below is the ‘Bin create/edit’ form
Bin Details
Site Location*: User’s selected warehouse location for the bin to be created will be getting displayed here. This field is automatically fed once the user logs in.
BIN Code*: Bin code is the unique code given by the user to the bin in order to differentiate the bin from one another.
BIN Type*: Bin type drop down displays the type of bin categories created by the user for different type of items based on various conditions. These types are created by the user in the database.
BIN Flag*: User can create the flags in the system for the bins and choose one flag per bin from here which will help to categories and find the bin.
Is Active: A checkbox to mark the bin status as active.
Zone*: User will mention name of the zone to which the bin will be allocated.
Aisle: user can define the position of bin being on aisle side.
Sequence No: User can provide sequence numbers to the bins in order to maintain the serial order.
Bin Coordinates
These coordinates for bin in the warehouse show the exact physical location of the warehouse with respect to the coordinates on scale:
X Coordinate
Y Coordinate
Z Coordinate
Other Details
Commingle Item: If user wants to put different items in a single bin then the check box of commingle item required to be checked.
Commingle Lot: If user wants to put two or more different type of items in one lot, then this commingle lot requires to checked.
Below are fields in which the user will input details related to the BIN’s physical size and space.
Default Bin for Inbound:
Cube Capacity
Weight Capacity
Default Bin for Return
Length-Width-Height
Loose ID
Approx. No of Units: User will enter the number of units that can be accommodated together in a particular bin.
2.2.4 LOTTABLE VALIDATION
Lots are the sub SKU’s or the parameters or the batches created in the warehouse system based on which the inventory lot will be moved out & Lottable Validation is the process of validating those parameters of lots.
For example: LIFO, FEFO, FIFO
UTILITY
–> User can further narrow down the search by using filter options of ‘Lottable Val Code’ and/or ‘Description’ to get any specific information.
–> User can add new lot and can validate the existing ones from here.
NAVIGATION
WMS >>> SETUP >>> Lottable Validation
Lots can be validated or searched on the basis of various filter options given:
Lottable Val Code: Lottable Validation code is the user generated code which is created while creating lottable validation. While enquiring or searching for the lottable Val Code detail this field can be used to input and narrow down the search.
Description: By entering the description of lottables, the lottable validation can be searched.
ACTION BUTTON
1. Search: Clicking on the search button without entering any filter criterion will populate the list of all the Lottable Validation created so far based on default filter setting. User can further narrow down the search by using filter options to get any specific information.
2. Reset: Reset button will refresh the filter fields to default settings, i.e. to an initial state to start fresh search.
3. Add New: To add a new LOT to the system.
2.2.5 RECEIPT VALIDATION
Overview
Receipt validation section enables the user to validate the receiving/inward conditions with respect to the Purchase order.
So the conditions of receipt validations are created here by the user which are further chosen by the user while creating the Purchase Order.
UTILITY
User can further narrow down the search by using filter options to get any specific information.
User can export vendor details in CSV format for the searched or filtered records using download option.
NAVIGATION
WMS >>> Setup >>> Receipt Validation
ACTION BUTTON
1. Search: Clicking on the search button without entering any filter criterion will populate the list of all the Receipt Validation created so far based on default filter setting. User can further narrow down the search by using filter options to get any specific information.
2. Reset: Reset button will refresh the filter fields to default settings, i.e. to an initial state to start fresh search.
3. Save: To save the new created receipt.
4 . Export: User can export vendor details in CSV format for the searched or filtered records using download option.
2.2 ORDER PROCESSING
Overview
Order Processing enables user to allocate orders, generate and manage manifests, manage picklist and much more.
UTILITY
–> Enables you to create and edit/update manifests and picklists.
–> Also lets you to search and enquire for the orders for their allocation, bulk shipment, manifest generation and put away.
- This section will enable user to inquire and search an already existing order and get the details of the order status being in allocated or unallocated state.
- User can import all the order data to the system from here.
- The order will get automatically allocated after creation if the SKU in the order has inventory available in the systems.
Navigation
WMS –> Order Processing –> Order Allocation
UTILITY
Allocate the unallocated orders.
User can allocate & unallocated Multiple orders from here with a single click.
Order can further be searched by using Advance search option.
Orders can be imported in the CSV file from here.
Fields on the basis of which the Vendors can be searched:
Order Number: Order number are the system generated unique order Id’s given to each order to distinguish between them.
EXT Order Number: External Order number is the number given in by the user in case where the orders are getting synced from a different platform/ or given by user.
Status: Order can also be filtered on the basis of their status or stages. Few of status mentioned below:
-> Confirmed
-> Cancelled
-> Closed
-> Allocated
-> Delivered
-> Shipped
-> Partly Shipped
and so on.
Order Date: Date of order creation on system.
Site Location: Warehouse from which the order will be fulfilled.
On Hold: Filter the orders on the basis of their Hold status. While creating the order checking this box will enable the user to put the order status on hold instead of confirmed.
ACTION BUTTON
1. Allocate: This is the bulk action button which helps the user to allocate all the selected orders from the listing with a single click.
2. Unallocated: This is the bulk action button which helps the user to unallocate all the selected orders from the listing with a single click.
3. Search: Clicking on the search button without entering any filter criterion will populate the list of all the Receipt Validation created so far based on default filter setting. User can further narrow down the search by using filter options to get any specific information.
4. Reset: Reset button will refresh the filter fields to default settings, i.e. to an initial state to start fresh search.
5. Advance Search: Advance search further improves the search results of order allocation by providing more fields to filter from. Below fields get added for the advance search option:
-> External Order No
-> Customer Email
-> Customer Phone
-> SKU Code
-> Order Tag
6 . Import: User can import all the order data into the system from here.
Overview
A manifest in simple context is a list of items either delivered to or shipped from a warehouse or location. After the order is created and picked, then the manifest gets generated by the user stating the details of transporter and other necessary.
Above given image is the layout of manifest in eRetail.
UTILITY
User can search and create or add new manifest from here.
User can scan the delivery number/ tracking number and can even mention channel type.
NAVIGATION
WMS >>> Order Processing >>> Manifest
Fields on the basis of which the Manifest can be searched:
Manifest Number: Manifest number is the Outbound delivery number
Manifest Date: Manifest can be filtered/ searched on the basis of Manifest creation date.
Transporter*: Choose the transporter type from the drop-down list. This Transporter type will be fed in the system from the database.
Status: Manifest can be either in pending confirmation state or it can confirm.
Location: Location of the warehouse.
User: Name of the user from which the logging has been done.
Order Count & Print: Order Count field displays the info corresponding to the order line items.
2.2.3 DELIVERY SHIPPING
Overview
Delivery shipping section enables a user to view the details of all the order and various order processing stages. From here the user can select the OB delivery number and generate pick list in bulk, user can generate labels and invoices and much more.
Utility
* User can generate Pick list for multiple OB delivery numbers.
* User can generate labels and invoices.
* The delivery shipping screen has different fields like Order No, External Order No, Order Date, Outbound Delivery No, Tracking no, Order Status and many more to filter and narrow down your search for orders & shipping.
Delivery Shipping tab is divided into below tabs:
(a) New: This section contains all the new orders whose picklist has not been generated as yet. From here all the detailed information about the Shipping, outbound delivery, dispatch and picking can be fetched from here.
Below are the options/filters based on which the search can be carried out to narrow down the search results.
Delivery Info: Whenever an order gets created in eRetail, the outbound delivery number gets assigned to the order. This delivery info displays the OB delivery numbers against which the Picklist needs to generated and whose picking has not yet been done.
Order Number: Order number is the system generated number provided to each order as its unique identifier.
External Order Number: External Order number is the number given in by the user OR order No provided by the sales channel/platform from where orders are pulled into eRetail.
Channel: This filter will specify the details about the channel from which the particular order or OB delivery belongs to.
Order Type: Order type filter contains the dropdown of type of order configured for that user. For example if the order is a COD order, or paid order, or consignment Order, or return order etc.
Picklist For: Here user can filter by choosing from the drop down the case for which the picklist is getting generated. If it is for RTV (Return to Vendor case) or it is for SO (Sales Order) or it is an STO (Stock Transfer Order).
Order Status: User can choose to filter between allocated and unallocated orders from here.
Transporter: Narrow down the search results by choosing the transporter from the drop down.
Order date & Ship by Date: User would be able to filter the order on the basis of order date and shipped date.
Action Button
Search: Clicking on the search button without entering any filter criterion will populate the list of all the New orders on default filter setting. User can further narrow down the search by using filter options to get any specific information.
Reset: Reset button will refresh the filter fields to default settings, i.e. to an initial state to start fresh search.
Advance Search: Advance search will enable the user to carry out the search based on external PO number and/or by channel name.
Export: To download the filtered or searched result in CSV format which is displayed in the data grid.
Generate Pick list: From here the picklist for multiple orders can be generated by selecting the checkbox against delivery number and then generating the picklist with this action button.
(b) Pick list Created
This section will display the orders whose pick list have been created but they are not yet picked and packed. All the filter options will be same here in the ‘pick list created Tab’ just as ‘new’ tab above.
The two action button options will get added:
Pack Order: From here the user can pack the orders in bulk by choosing the multiple orders and can click the pack button from the action button tab.
Print Pick list: With print pick list button the pick list can be printed. Pick list can be printed here in bulk for multiple orders at once.
This can be done in two ways:
-> SKU Wise Picklist
-> Order Wise Picklist
(c) Pick Pack
This section will display the orders which are picked but not yet shipped and manifest has not been generated yet. All the filter options will be same as above.
Few action button options will get added:
Pack Order: User can pack the multiple order at once from here.
Ship Order: User can ship multiple orders from here after they are picked and packed.
Generate Manifest: Manifest generation can be performed from here.
Print Label & Print Invoice: User can print the label and invoices from here.
(d) MP Label Refetched:
This section will display the orders whose labels for some reasons have not been fetched at first from the Marketplace, and with the Refetch button the order can be selected for the label generation.
All the filter options will be same as above.
Few action button options will get added:
Refetched: With this action button the labels for the multiple Marketplace orders can be refetched.
(e) Shipped
All the shipped orders details can be searched from here with respect to different filters given.
All the filter options will be same as above.
Few action button options will get added:
Update POD: POD stands for proof of delivery. The Update POD action button enables the user to update the proof of delivery comment at the time of delivery.
Reship: If once the shipment has been failed to reach the client due to any reason so user can attempt the reshipment.
Print Label & Print Invoice: User can print the label and invoices from here.
(f) All
All the order and delivery shipment will be getting displayed here in all section. All the filter options will be same as above.
Few action button options will get added:
Generate gatepass: Gatepass is a outward/outbound document proof containing the detail of items while making any product movement outside the warehouse.
The gatepass can be generated from here.
Generate Manifest: Manifest is the proof of Shipping in the form of a document which contains details of transporter, sku name and customer address.
2.2.4 BULK ORDER SHIPMENT
Bulk order shipment section enables the user to import the data for Bulk shipment.
The import can be for 02 events:
-Bulk Pack
-Bulk Ship
The user will be choosing the event and then to import the data in the form of CSV, user will be required to follow below steps:
->Choose the event out of Bulk pack and bulk ship.
->Download the template.
->Enter the data in the template without disturbing the template fields.
->Upload that Excel/CSV file.
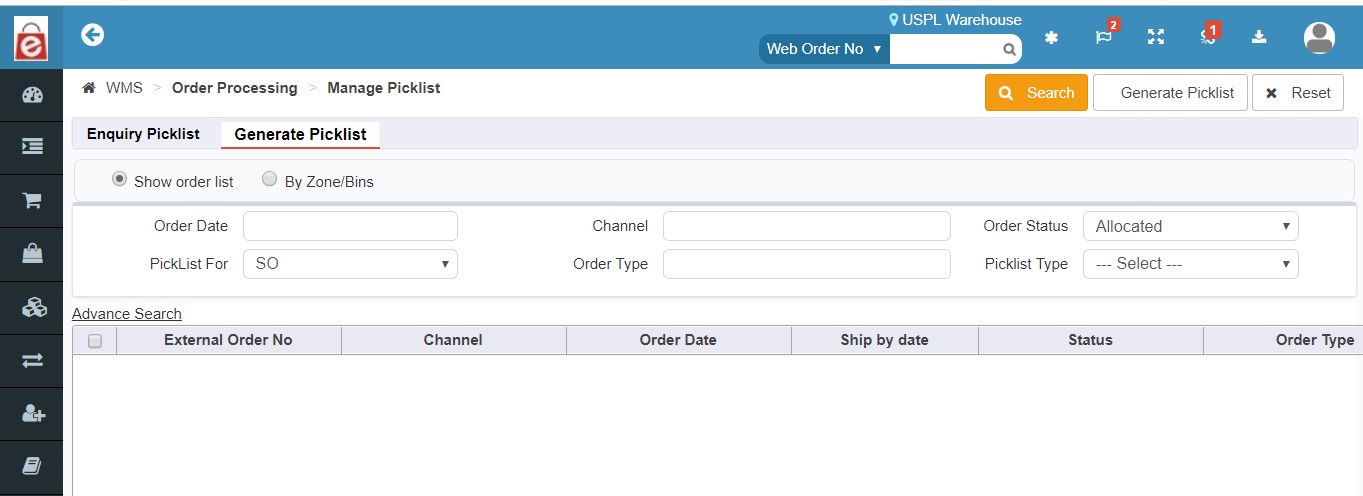
2.2.5 MANAGE PICKLIST
Overview
User can manage the picklist for orders from here. All the allocated orders SKU needs to be picked first. And to get picked it should have a picklist corresponding to that. From this section user can generate new picklist and can even enquire for the existing one.
Manage picklist section is majorly divided into:
->Enquiry Picklist
&
->Generate Picklist
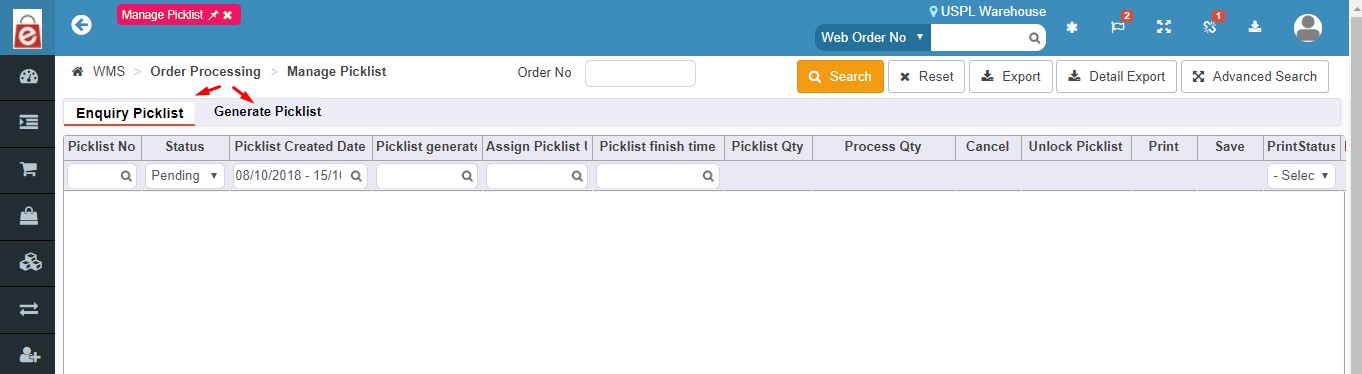
ENQUIRY PICKLIST
Enquiry picklist section enables the user to enquire and search for any particular picklist based on below fields:
->Picklist number
->Picklist created Date
->Status of the picklist
->Pending
->Cancel
->Complete
->Processing
->Picklist Generated By
->Assign Picklist User
->Picklist Finish Time
->Picklist Quantity
->Process Quantity
->Cancel
->Unlock Picklist
->Location Code
->Picklist print date
ACTION BUTTON
Search: Clicking on the search button without entering any filter criterion will populate the list of all the picklist on default filter setting. User can further narrow down the search by using filter options to get any specific information.
Reset: Reset button will refresh the filter fields to default settings, i.e. to an initial state to start fresh search.
Advance Search: Advance search will enable the user to carry out the search based on advanced fields.
Export: To download the filtered or searched result in CSV format which is displayed in the data grid.
GENERATE PICKLIST
User can generate the picklist from this section by two ways:
-By Show Order List
-By Zones/Bins
Once the user chooses one of above two methods given, then comes the below fields in order to create the picklist:
Order Date: To create the Picklist firstly choose the date when the order was placed. This is mandatory field.
Channel: Then specify the channel under which the order was placed.
Order Status: Mention the order status: Allocated or part allocated.
Picklist For: User will have to choose the order for which the picklist is getting generated for. By default there comes the 03 options out of which the user will have to choose one, they are:
-STO
-SO
-RTV
Order Type: Here the user can select the order type to narrow down the results as it was the COD or prepaid or so on.
And then when the order comes as a result of all the above field entry, choose the order and click on generate picklist action button.
2.2.6 MANAGE PICKING
Manage picking section enables the user to scan the picklist by the picklist number generated and then pack the order.
From here user can get the details of last 20 processed orders.
Picking can be managed here:
-> by SKU
&
-> by ORDER
Once you enter the picklist number and scan the same, you get the option to fill it in order to pack the same. Below are information which are required to pack the picklist.
Order: Scanning the picklist number automatically generates the corresponding order number with respect to the picklist generated against the same.
Delivery No: Delivery number gets auto populated here which is the OB delivery number which gets assigned to the order the moment it gets created
Transporter: User will choose the Transporter for the packing of order from here.
Tracking No: Subsequently the user will enter the tracking number for the transporter or in some cases depending upon the transporter chosen, the tracking number will be auto populated.
No of Boxes-Weight: Mention the number of Boxes in which the user will be packing the order and weight of SKU.
LBH: User will mention the Length, Breath & Height of the Box.
Shipping Address-Image: User will enter the shipping address details and upload the image if any.
Then User will click on confirm Packing button, with which the order will move from pick to pack stage and the Invoice and label can be printed for the same.
INVENTORY
Overview
Inventory section under WMS provides all the details about each inventory present in the system. This section also enables the user to monitor the inventory move, inventory scan and much more.
UTILITY
-Enables the user to move inventory by scan and by history.
-Cycle count feature can be used by the user to match & Verify inventory.
-Enables the user to adjust the inventory in warehouse locations.
-Outbound memo enquiry by user.
NAVIGATION
WMS –> Inventory
Inventory section is further divided into various sections, lets understand them all:
2.2.1 INVENTORY VIEW
Inventory view section enables the user to view real time status of inventory present in the warehouse. It shows item wise inventory for each of the products like total stock in hand, Free stock or available quantity.
In inventory view section the inventory can be viewed or searched by SKU, by SKU Bin, by Description, by Mfg SKU code etc. Lets understand each in detail.
By SKU
Here user can get the inventory detail by searching the inventory by SKU based on below fields.
SKU Code
SKU Description
Mfg SKU Code
Hierarchy Code
Brand Code
Vendor Code
By SKU BIN
Here user can get the inventory detail by searching the inventory by SKU BIN based on below fields.
SKU Code
SKU Description
Mfg SKU Code
BIN
Inv Bucket
Zone
Subsequently the inventory can be searched based on below mentioned tabs and to narrow down the search the filter fields can be used in each tab.
By SKU LOT
By SKU BIN LOT
By SKU IMEI
By SKU UNIQUE NO
Market Place Inventory
By SKU BOM
2.3.2 INVENTORY MOVE HISTORY
This section enables the user to view the full history of events when a particular inventory has been moved from one zone to another or one bin to another. Also it enables the user to view the different transactions made in the system during the movement of inventory from one location in the warehouse to another.
On the inventory move history screen, the user by clicking on the search button without entering any filter criterion will get the list of all the inventory move history based on default filter setting. User can further narrow down the search by using filter options to get any specific information.
Fields based on which the inventory move history can be searched:
SKU CODE: Any unique code which a user gives to the SKU while creating it. This SKU code is a mandatory field and once created and saved cannot be changed and must be a unique number.
SKU DESCRIPTION: User can search or filter the inventory history based on the SKU description of each SKU.
MOVE DATE: Search or filter the inventory move history based on the move date.
SITE LOCATION: User can choose the warehouse location for which the user is enquiring about the inventory move history.
MOVE QUANTITY: Mention the move quantity.
FROM ZONE & TO ZONE: User can view the inventory move history from zone and to zone.
FROM BIN & TO BIN: User can view the history of inventory move from one bin to another.
PUTAWAY NUMBER: Inventory move history can also be searched or filtered based upon the putaway number.
ACTION BUTTON
1.Search: Clicking on the search button without entering any filter criterion will populate the list of all the Inventory move history based on default filter setting. User can further narrow down the search by using filter options to get any specific information.
2. Reset: Reset button will refresh the filter fields to default settings, i.e. to an initial state to start fresh search.
3. Export: To download the filtered or searched result in CSV format which is displayed in the data grid.
4. Add New: To add a new Inventory Move to the database.
5. Advance Search: Advance search further improves the search results of Inventory move history by providing one more fields to filter from i.e. Style Code.
2.3.3 INVENTORY MOVE
This section enables the user to view the full history of events when a particular inventory has been moved from one zone to another or one bin to another. Also it enables the user to view the different transactions made in the system during the movement of inventory from one location in the warehouse to another.
2.3.4 INVENTORY MOVE BY SCAN
Inventory move section is used to adjust and update the system inventory according to any changes being made in the physical inventory in the warehouse.
User will be scanning the inventory to be moved from one bin to another.
NAVIGATION
WMS –> Inventory –> Inventory Move by Scan
It can be done in two ways:
->INVENTORY MOVE BY SCAN
&
->EACH PIECE MOVE
INVENTORY MOVE BY SCAN
Inventory move by scan can be performed by filling in the below details:
SKU Code*: Any unique code which a user gives to the SKU while creating it. This SKU code is a mandatory field and once created and saved cannot be changed and must be a unique number.
SKU Desc: User can search or filter the inventory history based on the SKU description of each SKU.
From Bin*: Name of the existing bin w.r.t. the inventory.
Quantity*: Quantity to be moved.
To Bin*: Name of the bin where the inventory is getting transferred to.
ACTION BUTTONS:
Add: Add Inventory/SKU which will be moved or transferred from one bin to another.
Reset: Reset button will reset the fields to default settings, i.e. to an initial state to start fresh move.
Confirm Move: User will use this button to confirm the inventory move.
EACH PIECE MOVE
Inventory move by each piece can be performed by filling in the below details:
From Bin*: Name of the existing bin w.r.t. the inventory.
To Bin*: Name of the bin where the inventory is getting transferred to.
SKU Code*: Any unique code which a user gives to the SKU while creating it. This SKU code is a mandatory field and once created and saved cannot be changed and must be a unique number.
Quantity*: Quantity to be moved.
2.3.5 CYCLE COUNT
Cycle count is the process to verify the actual existence of SKU’s in a particular bin with respect to that of system count. This process enables the verification of physical quantities and updated ones in the system.
The primary inference is that the accuracy of the items in the cycle count can be used to determine the accuracy of the items in the warehouse.
Cycle count section is divided into two parts:
-CYCLE COUNT ENQUIRY
-CYCLE COUNT CREATE/EDIT
Cycle Count Enquiry
Clicking on the search button without entering any filter criterion will populate the list of all the cycle count based on default filter setting. User can further narrow down the search by using below given filter options to get any specific information.
Cycle ID: Cycle ID is the unique identification given to any particular cycle count process by the system.
Type: From here the user selects the type of cycle count enquiry to be searched.
Status: User can filter the cycle count results based on cycle count status, that is: Confirmed, Cancelled and WIP.
Updated Date: The last updated date for the cycle count is also one factor to filter the search results of cycle count.
Bin: Bin wise filter.
User: Filter the cycle count search based on the user name.
Cycle Count Create/Edit
This section will enable the user to create the cycle count for any particular bin.
User will have to enter the type of count and then the bin name to carry out its cycle count and then click on confirm button.
2.3.6 STOCK ADJUSTMENT
Stock Adjustment is the process of increasing or decreasing the inventory of an existing product in the system.
If there is a mismatch or difference between the stock as per eRetail and physical stock (present in the warehouse) during cycle counting, Stock adjustment option helps us adjust the stock levels as per inventory available.
Stock Adjustment is divided into two sections primarily:
-Stock Adjustment Enquiry
&
-Stock Adjustment create/edit
Stock Adjustment Enquiry
In the Stock adjustment enquiry, the list of all the stock adjustments done in past will get displayed here based on the filter settings used by the user.
User can search the stock adjustments on the below basis:
->SKU Code
->Date
->Booked Stock
->Adjusted Stock
->Bin
->User
->Reason
->Status
->Remarks
->Site Location.
ACTION BUTTON:
1.Search: Clicking on the search button without entering any filter criterion will populate the list of all the Stock adjustment based on default filter setting. User can further narrow down the search by using filter options to get any specific information.
2. Reset: Reset button will refresh the filter fields to default settings, i.e. to an initial state to start fresh search.
3. Export: To download the filtered or searched result in CSV format which is displayed in the data grid.
4. Advance Search: Advance search further improves the search results of Stock Adjustments by providing two more fields to filter from i.e. Stock adjustment Mode [Increase or decrease] or SKU description.
5. Confirm Adjustment: User can mark the multiple stock adjustment entries from the result displayed and can confirm them in one go with this confirm adjustment action button.
6. Cancel Adjustment: User can mark the multiple stock adjustment entries from the result displayed and can cancel those adjustments in one go with this cancel adjustment action button.
7. Add New: To add a new Stock Adjustment to the database.
User will have to fill in the form with below mentioned fields to create the stock adjustment.
It can be done by two methods:
-Stock adjustment by scan
&
-Import
Stock adjustment by Scan
Stock Adjustment Mode: User can choose the mode for which he wants to adjust the stock. I.e. he can either increase the stock under adjustment or decrease the stock under adjustment.
SKU Code: Any unique code which a user gives to the SKU while creating it. This SKU code is a mandatory field and once created and saved cannot be changed and must be a unique number.
SKU Description: User can search or filter the inventory history based on the SKU description of each SKU.
Reason: The drop down contains the values of different reasons behind the adjustment like stock take, Order shipment, Damaged in warehouse, Miscellaneous etc.
Adjusted Bin: The field is used to input the Bin number from where the adjustment needs to be made.
Adjusted Id: Adjusted Id is the system generated Id given for each adjustment made.
Lot: The drop down contains the values for all the lots for that SKU that are existing in the system.
Adjusted Quantity: The Field is used to input the quantity of the SKU that needs to be adjusted.
Book Stock: The field displays the total number of items for the SKU in the system.
Adjusted Stock: The field displays the total number of items that have to be adjusted.
Free Stock: The field displays the total number of items that are available for allocation.
2.4 LOGISTICS
2.4.1 Manage AWB
This screen enables user to search for a AWB number based on various search criteria. This is useful when users are using offline transporters. Here user can add AWB bank obtained from offline transporter.
Various fields in this screen are the following:
Site Location: This will be set to default site location of the user in which he is logged into.
Transporter: User may filter records based on a transporter.
Order type: Search results may be narrowed using order types: Prepaid, COD
Status: Search results may be narrowed by using the following status: Free, Issued
AWB No.: Search results may be narrowed by using the AWB No.
Courier Type: User may choose following courier types: Forward and reverse to narrow down the search results.
Action buttons in the screen are given below:
Search: By pressing this button, search results are displayed.
Reset: Reset button will reset the search criteria to default for a fresh search.
Export: Exports the search results in an excel sheet.
Delete: Deletes the selected AWB numbers.
Add New: This opens a new screen where AWB numbers can be added.
Adding New AWB in the system:
This screen enables user to create AWB number or add AWB series for a transporter in eRetail and thus enabling user to work with offline transporter.
Various fields in this screen are the following:
Site location: This is set to user’s logged in location.
Transporter: User may choose a transporter for which this AWB will be created.
Order type: User may choose a particular order type: Prepaid and COD for which AWB will be created.
Status: User will choose the status of the AWB getting created, it is either Free State or in issued state.
Add Single AWB: User will select this checkbox if the single AWB needs to be added.
Add AWB series: In case user is required to add a full series of AWB then user will check this option.
2.4.2 Transporter Preferences
This section will display the list of transporter preference based on the warehouse location and various other filters.
The search results can also be downloaded from here for future references.
Below are the fields based on which the transporter preferences can be searched.
-From Location
-Destination Pincode
-Order Type
-Transporter
-Preference Order
-Created By
-Record Updated By
-Record Update date
ACTION BUTTON
1.Search: Clicking on the search button without entering any filter criterion will populate the list of all the transporters and logistics info based on default filter setting. User can further narrow down the search by using filter options to get any specific information.
2. Reset: Reset button will refresh the filter fields to default settings, i.e. to an initial state to start fresh search.
3. Export: To download the filtered or searched result in CSV format which is displayed in the data grid.
2.5 INBOUND
2.5.1 Inbound Enquiry
Overview
The inbound process starts when items arrives in the warehouse location, either received from external sources or from another company location. An order becomes an inbound shipment when a purchase order release is packed and it is physically ready to be shipped.
Navigation
WMS –> Inbound –> Inbound Enquiry
Inbound enquiry can be carried out by filtering the below data:
Inbound no: Inbound number is the unique identification system generated number given to every inbound created in the system.
STO no: User can search the inbound enquiry and can narrow down the search results by using STO no. as a filter.
ASN no: User can search the inbound enquiry and can narrow down the search results by using ASN no. as a filter.
PO no: Inbound can be searched with respect to the PO number generated for the same.
GRN no & Date: Inbound enquiry can be carried out by using the Goods Received Note and date.
Inbound Type: User can filter the inbound numbers based on their types and categories.
Invoice no: The inbound can be filtered on the basis of invoice number as well.
Vendor: User can filter the inbound enquiry by the vendor name as well.
Status: The inbound can also be searched with the status of the inbound entered in the system.
The Status based on which these inbound can be filtered are:
-> Cancelled
-> Confirmed
-> GRN in Process
-> GRN in QC
-> Pending Confirmation
->QC Done
Inbound Location: User can search and filter the result on the basis of inbound location.
ACTION BUTTON
1.Search: Clicking on the search button without entering any filter criterion will populate the list of all the inbounds done based on default filter setting. User can further narrow down the search by using filter options to get any specific information.
2. Reset: Reset button will refresh the filter fields to default settings, i.e. to an initial state to start fresh search.
3. Export: To download the filtered or searched result in CSV format which is displayed in the data grid.
4. Advance Search: Advance search further improves the search results of Stock Adjustments by providing two more fields to filter from i.e. Creation date, Lot number, SKU code, Order Number.
Detailed Export: Detailed export will take you to the report page where all the reports are getting downloaded.
Add New: Adding a new inbound in the system. The details of which can be seen in coming section.
2.5.2 INBOUND CREATE/EDIT
Inbound Create edit section is majorly divided into two parts:
->Inbound Create/ Edit
->Import
Inbound Create/Edit
To initiate the Inbound create/ edit, the first step required is entering the PO number.
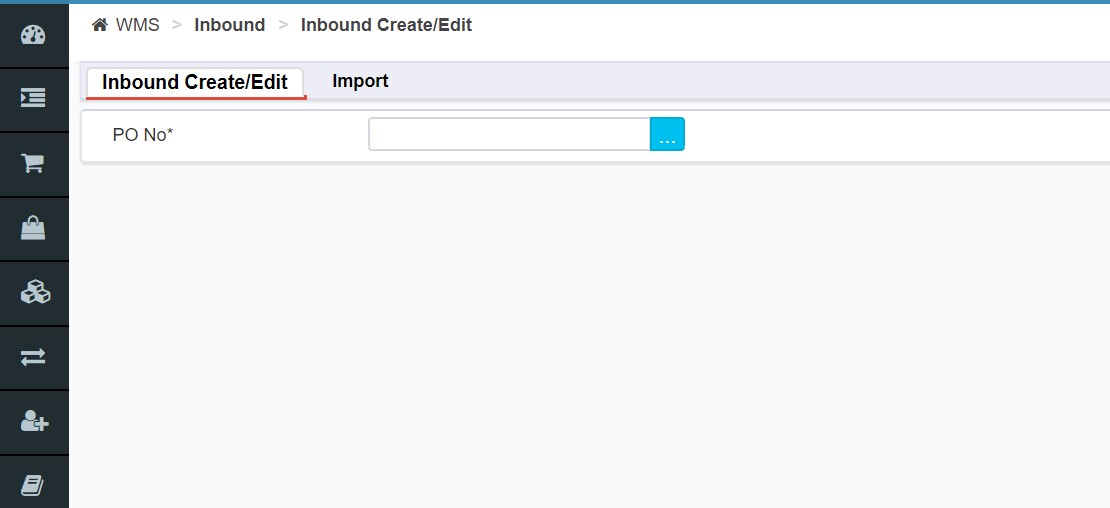
After entering the PO number, the user can do inbound for the selected products.
Inbound Create Edit Process is divided into four tabs:
->Inbound Create/edit
->User Defined Field
->Attached Document
->Import
Inbound Create/Edit
Transporter Code: Enter the Transporter Code with respect to the inbound.
Remarks: Remarks if any.
Invoice No-Date-Tax-Amount: User will have to enter the Invoice number for the inbound, date of inbound, tax calculated for the products of inbound and the Invoice amount of that inbound.
Gross Weight: Weight of products to be inbound.
Inv Bucket: Inv bucket shows the status of the products in inbound and accordingly to be assigned the bucket. User will have to select the most suitable one out the given options.
No. of Boxes: Total number of boxes to be inbound.
Material Rec Date: Date on which the consignment was received.
Ext Inbound No: External inbound number is given in case inbound numbers are getting synced from a different platform.
These are the custom fields which can be created by the User for inbounds in case of any extra information required.
Attached Document
Any important document with respect to any particular inbound which needs to be canned and attached can be done from here. Attached document section lets user to attach any important document/contract for the vendor.
2.5.3 INBOUND REAL TIME
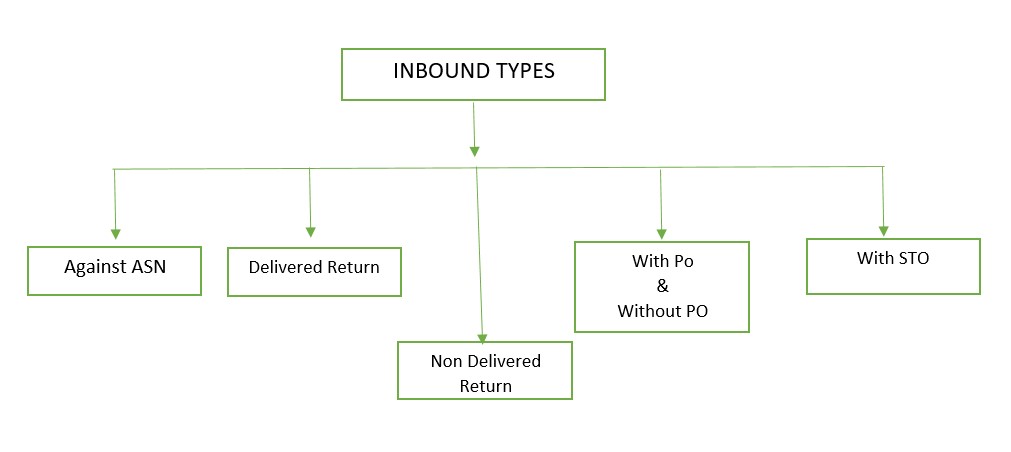
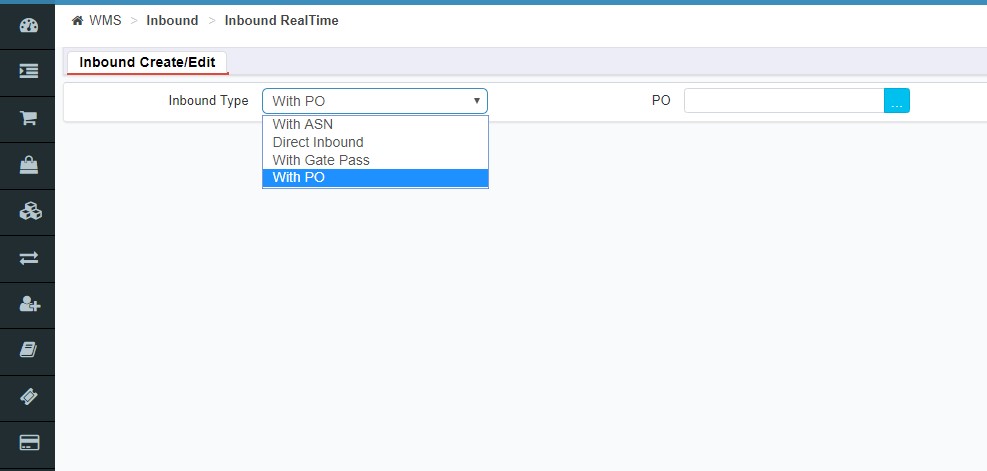
Inbound Real time can be done with four types:
With ASN
Direct Inbound
With Gate Pass
With PO
With ASN: Inbound with ASN that is Advance Shipping Note is the case where the goods arrive earlier than expected and the inbound for the same needs to be done. In this case here the ASN number will be required instead of the PO number to start the Inbound process.
Please refer the clip below:
Direct Inbound : Direct Inbound is the scenario where inbound is done without PO, which means directly inward of the products received. Here the Vendor code is required for the inbound to be done. Lets understand via this video clip:
2.5.4 INBOUND QC
The Inbound QC process is carried out in order to do the quality check of the SKU’s inward during inbound.
User carries out this process with the help of inbound numbers for the inbound already registered in the system. Refer to the clip below:
2.5.5 DIRECT INBOUND
Direct Inbound is the scenario where inbound is done without PO, which means directly inward of the products received. Here the Vendor code is required for the inbound to be done.
NAVIGATION
WMS –> Inbound –> Direct Inbound
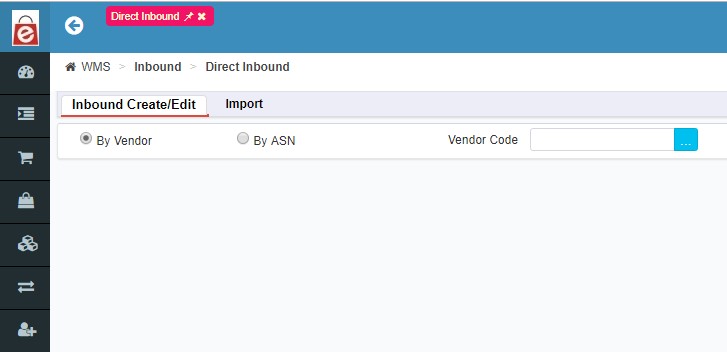
The Direct inbound can be done:
By Vendor
&
By ASN
Or
The Direct inbound can be done IMPORT.
2.5.6 STO INBOUND
STO inbound is done in case of stock transfer order received at the warehouse. User with multiple locations or warehouses require to transfer the stock from one warehouse to another for orders & the inbound for such cases is done here.
NAVIGATION
WMS –> Inbound –> STO Inbound
Process :
Here the User will enter the STO number or will import the STO numbers for bulk STO inbounds.
Once the STO is entered then the regular process of inbound will be carried out by the user.
2.5.7 RETURN INBOUND CREATE/EDIT
Return inbound is done in case of Customer returns or delivery failure, as in both these cases the order is received back at the warehouse. When the order is received in the warehouse as customer return then again the inbound for that return is done to re allocate the bins and zone to the returned orders.
NAVIGATION
WMS –> Inbound –> Return Inbound
Process :
Here the User will enter the Customer Return number or can bulk upload the RTO for Inbound.
Once the customer return number is entered then the regular process of return inbound will be carried out by the user.
2.6 MISCELLANEOUS
2.6.1 Manage Putaway
Putaway is the process that defines the location of SKU in internal logistics process from receiving of an SKU to stocking these items to their designated location (Bin/Zone) in the warehouse. This section enables the user to view and search or filter the list of all the putaway done and look into their details if required.
NAVIGATION
WMS —>Miscellaneous —> Manage Putaway
Putaway Enquiry
Putaway enquiry can be searched based on below filters:
PutAway No. : Putaway number is the system generated unique number given to each putaway done for its identification. User can narrow down the search with putaway number as a filter.
Status: User can search the putaway by choosing one of the status options as a filter. Below are the status based on which the user can narrow down putaway enquiry.
Cancelled
Closed
Confirmed
Open
Part Confirmed.
Created Date: The Putaway can also be searched based on the date created by entering the date or date slot and can search for the putaway request created during that period.
Confirmed Date: The Putaway can also be searched based on the date on which it was confirmed by entering the date or date slot and can search for the putaway request created during that period.
Putaway Type: Putaway can be searched based on its type as well.Putaway can be of 2 types:
a) Selected Inbound
Whenever items are inbound into the warehouse, Selected Inbound’ type of Putaway is created. Where simply the inbound number is fetched and putaway for the same is processed further.
b) Cancelled orders
Orders which are cancelled by customers and are to be returned to the warehouse. This also includes orders / items which got cancelled after their pick up process was complete but were yet to be packed and dispatched from the warehouse. Since these items have been moved from their designated bins to the picking area, these are required to be put back into their designated places.
Location Code: Filter on the basis of Warehouse Location where it was generated.
ACTION BUTTON
1.Search: Clicking on the search button without entering any filter criterion will populate the list of all the Putaway based on default filter setting. User can further narrow down the search by using filter options to get any specific information.
2. Reset: Reset button will refresh the filter fields to default settings, i.e. to an initial state to start fresh search.
3. Advance Search: Advance search further improves the search results of Putaway by providing few more fields to filter from :
Inbound No.
Confirmed Date
SKU
PO No.
Order No.
Bin (From-To)
To Zone
4. Download: To download the filtered or searched result in CSV format which is displayed in the data grid.
5. Add New: To add a new Putaway to the database. Putaway can be created by two ways.
While adding user will be asked to choose the type of putaway to be created first.
Putaway types:
a) Selected Inbound
Whenever items are inbound into the warehouse, Selected Inbound’ type of Putaway is created. Where simply the inbound number is fetched and putaway for the same is processed further.
b) Cancelled orders
Orders which are cancelled by customers and are to be returned to the warehouse. This also includes orders / items which got cancelled after their pick up process was complete but were yet to be packed and dispatched from the warehouse. Since these items have been moved from their designated bins to the picking area, these are required to be put back into their designated places.
Choosing the type, then user will be taken forward to enter the details for Putaway.
Putaway Type: Putaway type will be auto populated based on user’s selection in prior step.
Inbound No.: User will search and enter the Inbound number against which Putaway needs to be generated. When the user searches the required inbound number in ‘Inbound pick list’ pop up, only those inbound numbers will be shown in search results for which bin bucket is of type ‘in process’.
Putaway Mode: User can choose putaway mode from the below two options given:
User Defined Putaway: User defined Putaway is the putaway where user manually enters the Bin where he/she wants to do the putaway for the inbound SKU.
System generated Putaway: here system will suggest the Putaway bin to user. Though this field will be editable, system will automatically provide the Putaway bin.
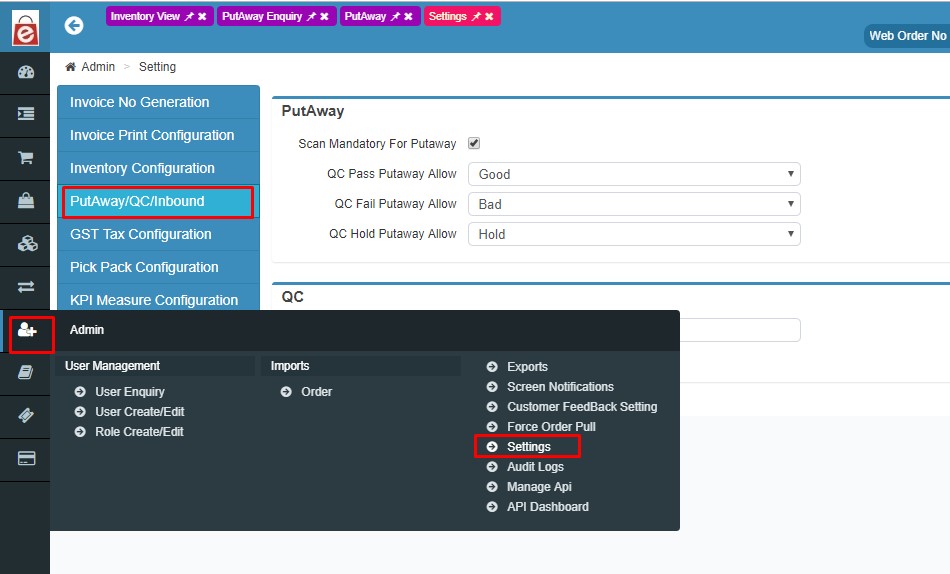
QC Status: QC status is the quality check status which the user selects for the putaway.
These status can be created from Settings.
Navigation for Settings Menu:
Admin –> Settings –> Inbound / QC / Putaway
Right after this, user will be asked to enter the Bin in which he wants to putaway the SKU.
Putaway Bin: Putaway Bin is the bin where the SKU’s will be kept for putaway.
SKU Code: SKU code needs to be scanned by the user to proceed further.
Putaway Quantity same as Qty for Putaway: This checkbox implies that the quantity of items to be put away is the same as quantity of items received in inbound.
To Bin: The bin where the inbound items are to be stocked.
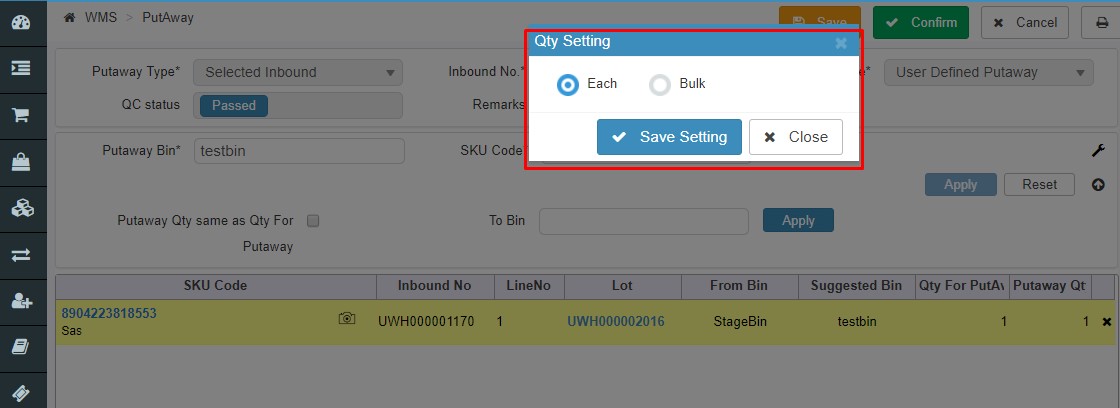
User has the option to scan each item for Putaway or scan items in bulk. For this, user will be required to select ‘Bulk’ or ‘Each’ form “Qty Setting” pop up which appears after clicking on settings icon as shown in the screenshot below:
Refer this video clip: